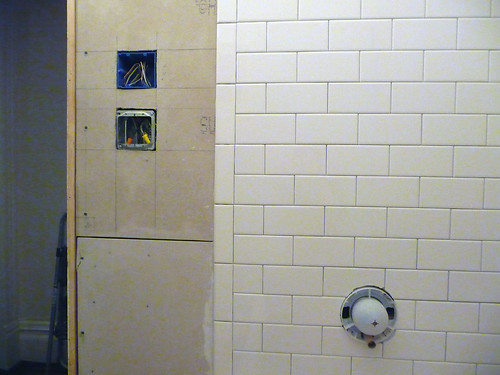
Hey, look what we did! It’s tile! (Sorry the photo is so crappy, the only light in there right now is a work lamp.) Up until the last second (literally!) we were debating whether to set the tiles in a traditional running-bond pattern or in a more modern horizontal grid. In the end running-bond won out, mainly because the less linear a pattern, the more it hides irregularities like slightly off-square wall corners and unleveled bathtubs. You have to know the limitations of an old house!
And yeah, we only got this wall done—the other will have to wait until Saturday. Cutting the holes for the fixtures proved challenging (we only have a manual tile cutter and a pair of nippers), so it took longer than expected. The other wall is just a big rectangle, though, so I expect it will go very quickly, especially now that we have a good feel for the right ratio of thinset to water, etc.
Aside from the fact that my fingertips now feel like cat tongues, the whole experience was pretty painless. I highly recommend tiling as a DIY project. This was way easier than hanging wallpaper (or even painting, in some ways). A lot of advance research/reading was required, but doing this ourselves (including all of the prep work, which was extensive) saved us thousands of dollars. It’s all about having confidence!
I also got two coats of primer and a coat of paint down on the floor in the back room. It looks AMAZING. It’s like a giant, fluffy cloud of brightness in there! I’m holding off taking photos until I get the second coat down (hopefully tonight) and have a chance to hang the doors (probably this weekend). I still don’t know what we’ll be using that room for, but at least now it’s not wasted space.


33 Comments
woah! that is nice looking!
Your tiling looks fantastic! Your confidence payed off in more ways than one. You saved money, and it looks perfect. Can’t wait to see your painted floors.
Great job! I like the traditional pattern.
Beautiful!
Congrats on a job very well done! It looks fantastic. You and Evan deserve huge pats on the back.
You did this YOURSELF Anna!??? Kudos to you! You did great! I wonder how much you knew/experience you had about home improvement before buying this house? If not much, you show that anybody can do it!
That looks fab, and – given that I’ve just decided to tile our new kitchen myself, with no prior knowledge or experience – very reassuring!
Mel
Fantastic work. You did a terrific job! And, of course, you can’t beat Subway tile for style and price. Don’t forget that light sanding between top coats on the floor–it makes a world of difference. “:)
Now for more important matters…those fingers and hands. For years I had hands like sandpaper from doing all of my renovation products. And, it drove me nuts. My hands were so course I literally couldn’t tie a silk tie without my fingers getting stuck to the fabric. I assume that’s what you mean by “fingers that feel like cat tongues” (a brilliant description by the way). For years, I tried every hand lotion known to man…and woman. Body Shop. L’Occitane, Origin, etc. In fact, I think I have a near PhD in hand lotion. And I have only found one product that works. In the city there is a store called Sabon (it is a wierd sort of soap store). They have a salt body scrub (Lemon Mint) that you rub on your hands and fingers and rinse off…and presto…like magic your fingers and hands are like the day you were born. I know this sounds very wierd…and I really don’t like the store for some reason I can’t explain…but this stuff is like magic gold. The good thing is they do have a sink in the store where you can try the product. I know this sounds crazy but for as much renovation that you do (and it is really fantastic) you need this stuff.
Wow that looks amazing! I wish I were that handy!
Hello! Great job! I too love to tile. It’s meditative.
You might want to invest in one of those wet tile saws. The ones they sell at Home Depot for around 80 bucks actually work pretty well! I got a used one at a stoop sale, you can find them on craigslist too. saves a lot of time! you can use it on mosaics too.
it’s a bit messy, with a muddy water spray occasionally, but totally worth it.
We have had all of the supplies purchased for our tile backsplash in the kitchen for almost a year now, but have been too intimidated to start it. Any websites you would recommend that have a good how to?
If you have a Dremel (and if you are going to do a large renovation, a Dremel will become your best friend), you can buy a tile cutter attachment for $10. It will cut through tile like butter.
Wow! Great tile job. I tiled my kitchen backsplash with white subway tile. Yours looks pristine!
We have a wet tile saw – I would have let you borrow it! It looks amazing anyway! You guys are so much faster than my dad! 😉
Wow your finish looks amazing 🙂 You must show all when it is complete.
You are a rock star.
It looks so good, you both did an AMAZING job! I think you have inspired me to try my own hand at tiling this summer!
I love that tile. The job you’ve done looks great! I can’t wait to see the pictures of the floor!
Super job! It is a total coincidence that i just did a historical interiors blog about subway tile last night! I was chuckling at a thread on another blog debating on whether subway tile is “out.” How can something so classic and period be out??? Damn trendsters.
Anyways… good work and I can’t wait to see the rest. And your floors! As I am busy stripping paint to reveal the wood of my upstairs hallway…
Cherisse: We knew just about nothing when we bought the house, but we’re both good readers and enjoy paying attention to detail. We also save the important stuff like plumbing and heating for the professionals. 🙂
sonofcontractor: I will definitely look into that scrub! In the mean time, I have a hand lotion for you: B&BW Look Ma, New Hands. Amazing! (And thank you for not saying I should be wearing gloves. Who can tile with gloves on??)
LJT: The John Bridge tile forums are the best places to learn/ask about all things tile related!
Looks great and the subway tiles are so pretty! I can’t wait to see the end results.
those subway tiles look so perfect @_@ i can’t wait to see the bathroom completely finished.
even more so, i want to see the painted floors. I’M SO EXCITED!!!
Way to go! I can soooo relate. We tiled our whole kitchen floor in 4×4 tiles! Our bath tub surround is next 🙂
A,
You are not going to believe this…but I tried that stuff! I am not kidding, I know more about hand lotion than my wife (which definitely freaks her friends out!). Two different approaches. The New Hands approach uses a parrafin strategy which is good is you have rough skin on the surface. The crazy Sabon stuff uses salt which actually scrubs off the layer of dead skin cells to reveal smooth skin underneath. Crazy, I know. Plus, I am told the salt comes from the Dead Sea. Something about that I like.
Gloves? Oh Mrs. A. You are too much of a pro for me to suggest something that awful. Bob Vila never wore gloves. Neither did Mike Holmes (if you have never watched Holmes on Homes, you are missing the best home renovation show ever!).
I do look forward to perhaps a hand lotion “rub off” in a future post. That will give the nattering nebobs of negativism something to post about over in the comments section at Apartment Therapy. 🙂
Looks great! I am impressed that you come home from work and manage to paint your floors. I would not be that motivated.
Totally professional, and I am inspired by your motivation… off to paint a chest of drawers now!
Hello!
I’m from Québec (Canada). I have to install the same subway tile in my shower and i’m wondering if you use a little cross (i don’t know the name in english since i’m french!) between each tile to be sure the space between the tiles is the same everywhere.
Thanks!
Élise
Élise: The little cross is called a “spacer”. 🙂 Most subway tile these days is made with the spacers built in (the back is very slightly larger than the front), so you aren’t supposed to use anything additional. They are self-spacing. You’ll know what I mean when you look at the tile (if you have the same kind) — there are little bumps on the sides already, those are the spacers. I hope that helps! 🙂
Wow – it looks wonderful. What a precise job you two do. I agree that running-bond was the best way to lay the tiles.
It’s cool to know that tiles now have “built-in” spacers. The last time I laid tile (long ago), the spacers really did me in.
I love your comment about confidence. Regular people are totally capable of doing these sorts of projects in their homes – you’ve been a brilliant example of this.
Anna,
I soooo love your work. Its amazing how similar our homes are! My bathroom layout is almost identical, and I have the exact same cast iron tub that I am about to put the exact same white subway tile around!
Question:
Did you use subway tiles with the bullnose edge or the straight edge? What brand are your tiles?
Thanks!
It looks great! we are about to embark on our own tiling project so i’m glad to hear it is relatively easy.
where did you purchase the floor tile from?
patricia: The tile is American Olean. There’s a full source list for the bathroom in this post.