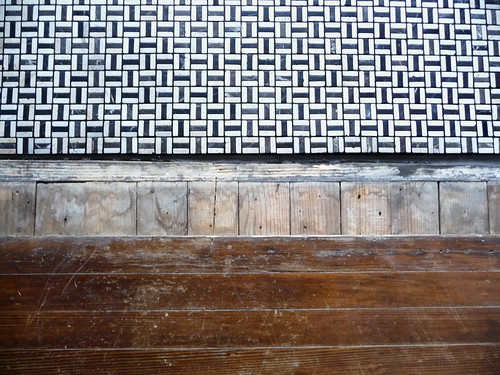
It’s been a while (three weeks, to be exact) since I posted an update on the status of the vestibule re-tiling project, and I don’t really have any excuses. Or rather, I have a lot of excuses, but I don’t have any good ones.
See that 6-inch gap between where the tile ends and the floor begins? That gap has turned me into a serious procrastinator. Sure, the tile is down. It’s even grouted! But the gap is there. So I can’t take pictures.
The tile is actually the same height as the subfloor (the water-stained boards running vertically), so I couldn’t go any further. Instead, I had to make the world’s largest threshold (42″x6″) out of an oak board. I stained it black, coated it with polyurethane, and slid it into place . . . but it looked funny. Or at least I thought it did. But a week later, it looked alright? And then a week after that, it started looking pretty good.
And then I started focusing on the wood floor. Is it really that scuffed and scratched?! I guess it is, but I never really noticed until the new tile and threshold went in. We can’t get the floor refinished, though, not right now. It’s too expensive and too messy and too disruptive. (Yes, we should have done it four years ago before we moved in. I know.) Can I really take photos of the tile with the neighboring floor look like that?
Should I retouch the wood in Photoshop? Speaking of Photoshop, should I just clone in a few more rows of tile and a less-gargantuan threshold? Hey, why even finish the tiling in the first place if I can just do it digitally?!
This, my friends, is my thought process when it comes to posting photos, and is the reason why I show so few progress shots. That said, are progress photos something you want to see? Is it helpful in some way to see pictures like this? Or is it just more fun to see the before and after (really after)?


64 Comments
I like progress photos… it shows the reality of the torture– not just the gorgeous finished project!
I have to tell you, personally, I love progress shots, because I feel I’m a visual learner and I like seeing things go step by step in the renovation progress.
I’m all for fudging it with Photoshop.
I’m trying to think of something you could put between that would be in-line with floors that need refinishing . . . you know, a stop-gap measure Heh.
I appreciate the progress shots-I also appreciate your honesty regarding your procrastination. Recently I experienced that shot to my momentum in a project. I was really getting somewhere, but then I messed up spray painting a lamp for the stairwell and there went all my ambition. Starting again next week.
So yeah, thanks for just shrugging your shoulders and saying, well that’s it for now.
Show the process pics! I like seeing things in progress just as much as before/afters.
Each little challenge that you face as you renovate or decorate may inspire or reassure someone else in their own home project.
Don’t know Adam but, what he said. You have such great taste, seriously, nothing looks bad.
Absolutely on the progress shots, very helpful.
I LOVE progress shots, but sometimes it can be tough on the other end when people think it’s your finished work.
aww, don’t be so hard on yourself… the planning and work you and Evan have put into your surroundings is just darn impressive for the short time you’ve had this house. Add it all up and it’s a big WHOA… And, yes, the before and afters are great inspiration (while I sit on me bum with a cup of tea not getting any of my own wish list items checked off!!!) So I continue to look forward to the afters and the befores if you share them!
Prolific blogging day! Progress shots can be fun, but don’t feel pressured to show us stuff unless you’re comfortable! We’ll wait 🙂
So are you sticking with the oak threshold? Did you consider marble? Too bathroom/kitchen-y? I also have no clue what that would cost. I just like marble.
Lolz on the Photoshop! I ALWAYS KNEW D16 was too good to be real.
Dude, I totally hear ya. I’m always in the middle of a thousand projects, and usually procrastinating each one. But I like the progress shots! Keep them coming!
FYI Dan, the marble thresholds are affordable, but also come pre-cut in narrower widths – about 4 inches I think. They might have to cut a custom size for this doorway.
@Adam: But…what if I demonstrate how to do something, and I do it WRONG? This is a big fear of mine, since I know we don’t always do stuff the “right” way. I don’t want to burn down anyone’s house, you know?
@Jason: Y’know, we thought about that, but the floor is a non-standard thickness, so it started to seem like a big hassle. Also, because of where the door falls when it’s shut, it seemed a little weird to have floorboards continuing into the vestibule. Or maybe we’re just lazy…
@Design Milk: That’s a good point. I definitely want to encourage people to take on projects (like tiling!) without fear.
@Cynthia Wig: Yes!! That is a big fear of mine. I once had a big commercial blog post progress shots of my office and call it “after”. I felt unreasonably embarrassed. Thus, my attitude tends to be, “DON’T LOOK AT ME, I’M NOT DONE YET!!!”
@Dan: As amy said, the pre-cut marble thresholds (which are pretty cheap) come in sizes that are too small for this doorway. Even if the 4″ width was okay, the length is never going to be 42″. This is a huge doorway. We could get one custom cut, though, and it wouldn’t be too expensive (probably about $100), but I don’t want to go crazy with the marble — there’s a marble-topped credenza a few feet from the doorway, and a gigantic marble fireplace across the room. Also, the tile itself is a very warm, creamy black and white marble that would probably look pretty crummy next to cool white Carrera marble (which is probably what you’re envisioning).
Oh Anna….those tiles! Love!
And progress shots are great. It’s really interesting to hear your dilemmas, as we all go through them, and we all procrastinate. I also like hearing your thought process and how you think you’ll resolve the issue.
To be honest, I actually gasped when I saw the shot of the tiles and I didn’t even notice the condition of the timber floor until you mentioned it. I do quite like a lived-in looking timber floor, and this is right in your entry-way, right? Even if you’d refinished the floors years ago, they still be looking a little scuffed by now. I say embrace the scuff!
I do love progress shots. But…I would really appreciate seeing the 6″ threshold. We have been procrastinating for a year because we need to make a 6″ threshold and just don’t know how to do it…
progress is great! it’s all the little details and decisions that take time and labor that are so helpful to see as a process.
i might even say they are better than perfect before and afters that seem so effortless and easy. i really like to see the struggle and headaches.
*although there are pictures floating around of our place in early unfinished states that make me cringe when I see them pop up (like our kitchen on D*S most recently – ugh).
I really appreciate progress shots. I also like at leas a couple before shots, it makes the after shots so much more fun.
Progress photos are good so that one doesn’t panic about their own house looking like the pits.
I think showing houses is starting to go down the ‘model retouch’ route. What I mean by that is similar to how they retouch someone gracing a cover / ad to hide the imperfections, all the photos that are shown omit the ‘ugly’ areas and it does make me wonder a) how on earth is everyone managing to keep their houses so clean especially fellow pet owners and b) why is my house the only one with a ton of imperfections!
I probably will never refinish my floors, if it’s any consolation. They look like shite but I’m sooooo lazzzzyyyyy.
sorry, I should add–I LOVE progress shots. love, love, love them. they inspire me–make me think I could actually do it myself one day.
I really like the progress shots and I think that they demonstrate the design process really well. Design is subject to constraints and design is about how these constraints are worked with. Your house is an example of design done well. Thanks for being brave and sharing. That said, could you post a picture with the threshold?
I am all for progress shots. At the very least, they reassure me that a fabulous ‘after’ does not appear magically out of thin air.
I love progess shots! I’m in the midst of so many projects myself (scraping-sanding-painting the front porch rail, trimming the opening between the foyer and my office, painting the foyer which is almost done but it’s too hot to paint, etc. etc. etc…) I love getting some reassurance that not everyone else’s houses are picture perfect all the time, and that others are living through the inbetween/unfinished stage that I feel I am perpetually in.
I totally vote for process shots!
The progress shots are EVERYTHING. There are any amount of inspirational interiors out there, but it’s the nitty gritty of DIY that makes your blog so compelling. Door Sixteen, Brick House et al make me look around my own house and say ok let’s do this thing, instead of defeatedly sighing at issues of Elle Decoration.
personally, I love all the before-during-and-after. But you should only post what you’re comfortable with 🙂
“the marble thresholds are affordable, but also come pre-cut in narrower widths – about 4 inches I think. They might have to cut a custom size for this doorway.”
They would have to cut a custom size, but a threshold is so small that you have a special opportunity!
If you go to a place where they cut stone, you can usually get a really good deal on a piece left over from a slab. I got a custom cut piece of granite for my bathroom for $40 because I went down to the stone guys and basically looked through the junk left over after they’d cut phenomenally expensive bathtub surrounds out of a single piece of marble. The leftover hunks of stone are not worth much to them at that point, so they’re usually happy to cut something for you really cheap, especially if you show up at a slow time.
You could easily get a black one–black soapstone, black granite, even a dark blue or black marble kind of stone. Just go down there and look around. The shapes of the leftover pieces are irregular, so to get the full slab you might have to cut two or three shorter from the same stone and then put them together…but that could still look really good if you grouted them dark and put them in really tight.
I’m all for progress shots!
@Barb F: I like “lived-in” looking floors, too, but these floors are very…varnished. And then scuffed. I personally prefer a waxed or oiled finish because the wear looks good (and can be touched up without full refinishing). Unfortunately, at some point someone decided to stain and polyurethane these floors, which really never ends well as far as longevity and “patina” are concerned…which is exactly the reason why I’m not a fan of polyurethane on wood floors! Personally, I’d love to have the floors sanded down and given an oil finish. Someday!
@Amy Spears: I’m afraid the how-to for the threshold would be pretty boring! It goes something like this: (1) Go to lumber yard. (2) Buy a board. (3) Cut the board. (4) Apply finish. Aaaaaaand…that’s pretty much it! We didn’t do anything fancy like make a transition slope. (Like I said, we don’t always do things the “right” way!)
@the brick house: Haha, you know the first thing I thought when I saw that post was, “Oh man, Morgan is going to be sad that her new chairs and light fixture and stuff aren’t in these photos!!” 😀 I hate when Apartment Therapy links to my old house tour — it’s SO out of date and unfinished!!
@Lydia: The only things I ever retouch (aside from my face!) are “accidents” — like if I noticed I forgot to move my camera case before I took the photo, or if there’s a big scuff on the wall that I’m about to clean off anyway.
@Monica: I’ll take a photo with the threshold in place over the weekend. I have some trim painting I have to do before I can slide it back into position. 🙂
I have the exact same thoughts about our pine floors but I have come to love the dents and scratches….it more authentic and shows the signs of a good life. Plus we were eager to move in since we had been living with my in-laws for three months. (Just read your comment above and I completely agree about oiled finishes…they are gorgeous!…ours are varnish too, oh well.)
The tile looks fantastic. Let the threshold evolve over time. I am sure that the black one looks great though! I love the composition of the photo that you did post!
Howard Restor-A-Finish on the floor — amazing stuff.
I like the in-progress shots. It reminds me that others are the same imperfect perfectionists that I am. You have a beautiful aesthetic and a beautiful home. But it has taken a lot of work to get there. That paired with personal attention to detail is what makes it all so special. Please continue sharing your process as it is a big part of why you inspire others.
that tile looks cool! I’d love to see a shot of it in its context. Process shots are great! Esp w/ old places, these things always come up and its great to see what creative solutions people try. Also, you are doing things yourself, so your solutions are going to be more interesting to me than someone paying a contractor $$$ to fix everything perfectly. Also, don’t worry about the scratches on the floor!
I always feel weird posting progress photos because I’ve got some major projects to complete before my place will even be halfway to the “After” state. Like the carpeting, ugh. “Don’t mind the turd flooring, just look at my new hutch!”
I really love seeing progress, because as people have said above, it’s too easy to think that the transformation was a piece of cake if you can’t see the sweat and tear droplets on the floors for the “During” shots.
Anna, lets face it progress shots are nice but they don’t show the IMPACT of the finish work. People get bored with progress because they cannot recall what the job looked like initially.
Don’t Photoshop as it takes away your integrity. We will all start thinking you eat bacon in secret instead of sticking to the Vegan-Morrissey Manifesto.
The floors look great. The tile has old school character and can pull off the adjacent beaten floor look. I like the juxtaposition which lends some interesting visual texture. Remodelista highlights this old/new tension consistently in their posts. Perhaps the black, shiny, new threshold is what is drawing the eye to the old worn floors? Just saying that the elephant in the room may not be the swath of worn, all be it varnished, Victorian flooring.
Please, you do not have to apologize for procrastination. It is nice to see you are human, when we’ve seen lots of posts like, “I stayed up all night and tiled my bathroom like a maniac!”
Would a black granite threshold work?
Also, with an oil finish floor, how often do you have to oil it? Do people just poly it because it is less upkeep? Sorry for all the questions–I’ve only seen the poly finish.
I love progress shots. Actually, my blog is mostly progress shots because nothing is finished (aside from the bedroom – and even then, is it ever *really* finished??). Most people don’t live in a constant state of perfection. At least I don’t.
As dramatic as the Before/After combo it, I feel it’s a little dishonest. It’s never as simple as waving a magic wand and *POOF!* Magically Changed!
The story is in how you get from the Before to the After. The journey is what’s interesting and compelling.
I didn’t read through all the posts, but , c’mon Anna! Didn’t we talk about this before?
http://www.doorsixteen.com/2010/06/21/sometimes-good-enough-is-good-enough/
Habits are hard to break, I know.
But for me, I love progress shots – especially when your “afters” are always so awesome! It makes me feel like I can get through my projects knowing that sometimes you get “stuck” on yours! I agree with @carrie – the journey’s the thing!
I just *must* get that tile!
I purchased OSMO Polyx oil to do the kitchen counters and plan on refinishing the floors in the house with it too. I am also in the boat in realizing that I should have re-finished ALL the floors in the house before we moved in. I did the kitchen and the bath, but all the wood still needs to be sanded and re-done. However, if I’d done the floor at that point (3 years ago) I may have rushed and ended up doing a polyurethane finish which I would hate.
I’m really excited to refinish the floors with this hard oil finish. I love it on the countertops and like you said, I can touch it up when a spot gets worn instead of refinishing the entire room.
I did have to have my sister pick the polyx oil* up and drive it over last year since no one here sells it and it is kind of spendy. But I get giddy just thinking of how great the floors will look when I eventually get them done and how easy the maintenance will be on them.
*despite the name, there is not polyurethane in the polyx oil. It is an oil wax finish with a low oder mineral spirit solvent.
Anna – love the tiles – and I think the floor looks great. I llike the contrast between new and old.
Don’t worry about doing it wrong! Sometimes there isn’t a right way and you’re not a DIY blog so you’re not really giving advice or telling people how they should do things. You’re simply telling YOUR story.
Also, progress shots are a great way to tell people what you’ve been up to without trying to explain it. Visuals are way more easy to understand than trying to use words to explain thresholds, flooring imperfections or “6-inch gap between where the tile ends and the floor begins” — the photo makes it way easier for me to really understand your trials/tribulations.
Jaime
progress photos are cool, too. And hey, it’s an old house, why is it not okay to have an old wood floor. Everybody knows you’re working on the house, don’t they? So I think it’s okay.
I don’t care about seeing the progression. B&A are perfect for my short attention span.
I like progress shots! And I like progress explanations too… you seem to have a wealth of DIY info which, as a new and relatively clueless DIYer, I find enormously useful.
Yet another vote for progress…I think it keeps things grounded in reality. Yes, it’s frustrating when your progress shots pop up…I got dinged by AT on my in-progress dining room by being featured in “books on the floor” …argh….but your readers will always know better.
Oh please keep ’em coming!
Anna – your post provided a much needed laugh! Amen to all your questions. There are days when I def. would love to just Photoshop my way to my dream house.
All I know is that those tiles look fantastic! Oh and progress is good.
Um…..YEAH post progress shots please. Whether they are up to your standards or not!! We all know you are practically perfect in every way, and we all need to see how you got that way!
I actually love the composition of this photograph… the different scales, finishes, textures, colours… it’s really quite incredible.
Great job on the tile! I can’t wait to see what the entire room looks like.
Agata
oh, that stream of thoughts was hilarious. i like seeing some photos of unfinished things – it’s reassuring. a good reminder that perfection takes time and often involves several iterations. that’s something i struggle with in my own decorating quests. (i’m impatient!) so i’m all for a few ‘in-progress’ shots from time to time.
I love progress shots. I love bloggers showing me their humanity. I’m happy! Much love xx
In terms of possibly showing someone “how to do something wrong” I don’t think you need to worry about that. You are very careful in your posts to let people know you are not a professional, and you also leave the things like electrical work to professionals, so I don’t think you need to worry about people destroying their homes with your advice. In terms of decorating, there is no wrong per se, just individual taste.
In an old apartment I had, we had the same problem. There were actually two spots like that, and one of the spots had some tiles in place (original victorian tiles) with a pattern in it. Maybe some plain black tiles or a few tiles with a pattern in it. Just throwing it out there, haha. Maybe that would look too tacky and distracting with the other tiles though. Depends on the room.
I hate spots like this. We have a few similar situations right now leading from one room to the other since we ripped all the carpeting and exposed the hardwoods. If you find a good solution please post it! I hate how I overlook little things like that and then just forget about them or get distracted by a new project.
Oh please, if we only ever saw “finished” shots, how would we understand the true blood, sweat, tears, late nights, hear pulling, agonizing reality of home renovation? If the afters were all you put up, you might as well be HGTV, and there’s enough of that kind of crap out there. We’ve been renovating for a year now and we are no where near finished. It gives me hope and encouragement to see how far you’ve come and are still working 5+ yrs into this commitment. It’s going to take me decades to bring this house up to scratch. I don’t expect you to be the expert but hope to commiserate and appreciate the work and design decisions put into a project.
Keep on what you’re doing. I certainly appreciate it.
@Valeria: I wish we could tile in that space, but it’s actually the same height as the existing tile. Does that make sense? So unless we cut out a section of sublfoor, the tile wouldn’t be level.
Next weekend I’ll take a photo with the wide threshold in place. It actually looks pretty good, I think. 🙂
Oh yeah, that makes sense. I’m sure the threshold will look good! Can’t wait to see the end result of the space! Love the tiles you picked!
Anna, please show ’em! And thank goodness — I thought I was the only one who balks at showing progress shots.
Anna, if you’re concerned about it, you could add a couple more pine T+G boards so your finished floor meets up a little closer to the tile, thus creating a not-so-wide threshold.
Regardless, I think it looks great. And I’m a big fan of in-progress pictures. The process is an important component in the enjoyment that comes with the finished product.
@Nathan: We considered that, but the existing floor is a non-modern-standard thickness (and has clearly been sanded down more than once, too), so that seems like kind of a nightmare, especially when you factor in the scratches…
(I miss your blog, by the way! I hope all is well in your house and with your family…)
Yeah, I guess you’d have to fabricate the pieces yourself and then distress them so they match…not an easy job and I can understand how that might not make it to the top of the priority list.
And I passed your comment along to Kathy. Who knows, it might be the nudge she needs to get things going again. Thanks!
Just a quick comment by a long-time blog lurker – I wouldn’t sweat the scuffed wood floor – I like the look of lived-in wood floors, and honestly think they have a beautiful honest patina.
Hi Anna
Try yachting varnish for the floors. It’s quite high gloss on newer / cleaner wood but a couple of coats over scuffed stuff doesn’t take the character away but cleans up the overall effect.