
I know I already covered the “before and after” phases of the dressing room in part three of my house birthday posts, but last night I came across some “during” photos (I think from April 2006) that are just too amazing/horrible to not share.
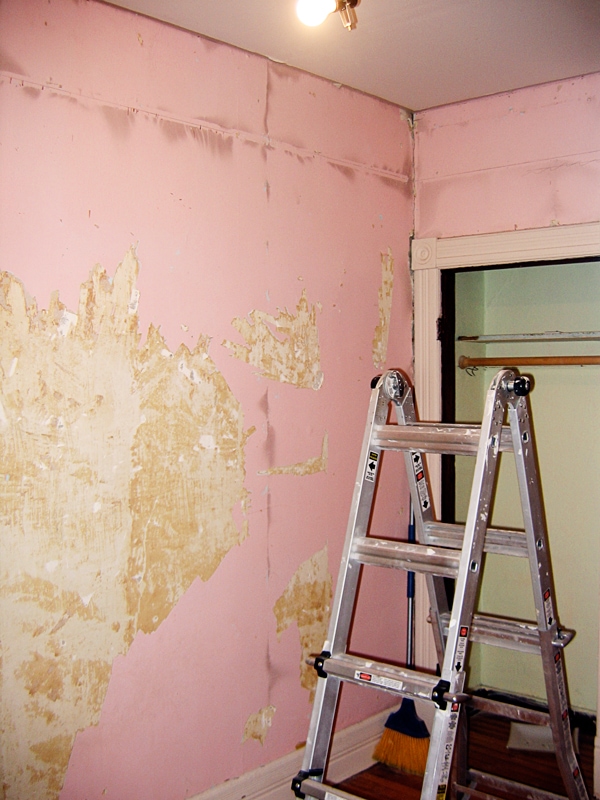
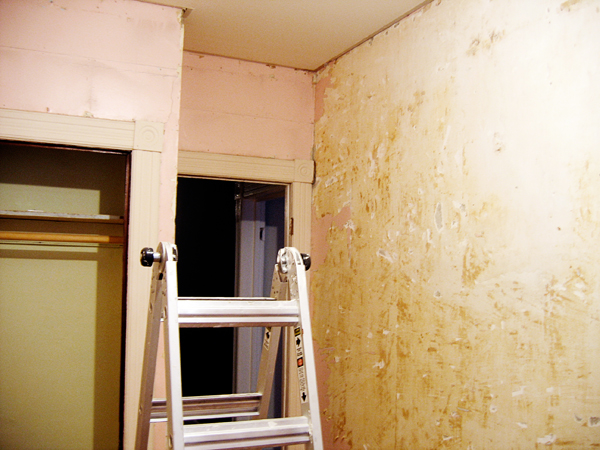
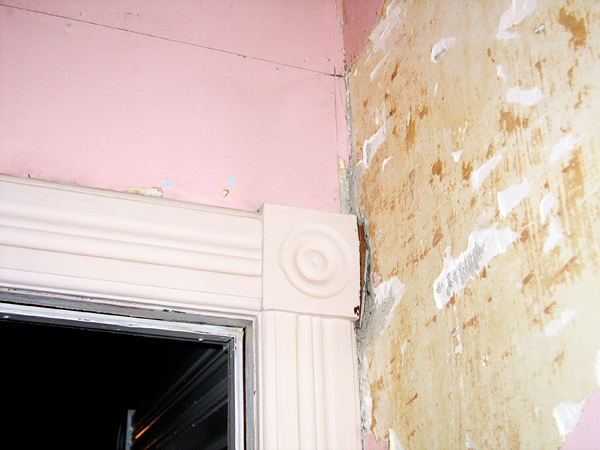
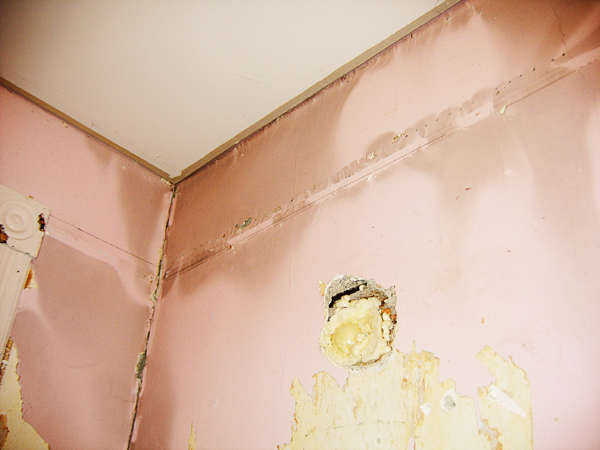
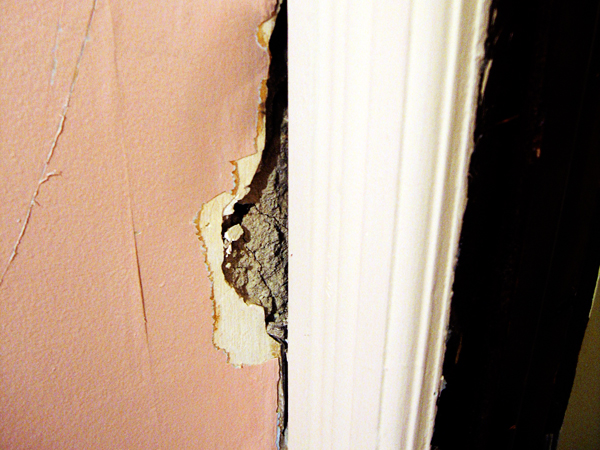
These photos were taken after we removed the fake wood paneling, before the room was fully replastered. When I talk about our renovation having been a lot more than just “a fresh coat of paint,” this is exactly what I mean! I wish I had more photos of this stage of the process, but the truth is that I was too tired, too disgusted, and too anxious to move forward to think about documenting it.
Yikes, right? I always think it’s funny when I’m reading the comments on “before and after” posts on some other websites and people complain about the lighting being different or the the photos being taken from different angles. Its like…geez, I’m sorry I wasn’t thinking about my white balance when I was hanging off the ladder with a crowbar in one hand and a camera on the other, while wearing goggles and a face mask! Suffice to say, the difference here isn’t just due to daylight and a better camera.
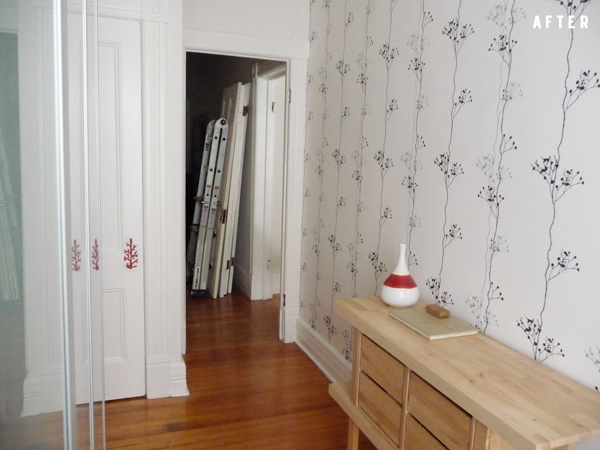
Yes, I’ve already posted it (and I should really take a more up-to-date picture now that those doors aren’t in the hallway anymore, and one of them is actually hanging in the door frame—but I’m waiting until the window has been rehabbed to take new photos!), but here’s the room after it was replastered, repainted, and wallpapered. Much less scary!!
See also:
• Five years ago, part one.
• Five years ago, part two.
• Five years ago, part three.
• Five years ago, part four.


52 Comments
This made me laugh. I’ve also noticed comments on other websites that tsk tsk an empty room “before” photo. Like, does everyone want to see ugly furniture from the previous tenants?
And beautiful room by the way!
Wow, happy 5! you guys are doing such a great job to a house of horror. seriously who has time to give it a proper fotoshoot when rehabbing. i’m lucky i even get a photo the before.
I’ve noticed those types of comments too, and they are just ridiculous. It’s always refreshing to see people take the time and energy to renovate and rehab things the right way! The results are obvious proof it’s worth it. This room looks awesome!
Why are people always so negative? Seriously, rather than putting all that negative energy out into the world, try complimenting the totally rockin rehab that I would never in a million years have the patience or the skill to do. Seriously, if I had seen that pink stuff, I would have cried and sold the house. You are a rockstar!
Beautiful! And so inspiring. I’m wondering if you took on the replastering yourselves…or is that a job better left to the professionals?
We have a family member (the guy I usually refer to as the “Plaster Fairy” here on the blog) who is very good at plaster work, and he’s done most of the finishing work for us. You can tell where Evan and I did the replastering because it’s far from perfect! 😉 Plaster work is definitely an acquired skill, and unless you have experience (or have a natural knack for it—I don’t), it is probably best to leave it to someone else who can do a good job. It takes days of drying and layering to get a smooth surface, and to go through all of that and wind up with a lumpy mess would just be really sad.
We are very, very grateful for our Plaster Fairy. Everyone should have their own!
i think the ex-owner of your house may have been or at least been related to the ex-owner of my house. that pink! we are finding it everywhere!
sadly, my after pics are not as lovely as are yours. great job!
What did you do to fill the holes in the plaster befor you rewallpapered?
Kim, that’s too complex a topic for me to really cover here on the blog (I’m too lazy!), but here’s a very good preservation brief that details that various steps to take under different circumstances.
I love seeing the during photos! They look a lot like our home’s during photos (except our walls are plywood so much easier). It’s so hard to explain to people sometimes why it takes 10 days (or more) to clean up a 6′ x 12′ room.
You have plywood walls?! Wow. Is the grain exposed, or have you coated them with paint?
Holy macaroni. What a transformation. The “after” looks so light and effortless. But what a tremendous amount of work went into making it happen. It’s awe-inspiring, actually.
And now I am l-ing-ol, because above you replied to a comment saying you’re too lazy to recap a reno process. But it’s clear that you managed to either muster up the energy to tackle yours, or steer the ginormous process along. Either way, I’m floored.
jbhat
When I say I’m “too lazy”, it’s because the amount of research and writing and editing that would have to go into answering a question like that would take hours and hours…and I just don’t have the time or energy. There are already so many great sources of that kind of information online, so I think it makes more sense for everyone involved to just share the link. Know what I mean?
Of course, of course! That’s what the internet is for. But as a non-diy-er myself (because I’m too lazy!), I just wanted you to know that I think what you have pulled off with your house is nothing short of amazing. Happy 5 years to you, your husband, AND your house.
jbhat
Okay! I now have hope. We have a bedroom in our old house we’re turning into an office. After stripping off three layers of wallpaper to discover walls in that same washed out salmony pink color as your dressing room had, damaged plaster where water had leaked in next to a chimney and ceiling plaster ready to crash on our heads I was ready to give up and call in the pros. But darn it, if I can get all that wallpaper off I can do anything! I just needed a bit of inspiration and encouragement, which your blog entry has done for me. Thanks!
Marcie, check out the bedroom makeover posts on my friend Adam’s blog if you want some MAJOR inspiration!!
i’m amazed by the projects you and your husband have done! it’s so fun to see.
i have seen your dresser/shelves/drawers in your dressing room here and there around the internet but don’t know what they are. could you share the name or who designed them?
thank you!
They’re part of the NORREBO line, designed by Francis Cayouette for IKEA in 2004. It’s since been discontinued, sadly! It’s really well-made, sturdy shelving. We used to have an entire wall which we used to store boxes of comic books, but since downsizing Evan’s collection, they’ve gone to my mother’s house where she uses them in her office. 🙂
thank you very much! now i know.
i’m super bummed. maybe it’s time to check ebay and craigslist.
I’m guessing some of those other websites start with A and end with Y 🙂
It’s not too pleasant to read those “I’m trying to be critical and funny and show what a huge design guru I am” comment, however, those sites do have a really huge advantage of not practicing that sweet “oooh it’s so fantastic” approach that’s so often to be found in the blogging world and that is, honestly, kind of boring.
This said, your room does look fantastic. Very fresh!
I always think the best “approach” (if you want to call it that) when leaving a comment on a blog is to imagine the person on the receiving end is sitting right across from you you.
Anna, I just love your style. Seeing what you’ve accomplished gives me hope.
Can you tell me what kind of drawers or boxes you have in your little shelving system thing? I have the same one from IKEA, but ours came with some giant wicker baskets that run the length of the shelf. I like the look of yours much better.
Tara, the drawer inserts were among the options that were part of the NORREBO line.
Wow – just have to say how impressed I am over what a great job you guys have done with the house. Applause!
Great to see some during photos. Your renovation makes our next task of stripping 50 years of wallpaper feel a lot less scary 🙂
love it! so inspiring anna! we’ve got a tiny room like this in a house we’re working on to move into except it doesn’t have a closet and it’s off the room that used to be the dining area. we’re going to make it my office but we can’t figure out what it used to be used for. was yours a tiny bedroom?
Peggy, yes, it was most likely a nursery! Most of the old houses we looked at when we were buying had them.
WOW! I am amazed! I also need a plaster fairy, I recently took out a false wall…and my walls are exactly like yours ‘before.’ Including the pink! Funny era.
The pink must be late ’40s/early ’50s, don’t you think?
Yep–it’s the last layer under the fake paneling, which my landlord said he put up when he was 20. He’s about 60 now. I’m sure no one touched it between the 40s–when he put it up.
We had several layers of ’70s wallpaper under 6-7 coats of paint (and many different, very bright colors to prove it) in our kitchen when we got this house. It took many, many long hours of scraping, so I feel your pain.
Wow! Photos like this make me terrified of my dream to buy a sweet little West Philly row home and nurse it back to health. I’m afraid facing that pink, hole-filled wall would make me drop into a heap in the middle of the floor and cry. I might never get myself together to follow through to your state of after photo glory and I’d have to live with the pink mess forever. I’m continually amazed at how you and your husband keep the momentum going. It really is amazing. Oh, and I have crazy love for that wallpaper. Gorgeous.
In addition to pink, I keep finding that industrial, locker room, sanitarium, green. In several houses now! Must be a sign.
ha ha sanitarium green is the perfect descriptive!
images like this make me regard you with AWE … that you could be brave enough to take on a massive project like this! you must have a great ‘vision’!
Ha, that type of comment cracks me up! You’re the first blogger I know to confront it, and I love the way in which you did. The room looks amazing (beautiful floors, too!). Was there a dropped ceiling? Or is that marking around the room for level hanging of the paneling?
It was actually the line where the first piece of paneling ended—the ceiling in that room is almost 10′ (minus the baseboard moldings), but standard paneling is only 8′ tall, so they actually stacked two pieces with a strip of plastic molding between the two. Real classy!
Wow, well done. I can imagine getting pretty anxious looking at that plaster in the before photos. I too am amazed at your energy – great job!
What a great transformation! I love the wallpaper!
PS. Thanks for leaving a comment about my fireplace door! I’m such a klutz and deleted the post (and your comment) for reasons that are not clear to me anymore and reposted it later. Didn’t see that there was a comment already…
What an inspiring job you’ve done on your house. It makes the idea of re-habbing a house so much less scary. I wonder at what point you moved into the house? Did you get a bedroom and kitchen semi-cleaned up before moving in, or did you move into the house of horrors as is? I always wonder what exactly I could live with while cleaning a place up…
Anna you amaze me.
I hope to hell when we buy our fixer-upper that I will have the strength that you seem to have.
Cheers!!
We pulled down some wood paneling in our mid-50’s house recently and the drywall underneath (yeah, I know?! why put paneling on top of drywall?) was patterned with ducks, pitchers, flowers, etc. It was really neat and very era-appropriate, we took a bunch of pictures before mudding over it, since no one will probably ever see it again.
Whoa. Plaster Fairy is key. We thought we’d skim coat all our walls ourselves. Oh, we were so naive. Ten million years later, we found some people to do it really cheap, and they did a really good job except, whoops, they didn’t use mesh over every inch (we didn’t know), so now it’s all cracking again after a year. The thought of doing it all over again — the mess, the dust, too many layers — fills me with dread and horror. Plus a skilled plaster person will charge $1,000 or more for just one ceiling.
Oh, Anna,
We bought the sister to your house in RIchmond, VA. The guest room had that same pink paint over two layers of wall paper, often over holes and always under paneling. In fact, every wall in this house had paneling. I spent summer of ’09 ripping out paneling and stripping layers of paint and wall paper. I found lots of pepto pink and sanitarium green. And my walls looked an awful lot like your during as well. It is so gratifying to see your five year progress. I’m in a bit of a funk after a year and a half. We had to replace all the systems (HVAC, electric, plumbing) as well as a good bit of stucco. That leaves us without major funds, and full time work means we are left without major time either. Renovations have slowed down tremendously.
Ultimately, I chose to comment because I wanted to say thanks. This gives me hope that someday I’ll have more than 3 half done rooms and 4 not done rooms, and 1 completely raw room. Let’s not even get started on landscaping.
Tamisha, I definitely know where you’re coming from!! It’s only recently that I’m feeling brave enough to show the ugly sides of my house, but believe me, there’s as much un-done and half-done here as there is done-done. (And yes, UGH, the landscaping!! Such a huge expense, and SO MUCH LABOR.)
I’m rapidly approaching my 2 year birthday with my house. My before and afters would be really quite sad at this point. No real renovations have happened, more just filling the house with stuff… which, I really want to go through and donate at least 1/3 of.
Here’s hoping that by year 5 I will have made more progress! Well done, on how much you have gotten done in 5 years.
You’ve done a fantastic job! This is going to make me sound really weird but I have to admit a slight frisson in the tummy when I get to work on a room like that. I like them as bad as possible so that you can see a huge difference!
I totally understand, LL! 🙂
You have done an amazing job!! Reading your blog, knowing that it has taken you five years to get to where you are in that house gives me a teeny, tiny glimmer of hope that maybe in four years or so, I will be there, too.
It also forces me to be patient and accept that not everything is realized within six months and if that were the case, many more people would be buying old homes and renovating them.
Thanks!
– agata.
(Good choice on the ferm livign wallpaper too…. I would buy out their stock if I had the money).
Wow! There’s really a big change made into this room. Good job!
I would love any insight into your painting secrets, your work is simply amazing. Your black fireplace and repainted windowsills look so crisp. When I’ve painted over work it looks goopy and messy, not fresh.
Expensive paintbrushes and a steady hand!