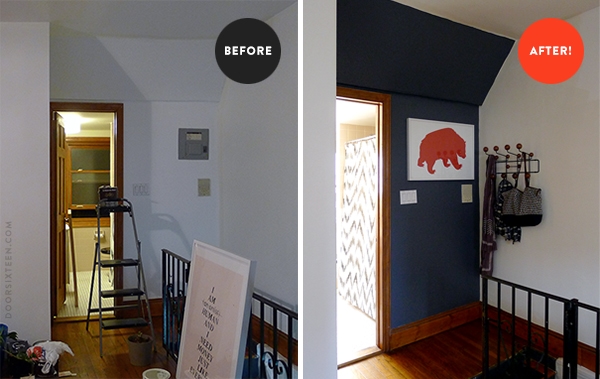
One of my favorite things about the new apartment is that that the last set of stairs — it’s a 4th-floor walkup — is just for us. Our apartment door is at the bottom of the stairs, and you walk up directly into our living space. That means that there’s no hallway noise, which in turn means that Bruno and Fritz are less stressed out (like most Chihuahuas/Chi mixes they are excellent watch dogs). That was a huge problem in our last apartment with its hotel-like corridors. When you get to the top of the stairs, there’s a small landing and a little wall that backs up to the refrigerator. It was pretty much dead space before, but over the last couple of weeks I’ve been turning it into a cozy little alcove-ish entryway.
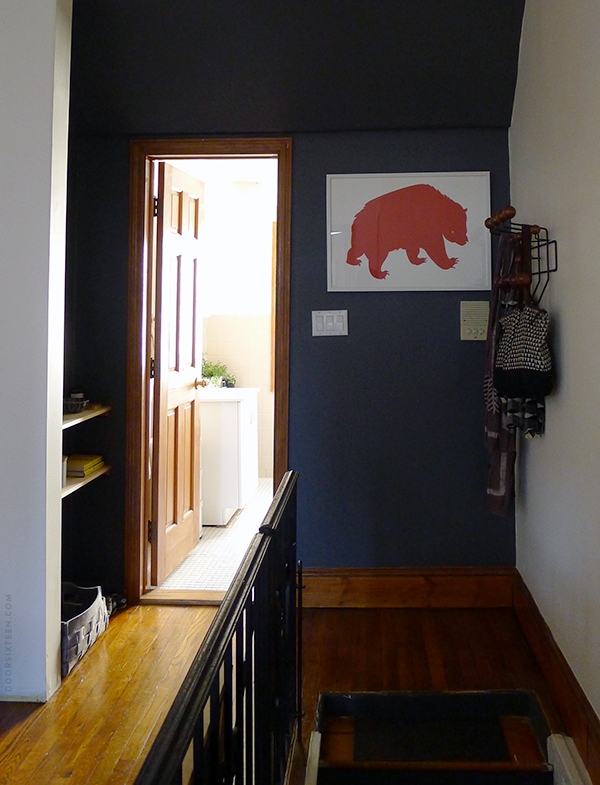
This is what you see first walking up the stairs into the apartment. And yes, that is an outdoor gate functioning as a railing, and yes, it is hideous. But we can talk about that in another post.
You might recognize that bear print from, oh, every other apartment I’ve lived in. It’s a silkscreen print from Banquet Atelier & Workshop, and I love it very much. It’s hanging off-center because I wanted to cover up the ugly electrical panel, and I figured that since the door buzzer and the light switches are all herky-jerky and crooked already, what’s another thing being off? If you ask me, three wrongs make a right.
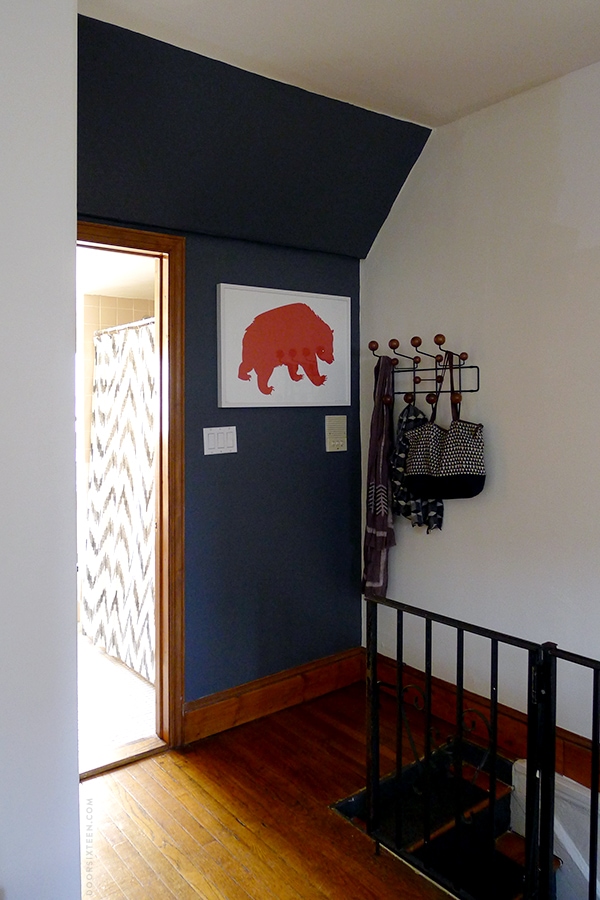
We’ve been trying to find a place to put the walnut Hang-It-All for more than two years! FINALLY!
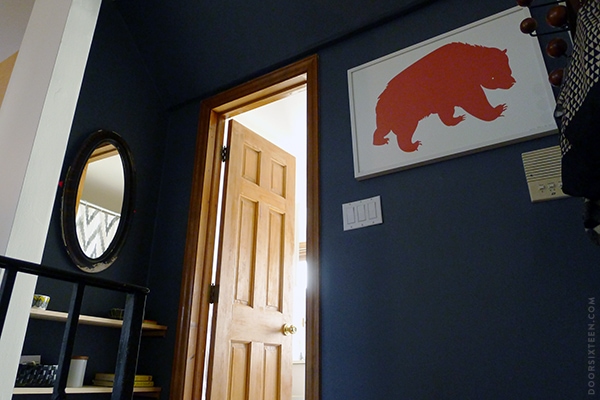
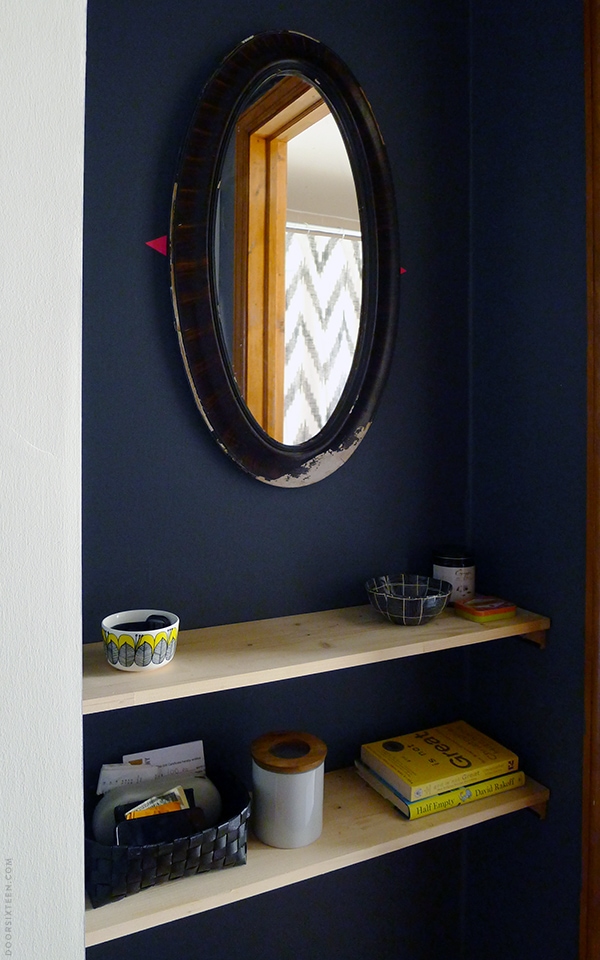
Shelves for dumping mail, keys, coins and jewelry! This is what they like to call a “landing strip” over at Apartment Therapy. I don’t like to call it that because it makes me think of bikini waxing, so let’s just call this the alcove. “Hey, where are my sunglasses?” “Oh, they’re in the alcove.” Works fine for me.
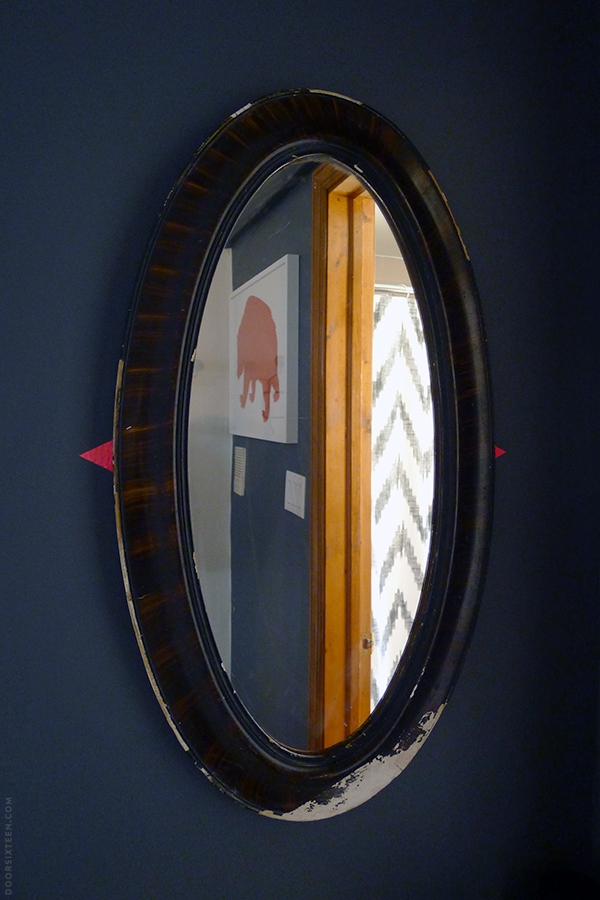
One thing I love about having a blog is that I can marvel over how much time passes between when I get an idea for a project and when I actually wind up seeing that project through. I bought this mirror for $5 on the street in Philadelphia in 2007 (our hallway looks so plain and sad, and I look so skinny…sigh), and since then it’s been sitting in a closet waiting for me to do something with it. It’s pretty badly damaged, and someone tried to fix it with what I think might be drywall compound, but I’ve stopped caring. I’m just happy to have it up on the wall finally! It’s really perfect in this spot. I don’t even mind the damage. See? If you hoard stuff long enough, eventually it pays off.
The little neon pink triangles are wall stickers from Ferm Living’s kids collection. I have a billion of them, and I have to force myself to not put them EVERYWHERE. So cute.
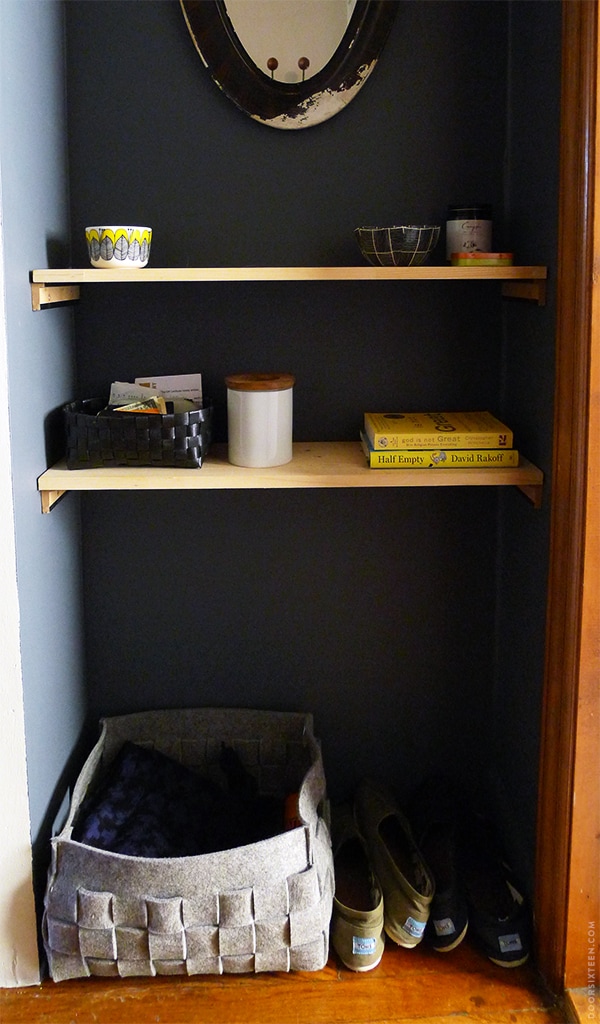
I could have put more shelves in this space, but since most of our books are kept at our house and we already have shelving in the bedroom, I kept it to a minimum. I’m sure over time more stuff will accumulate here, and I definitely need to add flowers. I also need to paint the shelf cleats to match the wall, but I’m all out of Deep Space — I’ll will myself into going to the paint store soon for more.
Shelves like this are really easy to make, by the way. This took me all of 30 minutes to do, including cutting and sanding the boards. I had a few $3 TRYGGVE shelves from IKEA in the basement at the house, so I just used those. It would be nicer to have deeper, chunky old wood shelves, but I didn’t want to wait. If I ever want to swap them out for different wood, it’ll only take a minute. No biggie.
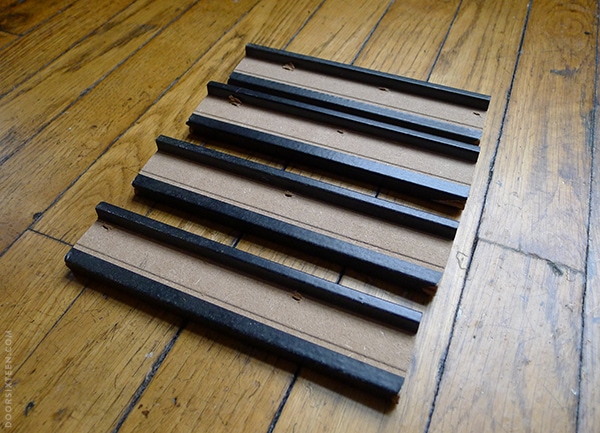
For light-duty shelving like this, you can get away with using a simple cleats on either edge instead of using brackets. I dug through my scrap pile and came up with a broken RIBBA frame (yes, I keep everything) that I thought would be perfect for the job! You can use anything that’s thick enough and drill-able, though — furring strips, scrap lath, a 1×2, whatever.
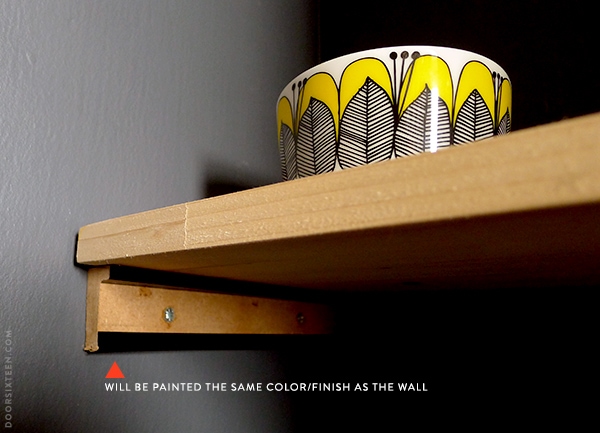
Mark out a level line on the wall, drill pilot holes through the cleats, put anchors in the wall (or drill into studs), screw in your cleats. Done! So easy. If you use heavier-duty wood and run a third cleat along the back wall, you can make very strong shelves. This is how we built the shelving in our pantry at the house, and it’s strong enough for huge stacks of dishes! Just make sure the shelf isn’t too deep and that you’re not using chipboard or MDF for cleats if you plan to use your shelves for heavy stuff.


53 Comments
Well done. Love the print you chose. I have a similar electrical panel that I would love to hide under some artwork. I would have never known that it was off-center if you hadn’t pointed it out.
Wow!
ps you have a much better design sense than the previous tenant.
HAHAHA. I was about to say that I’ve never posted photos from the when the previous tenant lived there, and then I noticed who this comment is from…
I still can’t get over that wall color, it’s so great! The space is adorable, a vast improvement from your “before” photo 🙂 Does it ever become tiring splitting time between your house and this apartment? I would imagine it would be frustrating if “that dress” or “that kitchen tool” was at one house when you needed it at the other.
Thanks, Kait! It was definitely MUCH more tiring commuting for 4 hours a day, so I try not to complain about having two place to live — it’s a luxury, and we’re very lucky. I don’t own many clothes (I basically mix and match three outfits, and I wear the same thing all weekend), so that’s definitely not an issue, and as far as kitchen stuff goes we have two of everything. Well, not everything, but two of all of the things a normal person would need on a regular basis. 😉 The only think I regularly screw up are coats, because NY weather is so temperamental! I’m forever putting away something at the house that I think is too heavy/light and then needing it the next day when I’m in the city. In the scheme of things, though, that’s not a big deal.
those shelves are perfect – and definitely not a landing strip – I would expect fighter jets to come roaring down on one of those – this looks far too peaceful for that!
i use that same print from banquet to hide a (basically) unfixable crack in the wall. the big red bear is a handy guy to have around.
What a clever way to do this. I never would have thought to use a broken Ribba frame. (I have a few). Looks great.
Quite a few apartments in Australia don’t have a walk-in hallway, so I love seeing all the options out there just incase we nab an apartment with a hallway/landing/alcove some day. The shelves look great – are you planing on painting the shelves too? They would sort of disappear into the wall which would look pretty nice.
No, I’ll probably leave them bare (or with clear matte poly). I think having some light-colored wood in the apartment helps ease the yucky orange stuff.
I’m wondering what your brother thinks of your improvements.
If I’m not mistaken he was the previous tenant.
You are not mistaken! He still lives nearby, and he and his wife read my blog. 🙂 They had their own thing going on here, and now they’re renovating a great place that they bought. I’m on call in case they need someone to come over and tile!
Lucky them, having your tiling skills on standby 🙂
What I have seen of your apartment looks great after all that you’ve done so far! And I guess it will get even better.
Oh how I envy the speed with which you take action! I really want to repaint the walls in my rental (from crappy-white to a crisper white), but I’m a bit intimidated by painting the ceilings (particularly with the ceiling fans up there). You make it all look so easy!
Painting ceilings sucks!! I make Evan do that.
we did VERY similar shelving basically all around our apartment. bare wood is sometimes way better-looking than any expensive store-made shelf (and a HECK of a lot cheaper too!) we used cheap brackets from home depot, but your “recycled” ones look much nicer 😉
see ours here:
http://www.beyondthestoop.com/2011/09/day-24-shelves-above-sink.html
they would have totally looked better with some paint behind those walls… ah well, you win some you lose some.
cheers!
Hi Anna – Your blog is inspiring. I’m writing this in a lovely Soot painted room, thanks to you. My question is about wall anchors. What wall anchors do you use? I have had, on most occasions, bad luck with them.
Hey Bobby, it really depends on what the wall is made out of. My house is mostly very old plaster over lath over brick, and hanging stuff requires some finesse and experience (and sometimes a couple of different kinds of drill bits). These shelves are at my apartment, which is 100% drywall/sheetrock — super easy to hang stuff on. For something relatively lightweight, regular old plastic anchors should be just fine. I’ve never had an issue. Just be sure you’re not drilling a hole that’s too big (you should have to use some force to get the anchor in, like giving it a smack with a mallet), and that you’re using the right size screw for the anchor.
What are your walls made out of, and what are you trying to hang?
Looks great! Have you checked remodelista today? If not, do it (they have a post about somebody painting their kitchen like the British standard one).
I hadn’t, but now I have! Yes, that’s a great kitchen — when I wrote about the British Standard one, a few people linked to it on Design Sponge in the comments. Don’t know how I missed it until then! 🙂
Great color choice! I love dark colors in a small space.
I love that wall color, what brand makes it? Such a great use of space and the “floating” will look even better with those cleats painted!
The paint is Benjamin Moore’s Deep Space. You can read more about why I decided to use it here:
http://www.doorsixteen.com/2013/02/26/new-bedroom-sneak-peek-painting/
This post is the best. This is the stuff I come to your blog to read. Your entry/alcove bloody awesome. And call that the seal of approval from Australia.
I swear I’m not stalking you, but I walk by your building all the time. One of these days I may run into you! I get my nails done practically downstairs! Your place is coming together nicely, welcome back 🙂
Tess, it’s ridiculous we haven’t met in person! We should make a coffee date. 🙂
Anna — I love what you are doing for your new apartment. I am in the market for a white canister with wooden lid just like the one you have in your “its not a bikini wax” alcove. Perchance is it available somewhere???
It’s from the CELEBER line at IKEA from a few years ago. Not sure if they still sell them, but they’re great! I have a bunch. I keep dog treats in that one. 🙂
1. You are a blogging MACHINE lately. Jesus, woman.
2. Um, so cute. I LOVE that mirror and the damage and the stickers and WTF YOU MADE CLEATS OUT OF A BROKEN RIBBA FRAME. You crafty thing, you.
It’s all looking so great!
Ah the paint looks so good. I have a weird hallway with no windows (house converted into flats). There is a very useful big space under the stairs where I can keep luggage, camping gear, cat carrier etc etc but it is so ugly, all exposed. I don’t know how to make it more appealing, curtains looks crap, I’d love to do something with it but I’m at a loss, anyway… on a side note can you tell me the colour value you used for the bright orange AFTER! circle? It’s so zingy.
It’s #FB3E20!
I knew I liked your blog and design sense, but then you went an posted a pic that included David Rakoff’s Half Empty. Full blown love, now.
Haha! And Christopher Hitchens, too…
Ha, ha. Can’t help but laugh at your “landing strip” comment, because I think of the exact same thing when i hear it! May I ask where you got that grey felt basket? I know i’ve seen them before (maybe on your site) but can’t remember where they are from? You scored an amazing apartment (awesome radiators!). Don’t even worry about that kitchen of yours, you have such great taste and so many other beautiful things to look at that no one will really care…(except you of course! lol)
Thanks, Kim! The felt basket is from West Elm:
http://bit.ly/Z8sFPx
They have them in several sizes, and they’re very nice!
I’m guessing yours is the extra-large size? I have a shoe basket in my little entry area as well and my grumpy Schnauzers nibble it when I’m out of the house so it looks like garbage now. This thing looks like it could take a bit of nibbling and still look great (crossing fingers).
Christina, I finally got a chance to measure mine — it’s the small size.
Thanks! 😀
Love what you’ve done with your little nook! Can’t wait to see what you do with the railing/gate situation. I am forever boggled by design decisions like that. It looks like it actually has the hinged gate portion attached to it! Ack!
Looks amazing, as per your usual mad skills. And that bear artwork over the electric panel? Nicely played, Ms. Dorfman, nicely played.
This a GREAT fix up for that space. I love the red print of the bear! Red and navy is a personal fave. Spot on!
Seeing that David Rakoff book made me really happy, and then really sad. You, though, continue to have excellent taste in all matters.
I adore David Rakoff. His death was a huge, huge loss. I’ve learned so much about life from him, and ultimately about dying an death — what a special human being.
God, I know. His death hit me so hard (which seems silly to say about a “celebrity”, but is true nonetheless). If you haven’t yet, listen to the audio versions of his books. They’re read by him, and he has most hilarious and most heartbreaking delivery. Gives me chills.
Also, this. https://www.youtube.com/watch?v=ldqjM7x6NhE
this looks awesome, K2!! well done!
Perhaps “drop zone” is preferable to landing strip? To my knowledge, that phrase does not have any unpleasant associations! I moved into my house about 9 months ago and have yet to address the entry situation (front door opens directly to living room)… following all your progress in this short time is good motivation!
To go the Shelf Shop on the Upper East Side. They have these tension-rod held, completely customizeable, shelves that are awesome. Here’s their website: http://www.shelfshop.com/ Don’t be put off by the fug that is their website—the shelves are a great solution to crappy walls, uneven floors, and weird spaces (like above a radiator).
According to that website, they’re no longer in business as of 2010. There is a link to another site on that site, but it appears to be a Rakks dealer. Wayyyyyyyyy too expensive for me. That’s OK, though, since I don’t need to buy shelves. I made my own, hence this post. 😉
Every time I see you bag in one of your pictures, I really want to steal it. Much more in that awsome hang-it-all. Could you please tell me where did you find both of them? Thanks!
Hi Lilien, the bag is from Bookhou, and the Hang-It-All is a limited edition version of the Eames classic.
My boyfriend and I are moving in together. We found a great rental apartment with a huge kitchen, but limited storage. I’ve wanted to install floating shelves above the stove and countertops for easy access to spices, oils, and other cooking gear, but I didn’t realize before we moved in that the wall in question is plaster. The house is brick, was made in the 1920s, and the wall is an exterior wall. I don’t know if the wall is lath and plaster or not, only that on the first attempt to put in a screw there was nothing but dust and no grip. The walls sound hollow. internet research is giving me spotty results — is all “plaster” nowadays really “drywall”? Are we only screwed if it’s lath and plaster? Drywall anchors seem to be the best bet — but we may need heavy duty ones and I can’t carve out a huge hole in the wall as the shelves have to be temporary since we’re renting. Oh, and the kitchen has a drop ceiling, so we can’t suspend anything from that! So — IS there a way I can install much-needed storage on plaster walls without making them permanent?
I’d like to hang shelves on my apartment wall, but I just realized there is brick behind whatever the wall is. I think it’s plaster right on top of the brick but I’m not sure how to distinguish between plaster and dry wall. How should I go about mounting these shelves? What are brick anchors? Do I need a masonry drill, or just masonry bits and screws? Thanks for your help.
Looks really great – as for details: I especially dig the little bowl with the yellow leaves (and the wall colour and the bear print an the alcove..).