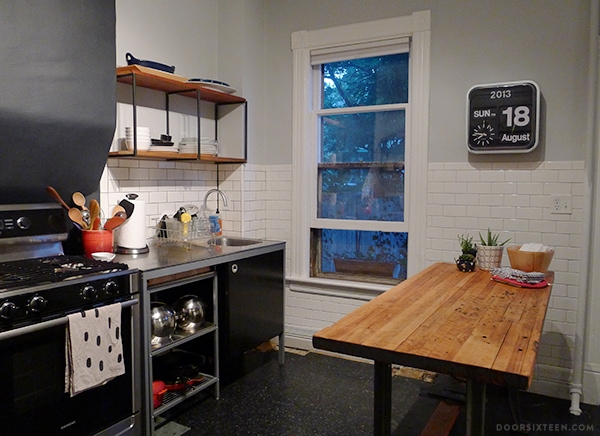
It’s been nearly nine months since my last kitchen tiling madness binge at the house, and it feels so, SO good to be back in the swing of things. Aside from not having bronchitis and a 102° fever this time around, it’s very encouraging to at least have a finish line in sight. Having the radiators disconnected means I can make lots of progress with the tiling and the flooring, but it also means I’m now racing to get everything finished before heating season starts.
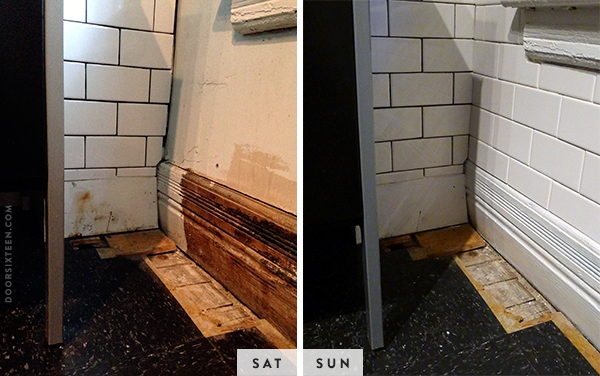
When I got to the house on Saturday, I was finally able to see this corner of the kitchen (next to the sink) radiator-free. The valve and supply pipe were positioned so closely to the pipe chase that the radiator actually had to be cut out by the plumbers — you can see the scorch marks on the painted wood from being in contact with a hot valve. We will not be having this radiator reconnected, since the one on the other side of the room provides sufficient heat on its own.
See how crazily sloped the wall and baseboard molding are under the window? When we bought the house, this wall was in a serious state of disrepair. Years of water seepage and ice buildup on the outside of the building had caused the mortar between the bricks to fail — you could literally push on the outside of the house and see the bricks move. There was so much water damage on the wall behind the radiator that you could see light from outdoors coming through the radiator. (I don’t think I have photos of all of this, unfortunately, but I’ll check on an old hard drive this weekend to see if I can find anything.) It was alarming, to say the least! We hired a wonderful contractor to repair the exterior of the house and stabilize the bricks and lintels — as well as dig out the foundation and waterproof the outside about 6′ below ground level — and all has been well since then, but all of the interior settling that occurred as a result remains. It is stable, though, and rather than open a can of worms trying to straighten the wall and re-set the baseboard molding, I just went with it as-is. It was kind of like tiling a ski slope, but it’s honestly not all that noticeable now that the tile is uniform and the molding has been primed. It’ll be even less apparent once I get everything grouted and caulked and make the moldings a little nicer.
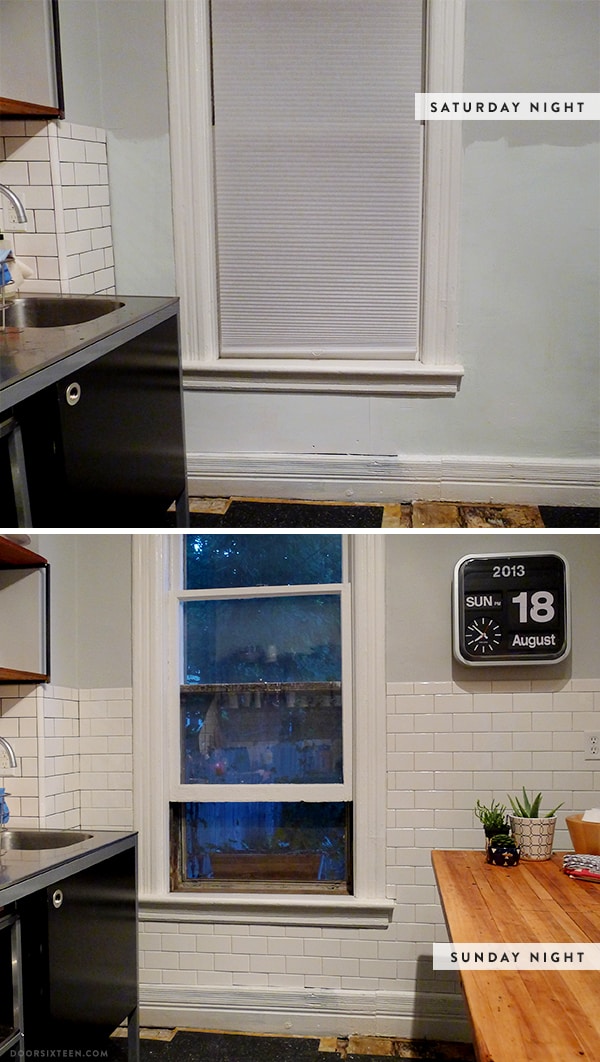
Not bad for a solid 12 hours of tiling! I feel like I should be going faster, but the unevenness of the wall means I have to do a lot of building up/tapering of thinset along the way, and it’s tedious. I really do love tiling, though — always alone, never with an assistant (though I won’t object to having my thinset mixed for me!). It’s somewhat meditative, and I’ve done enough of it at this point that I have a good system down. I always listen to NPR, I always use my Wood & Faulk pencil, I always use a certain orange plastic triangle, I always have coffee at the ready…as long as I know the necessities are there and I keep my workspace clean, I can keep going and going as long as I need to. On Saturday night I was up until 3:00am!
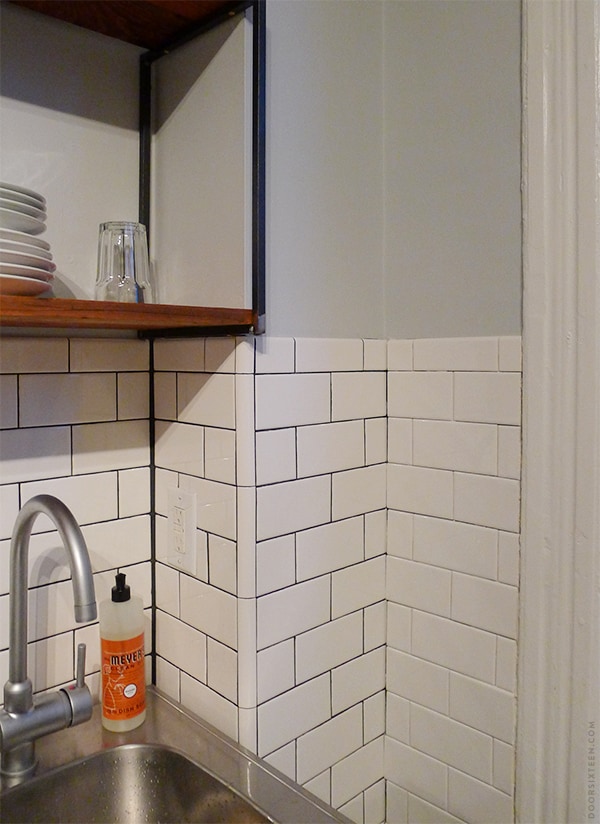
My favorite corner!! Man, I love how this is looking. I’ll be grouting this area next Saturday, and I know I’m going to take at least a dozen beauty shots when I’m done. Is it weird to be this obsessed with a corner? I just want to pet it. And maybe lick it? I love you, corner.
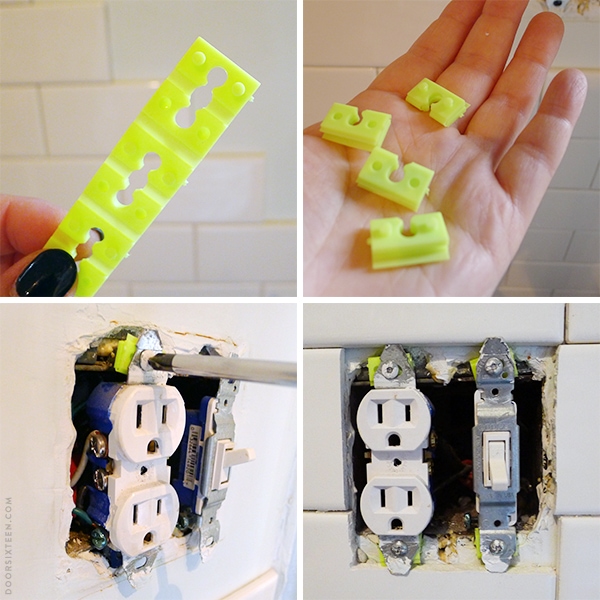
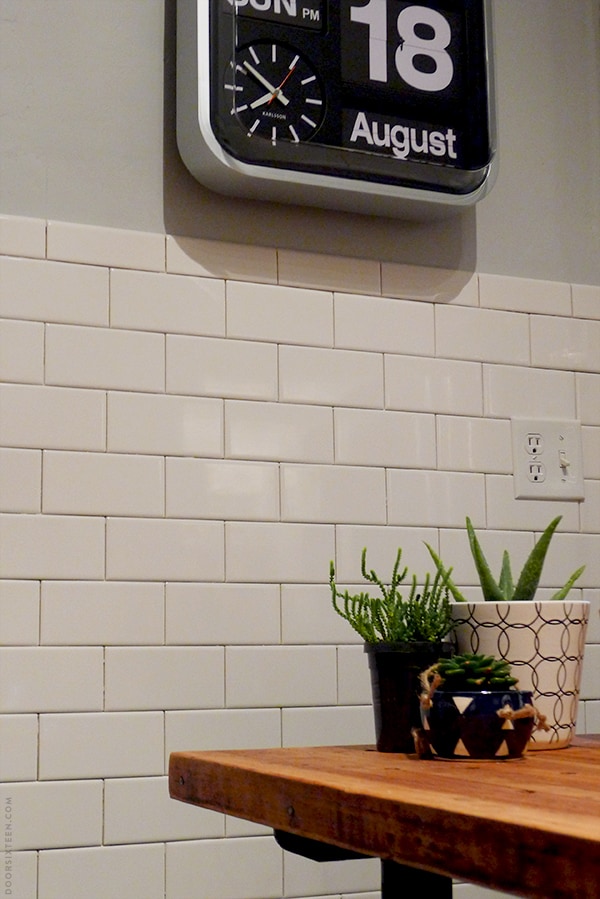
I keep forgetting to take pictures to show how you deal with outlets and tile. Because tile changes the distance between the surface of the wall and the electrical box, you have to move the switches and outlets forward. With single boxes you can use a box extension ring, but with double boxes like this one you can use these little plastic shims. After turning off the circuit to the box (!!!), all you need to do is loosen the screws connecting the outlet to the box and snap on as many shims as you need to move the outlet forward the same depth as your tile. Tighten the screws, and you’re all set. (These shims are great if you have a loose outlet that needs support, too.)
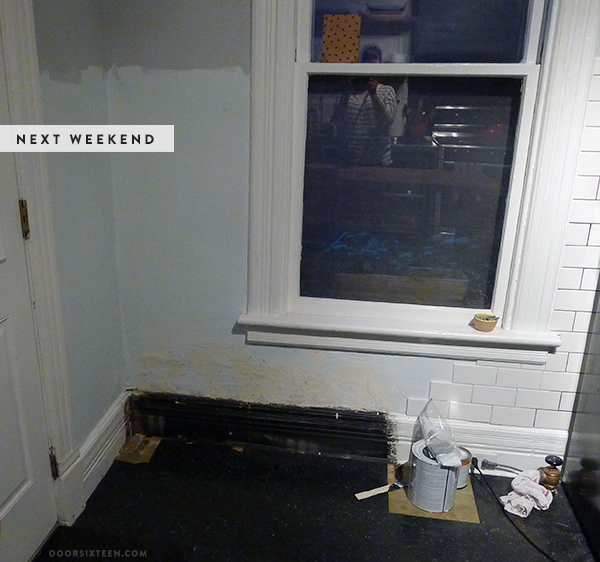
THIS IS ALL I HAVE LEFT TO TILE!!! Just this little corner! I have to do some repair work to the wall first because the plaster is really lumpy where the radiator was, but I should be able to finish this in a day. Then it’s time to grout!! See that lovely new radiator valve on the bottom right? That thing is smoooooth to turn. The old one was so rusty that bits would crumble off into your hand if you tried to close the valve. We had the plumber move the valve (and the pipe in the basement that leads to it) about a foot to the right at the same time so the radiator will be centered under the window instead of being crammed into the corner. And yes, that electrical outlet will need to be moved as well.
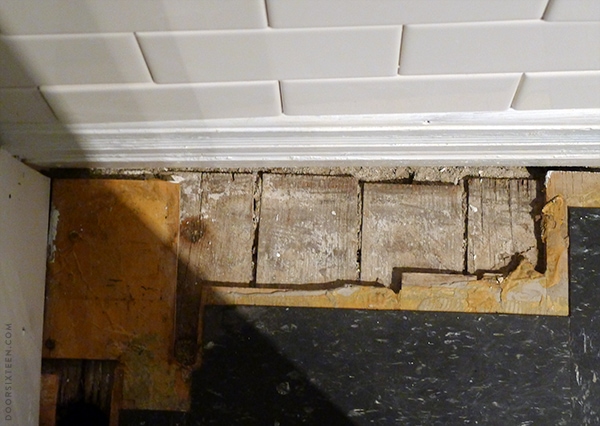
The kitchen floor is still a huge unknown, but I’m holding onto hope that the original pine subfloor will be salvageable enough to paint. We know that they unfortunately have a lot of water damage, and I have to admit that the condition of the exposed planks in this corner is not encouraging. We’ll see how it goes, though. I doubt we’ll be able to start demo work on the floor next weekend (I still have to finish getting the rest of the tile up and then grout and caulk everything, plus if the weather is good I want to refinish the radiator outside), but hopefully the weekend after that. Fingers crossed that the floor will be alright with a little Bondo and a lot of paint!



52 Comments
It’s looking really good! Good tip on the plastic shims, thanks! We just had subway tiles installed in the kitchen and the outlets have really been bugging me.
Where can you buy the shins??? Need them desperately. Ty
You mean the plastic shims behind the outlets? You can buy them at any big box store. There’s a link to them at Lowe’s in the post.
Just a FYI those plastic shims are not to NEC code and are not safe. By NEC code if there is more than a 1/8″ between the outlet tounges and the electrical box front edge you need a “fire ring” which prevents anything coming in contact with the screw terminals on the outlet. Just a FYI to keep you and the kiddos safe at you house and if you try to sell house that inspectors don’t find fail you on that for a house inspection.
Hi Chris, this is an old post (also, I don’t have children and this house was sold a year and a half ago), but for what it’s worth, NEC code 314.20 indicates a 1/4″ max setback, not 1/8″—I was well under that limit. Thanks for the tip, though.
314.20 In Wall or Ceiling
In walls or ceilings with a surface of concrete, tile, gypsum, plaster, or other noncombustible material, boxes employing a flush-type cover or faceplate shall be installed so that the front edge of the box, plaster ring, extension ring, or listed extender will not be set back of the finished surface more than 6 mm (1/4 in.).
It’s so exciting to watch this project as it’s nearing the end! Your kitchen is going to be so lovely when you’re done with it.
Anna this is all looking so so good–you are a tiling machine!
It goes without saying that your kitchen is proving to be major inspiration for my own in terms of colours and finishes–I just painted a wall in my kitchen Soot and got the go-ahead from my landlord to paint the lower cabinets dark..very excited about that! Like I always say, you’re always more than welcome to take a trip up to Toronto…I could definitely use some help in the tiling department!
Your kitchen is going to be so nice, Kisha!! I need to catch up on your blog tomorrow. 🙂 🙂
I love how this is looking! What a difference the tile made on that sloped wall in the corner, it is so cool how it brings everything together. Having been in your kitchen before, I always loved it just the way it was, but the addition of the tile makes it stunning! Great job Anna, I’m even more impressed than usual.
ps: About licking the corner; In Stephen King’s “Wizard and Glass”, the character of Rhea the witch uses a magic glass to spy on the townspeople, and one of them is a woman who cleans her house from top to bottom each day then licks all the corners after. LOL!
I never read the Dark Tower books!! 🙁
The Dark Tower series is some of King’s best work in my opinion, but you know I love most of his stuff. I’m reading Under The Dome right now.
I’m so glad you mentioned in your post about wanting to lick that tiled corner, because my first thought when I saw the tiling progress was “I just want to lick it!”
…Nope, I’m not creepy or obsessed with subway tiles or anything 😉
Okay, but only ONE of us can lick it…because otherwise that’s gross. 😉
The kitchen is looking really cool!
The corners (of floors) are always the worst so don’t get too disheartened. I’ve repaired wood floors before and had to replace individual planks if you have any questions. Though I really doubt I know more than you do when it comes to home repair.
Thanks, Cori!
Looking good!!! 🙂
Can you tell me where the clock is from?
Hi Lisa, the clock is by Karlsson. There’s a post about it here:
http://www.doorsixteen.com/2013/04/01/field-report-karlsson-big-flip-clock/
I love the clock as well. It reminds me a little (in shape/function not in color) of the clocks that Rivane Neuenchwander uses in her work “A Day Like Any Other.” Anna, did you perhaps see her solo exhibition at the New Museum in 2010? (it traveled to my museum in 2011 and I got to do detailed condition reports on the clocks and I fell for them).
The tiles are gorgeous and remind me that I still need to caulk 1/2 of my kitchen….maybe this weekend.
I don’t know her work, Pat, but I’ll check her out!
It’s looking SO good! It kind of makes me want to go tile something.
Have you talked on the blog before about plaster walls? Any tips? I’m moving into a new place in a couple weeks, and it will be the first time I’ve ever had plaster walls. I want to hang art, shelves and curtains, but the landlord has put the fear into me about the walls crumbling into oblivion if I attempt it.
My googling says to use toggle bolts, but this seems like kind of overkill for most things? I’m just not sure how strong plaster is or what qualifies as a “heavy” load.
Hi Shannon! Not all plaster walls are created equal, even within the same house. I have had very bad luck with toggle bolts. I usually like to drill a pilot hole with a masonry bit first to reduce cracking/crumbling, and then use plastic masonry anchors (check the weight limit). Depending on the weight of what I’m trying to support, I’ll then either use a masonry screw or a standard screw. Sometimes I use wall dogs, sometimes I use E-Z anchors…whatever works.
Pilot holes are really key, though, and it helps to put a piece of painter’s tape on the wall before you drill or nail anything.
Continually impressed by you. Man, if I had half your energy and productivity, oh the things I could do…
really love how it looks, and crossing fingers for the floor. pro-tip for exterior wall electrical outlets, these are really helpful for drafts! http://www.homedepot.com/p/Frost-King-Foam-Electrical-Outlet-and-Wall-Plate-Insulating-Kit-OS12H/100184290#.UhPjv-7n8iQ
Yup, we have one of those in there as well. 🙂
Hey Anna, love your blog. How are you cutting your tile? Sorry if you’ve already covered this but I didn’t see a post anywhere. I just adore the whole kitchen tile thing, just like they used to do way way way back in the old days. -Caitlin
I’m not sure if I’ve ever written about cutting tile, but I just have an inexpensive guillotine-style cutter. I also have nippers, of course, and a little hacksaw-style thing for doing detail cuts. All manual!
Oh, it looks wonderful. I have old pine floors in my house, same era. Most of them had been painted with many layers of heavy (lead) brown paint. Others had sustained water damage and looked a lot like what we see poking out in that photo of yours. I had the floors sanded, stained, and poly-ed (professionally). It was a major project (I had to move out of my house for ten days and EVERYTHING was covered in dust afterwards — apparently cleaning every inch of the house was not part of the sanding job by the workers), but the floors looked wonderful afterwards. One would never have believed they could have been transformed like that, but they were.
Good luck — I love seeing the photos of your projects!
Thanks, Erica, that’s encouraging. We don’t have a budget big enough to pay someone to refinish the floor, so I’m mostly just crossing my fingers and hoping I don’t find lot of rot or asbestos paper or anything like that.
So insanely good. Always in awe of the work you two accomplish on your place!
It’s all because of your pencil!!
That corner IS gorgeous. I would totally lick it, too… good girl!! xox
Wow keep it up, it is looking great!
Lick just one corner? The whole kitchen looks edible/fantastic! If you would bottle some of your energy, I would be willing to pay mucho dinero . . .
oOOoOoOoOoh thank you for posting about the outlets!! Just tiled my kitchen and have been struggling on how to fix that issue. Thank you — and the kitchen is looking awesome!
Is that charcoal colored silicone in the corner by the sink?
Yes, it’s siliconized sanded acrylic caulk. The brand is Tec, color Raven.
I am so excited about your tiling progress! I cannot wait to see how all the upcoming projects in the kitchen turn out!
Wow! It looks so amazing!
Oh wow, I really like your style! What an incredible change. Super nice!!! =)
This looks gorgeous, Anna! Congratulations on the amazing progress. What will repairing the other wall require? And what will happen to your base moldings when you move the electrical outlet? Will you have to find a match or is there a way to reuse what’s there?
The lumpy wall needs to be sanded, patched, and sanded again…then primed. Nothing major! The current hole in the baseboard molding for the outlet is only about 2×3″, so I’ll just patch it with a small piece of wood.
Oh, Anna, I literally gasped aloud when I scrolled down to the second picture. It looks SO GOOD. Can’t wait to see it with grout!
Oh, thank you!! I’m really excited for the grout, too. 🙂 🙂
We spent all of July (and still unpacking as we speak – a little at a time) ripping up old carpet and refinishing original pine boards in our 1898 bedrooms. We rented massive sanding machines and, post-sanding, I varethaned them myself (it was voted that I do both rooms, despite nearly fainting, because I work quickly and thoroughly).
One word of caution when sanding: twas suggested to us, by a neighbor who had sanded pine boards ages ago, that we start with a fine sandpaper because pine is so soft and delicate. We found this not to be true with our aged boards. We wasted an entire weekend using only finely grained sandpaper (by the time Sunday rolled around and there was little to no progress, the rental store was closed til Monday) when we really should have started with the bigger grit stuff. Our rental place bought back all of the sandpaper we didn’t use (if your place does the same, might I suggest you go hog wild and pick up the 10 or 20 pack of every grit, depending on how much you have to sand) and a number of the sandpaper sheets broke randomly: some lasted hours, some not even one whole minute.
PS: Turn off all air conditioner units when sanding. I had to go through the filters with a toothbrush afterwards, but in the 90-100 degree July heat, we didn’t really have other options.
Thanks, Heather. We actually sanded down the identical pine subfloor in the room above this one (seen here) a few years ago, so I think we’ll just use the same grits and approach as we did up there. Believe it or not, we used an orbital hand-sander for the whole thing! Since the end goal is to paint it, we don’t need to really worry about much more than just making the surface splinter-free.
I love your blog! Stumbled across it randomly today and I am hooked 🙂 We are in the process of refreshing (not quite as much of an undertaking as your house!) an old 1925 house and enjoying learning to be DIYers. Your tile project is looking great!
Hi Lauren! Welcome!
This is looking fantastic! I can’t wait to see what you do with the floor. Between D16 and Manhatten Nest, I’m getting a lot of inspiration/motivation for my own current renovation nightmares. 🙂 Hopefully our kitchen turns out just as nice!
Woah. That’s my favourite corner too!
Yes. Love the clock!
I loved your step by step on how to tile but what was the best was the extenders you used to move the electrical Boxes out to be able to install the wall plates!!
My question is… Where did you buy those lovely yello (life-saBing) little gizmos?thanks so much
Liz
Hi Liz, I bought them at Lowe’s—they’re linked in the post. But any hardware store should have them!