I had grand visions for my end-of-year vacation: I was going to catch up on emails, clean the house from top to bottom, watch movies, spend time with Evan and the dogs, and, of course, work on the kitchen renovation. It didn’t really work out that way, though. My flu morphed into bronchitis, and I’ve basically spent the past two weeks being a hermit and coughing. And coughing. And coughing some more. In between coughs, though, I’ve been tiling! Having something to focus on actually helped me to not cough so much (seriously!), and it also kept me from feeling like my vacation was a total waste.
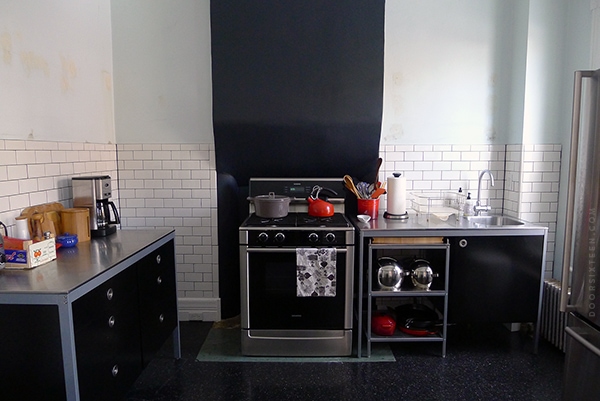
Not bad, yeah? I’m in love with the tile. I know there are people out there who don’t like black grout because it “looks moldy,” but I love how utilitarian and, well, subway-like it looks. It’s also in keeping with the general spirit of a Victorian kitchen. And how about that black hearth?! I don’t know why I didn’t do that years ago. It really turns what has been a difficult architectural feature to work around into something that looks intentional and feels like an important part of the room.
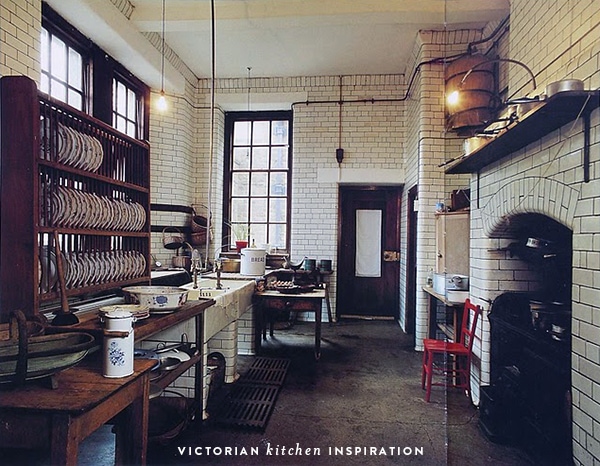
Photo via Kitchen Clarity
This is the photo I always come back to when I think about the kind of renovation work I’m doing. Obviously I’m going for something quite a bit more contemporary, but the key elements—the hearth, the open shelving, the tile work, the free-standing furniture and cabinetry, the colors—are all there. I’m very conscious of the age of my house, and of the fact that I’m not going to be its last resident. My house will outlive me, and while I am by no means a purist when it comes this stuff, I do like to think forward. That’s why I’m tiling all the way down to the baseboard moldings instead of just doing the backsplash area, for example—it’s about the past and the future as much as it is the present.
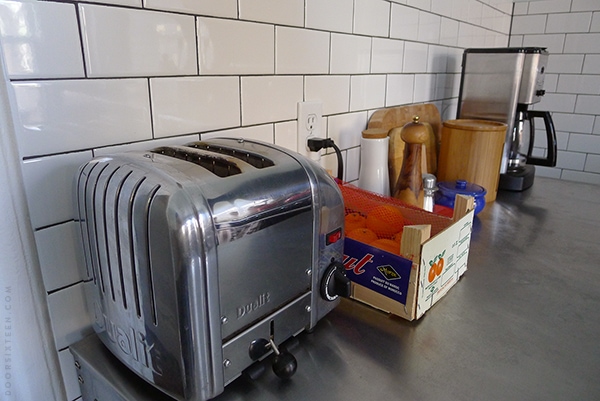
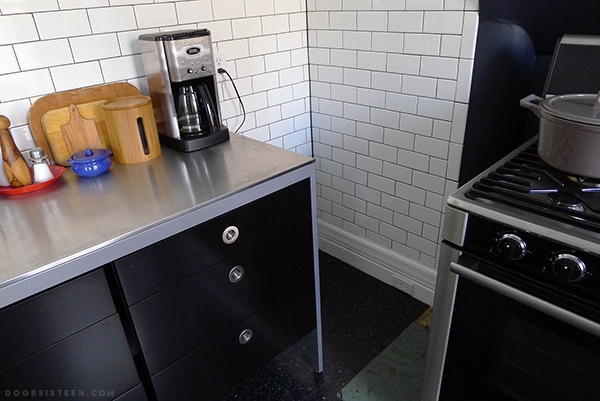
This weird corner space to the left of the stove has never felt right. I’m going to mount a length of butcherblock counter to fit perfectly there, and underneath will be a built-in dog bed! Bruno usually “sleeps” (that is, he rests with his eyes half-closed while staying just alert enough to scarf down any food items that might fall to the floor) under the counter while I cook, and I think he’ll really appreciate having a warmer, comfier spot to hang out in.
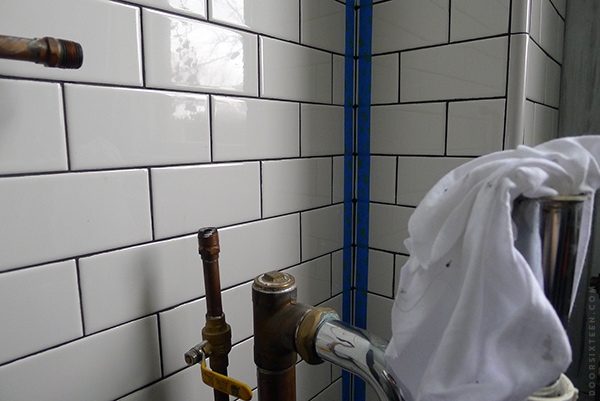
Here’s a tip if you want a nice, crisp caulk line in your corners: PAINTER’S TAPE. It works really well. Just make sure you pull it off immediately after running/smoothing your caulk bead—don’t let the caulk dry first.
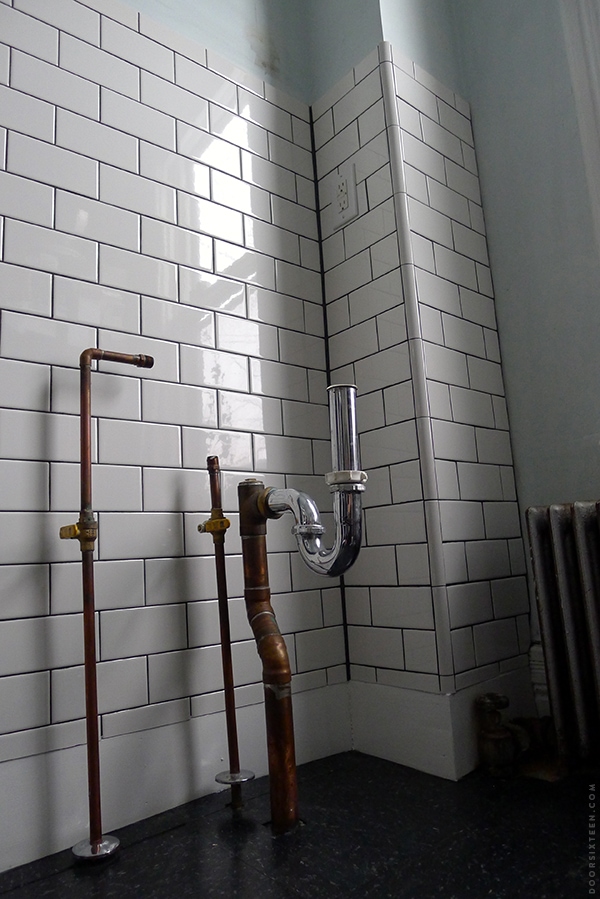
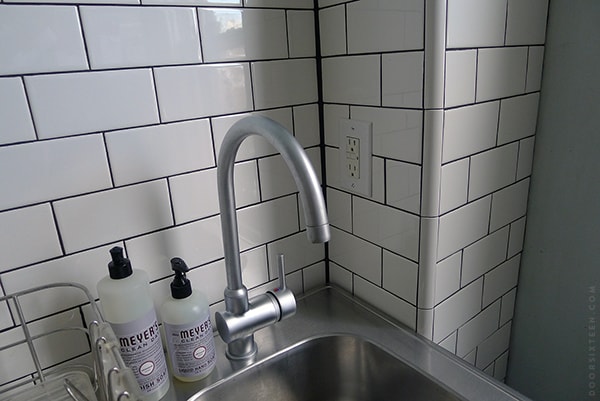
I had to take a full-length beauty shot of this corner before we reconnected the sink and covered it all up. Tiling this area took two full days, nine hours of which I spent on that outside corner alone. Since we’re using cheap, off-the-shelf tiles, there aren’t a lot of options in terms of curved tiles and stuff like that, so I had to get creative with trim pieces. I’m really pleased with how it’s looking! I know the details will get lost once the shelving is up and the kitchen is fully stocked and operational, but for now, I’m obsessed with this corner.
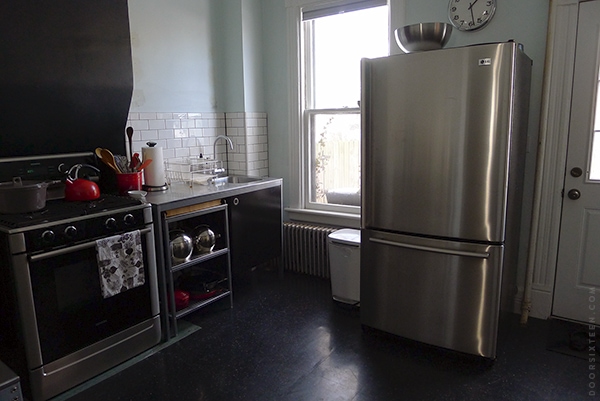
Ugh, the refrigerator is such a behemoth. I really want to get that cute little black Smeg. A smaller fridge could be moved to the wall opposite the stove, making room for the “island” to actually become a true ISLAND. The refrigerator we have is quite nice looking, but it’s really too big for the space. It’s the kind of thing that would look much better in a row of cabinets instead of just floating in the middle of the room.
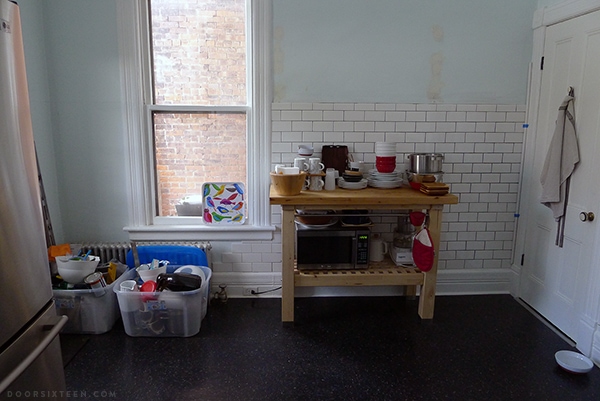
Our dishes, tools and tiling supplies are hanging out over here for now. Once we put shelving up this stuff can all be put away, and all of the food that’s currently living on the dining room floor can go in the pantry. I’m trying very hard to keep the kitchen as functional as possible while this renovation is going on. At least we were able to reconnect the sink yesterday! I’m not sure how much longer I could handle washing dishes in the bathtub. Every time I took a shower I thought about that episode of Seinfeld where Kramer installs a garbage disposal in his bathtub. Gross!
The back wall and the areas behind the radiators still need to be tiled, but that will have to wait until spring. The radiators are a mess, and we need to have them disconnected and capped before we can do anything. I’m not sure what we’re going to do heating-wise in the kitchen. The radiators are both really badly rusted, the legs are weirdly short and impossible to clean under, one of them doesn’t work at all, and they’re just not nice enough to warrant spending hundreds of dollars having them sandblasted, repaired and powder-coated. I’m guessing they’re only about 50 years old since they don’t have any of the ornamentation of the other cast iron steam radiators in our house. I was hoping we could install Runtal wall panels instead, but they only work with return-pipe systems—we have single-pipe steam heat. Sadface. I dunno. Maybe wall-mounted steam radiators? All I know is that it’s FREEZING in the kitchen, and the current heating situation isn’t working out.
Want to see some progress shots? I’m terrible about stopping to take photos while I’m wrist-deep in grout, but I did take a bunch of Tilestagrams! Here are eight days of tiling condensed into a dozen snapshots. Yay! Tile!



90 Comments
It’s looking really lovely Anna! I love the tiling and the black grout. Are you going to tile all the way up the wall? Also, just a curiosity question, what are those silver globe things on your shelf under the sink?
No, this is the finished height! I’m putting open shelving above the tile. And those are pots on the shelf. 🙂
Looks great! Just fyi, Smegs are lovely, but get terrible reviews. Perhaps that doesn’t matter to you, but just letting you know what I’ve read. (I was depressed.)
Haha, of course it matters. There are some bad reviews online, but everyone I know who actually owns a Smeg loves it, and the more recent reviews are quite good on the whole:
http://www.ajmadison.com/cgi-bin/ajmadison/FAB28U.html
Not worried about it, really. I’m guessing they just had some issues initially when introducing their first models to the US market! 🙂
Well, that’s good to know. I did see the good reviews on AJ (since I’m researching fridges, too), but I saw some scathing ones elsewhere. I hope they have improved. They are very pretty, but I need to see one in person to understand if it can hold enough for my family.
Oh, I just saw this on the AJ Madison site:
NOTE: A gap of 12 1/2″ must be left on the hinged side of the refrigerator to allow the door to open properly.
I don’t have that kind of room to spare! But they are gorgeous.
looking great! love that inspiration photo, and i don’t think the black grout looks moldy in the least
wowsers! look at all that tile! at first i wasn’t so sure about your dark grout, but now i’m in love…. and i had to comment on the meyer soap 😉 our BODEGA gave us a bottle of meyer handsoap for christmas and it’s heavenly.
cheers! hope you feel better and get that darn tiling done soon!
The tile looks so good. The thought and care you put into your projects truly shows. YAY indeed!
Love the simplicity of subway tiles. Urban and cool all the way!
OK, it’s ridiculous how good this looks. LIKE SO GOOD. I need you to come over and teach me everything you know about everything so my kitchen can looks half as awesome?
No more tiling until spring, but you know I’m happy to teach you any time you want!
Love how it’s coming along! The look is perfect, especially the dark grout. Keep up the aweseome work.
It’s lovely that you’re thinking of future dwellers of your property. We tried to do that for our renovation choices, too. Regarding your heat issues, we also have steam heat – our house was built in 1920 – and we ended up needing to add a unit to our kitchen to maintain a code-level amount of heat. We ended up with baseboard units by a company called Base-Ray. They’re cast iron, and have sort of a fifties feel design-wise, but they’re efficient, and might help you in your space planning. Something to consider. Good luck with your renovation!
Thanks, Kati! It looks like their baseboard units are only for hot water (return pipe) systems, but they do have something interesting and kind of tank-like and cool for steam systems. Very interesting!!
Oh, that looks fantastic! Cannot wait to see the shelves back up. Good job! Glossy tile is so much better than dirty painted walls. I’d tile if I could.
Anna, Happy New year. Thanks for the Swedish xmas music which I shared with my Swedish friends I suspect it has gone the rounds of the Christhurch nordic society members. The tiling looks fantastic, did you tile black behind the stove or paint I can’t tell? I like the black chimmney, it looks great. I hope you find a really good radiator solution, having a comfortable kitcken is important to good eating don’t you think. Our house has an indoor kitchen with stove and crappy bench and the fridge, and the water and sink are in what used to be the laundry which is basically outside. We don’t get the cold winters here in Christchurch NZ like you folks, but we do get snow sometimes and lots of frosty mornings.not much fun on an early am start. I would love to get radiators but the are very uncommon here.
No, I didn’t tile behind the stove. It’s hard to tell from the photos, but the hearth/chimney is really curvy and VERY irregular in its shape. If I do tile it, it’ll have to be with some kind of small, mosaic-type tile (like pennyrounds) that can accommodate curves. Honestly, though, I don’t make much of a mess around the stove…probably because I don’t really do much frying! It’s around the sink and counters where I tend to get sloppy. 😉
Great job! Looks great!
Wow. Just wow. I discovered your blog when I was researching paint colors on the internet for my own house – a 1900 Victorian in St. Louis. I have been contemplating doing the same thing with tile in my kitchen, but have been wavering because of the time and cost. I think seeing your kitchen done this way has convinced me! I had to start completely from scratch in my kitchen as it was 1970s faux wood paneling with hunter-safety orange walls and a wagon wheel-esque chandelier. Under three layers of vinyl and linoleum flooring were the original encaustic tiles – I couldn’t keep them in place (they are in tubs in my basement). I have been trying to keep the aesthetic of my kitchen between 1900 and 1930 while providing modern conveniences. The subway tile to the floor would definately help with that. Thanks for the inspiration!
Earen, if it’s at all encouraging, all of the tile you see here cost less than $200. It’s REALLY affordable! I’m just using American Olean from Lowe’s…really inexpensive stuff, but it looks great. I used it in my bathroom a few years ago, too.
I hope you’re able to save your encaustic floor tiles. Every now and then I find one (broken) buried in my garden, and I feel so sad that someone ripped them out of the original kitchen and vestibule in my house.
Oh – and I LOVE black grout with white tile! That is what I did in my bathrooms and it is gorgeous.
I just love subway tile with black grout, we recently installed it in our bathroom with white penny tile/black grout on the floor. Really like that you painted the hearth black, it’s much more of a feature now, before it blended right into the wall…
Awesome job Anna! I love your train of thought. We live in a 1925 bungalow in Boston and that’s basically been my thinking too, but in that period style. Bringing cottage style free standing furniture in, but loads of 50’s vintage stuff.We’ve got wainscoting on our walls, Black and white checked floors and the original pantry with a sink and conveniently our dishwasher next to it. Not a typical kitchen, but actually very functional.
WOW…It looks amazing!! I’m totally saving this as an inspiration for my own future projects! Thanks for including all your great tips!
Sorry to hear your vacation plans got smooshed and bronchitis is definitely the worse. I had it when I was 19 and to this day, when I get a small cold it turns into the nastiest cough which lasts for weeks. I hope you’ll fare better.
Have you seen red grout in action? I’ve seen it for sale at the tile shop I go to, but have yet to actually see it in someone’s home.
Thanks! Yeah, I’m one of those people who always gets a bad cough, too…it’s been like that for as long as I can remember. It’s almost like asthma that’s triggered by a cold?
I’ve only seen red grout in use in the display kitchens at IKEA!! I think it looks great in a really contemporary kitchen with square white tiles.
I have the same attidute towards the end of the year. I planned to apply for internships and write a lot, but in the end…I did about a third of that.
Your kitchen looks so lovely! I like the way the black grout looks with the tile, I don’t see how that would look moldy or anything.
It looks fantastic! And the inspiration photo is incredible. I am very impressed that you did all that work, I tend to be a bit lazy about projects 🙂
Wow! Looks amazing. You may have swayed me into doing dark grout when we redo our bathroom.
Hope you’re feeling better soon.
Looks great Anna! Can’t wait to see the end result with everything in place.
If I remember correctly you like the ÖRSTED rug from Ikea and just want to let you know that I saw one in Elizabeth @ AS-IS section down to $400. It was few days ago.
Wow! Looks great. I love a subway tile with black grout. We started out doing our bathroom backsplash in it and then did the whole kitchen. Luckily my only job was grout cleaner and assistant tile cutter.
This is looking so good I love your commitment to your home’s age and your legacy. Our house is about the same age and previous owners were ruthless in ripping out original details.
One of my primary takeaways (other than tiling is no joke!) from what you’ve shared is that using the same tile in one’s bathroom and kitchen is ok! White subway tile really is the best choice for both rooms –classic and easy to take care of.
My gad, I love this! My kitchen is such a piece of shit. Sorry for the foul language but it’s true!
Hi Anna,
I hope you’re feeling better! It’s been a million years since I’ve seen you but I’m enjoying Newburgh quite a lot and still working on our house. Eddie is going to use 4″x12″ subway tiles left over from tiling our shower (the contractor did not do half as good a job as you) to make a backsplash in our kitchen. I’m begging you to give him a tutorial beforehand! The black grout magnifies the smallest deviation in pattern.
Hugs and Happy New Year!
Happy New Year, Sherry! We’d love to see you and Eddie and little E…tiling or no tiling. 🙂
hey sherry! if it’s any consolation, we had someone do a bad tiling job a while back which forced us to figure things out. we knew we couldn’t do it any worse and would have the added benefit of no labor cost.
I want to go back in time and re-do that tiling job myself!!! 🙁
Your house is lucky to have you guys as it’s “parents”- I love the bit about planning for the future of the home, instead of just now. You’re spot on!
So many lovely houses (especially in the UK) have had all the architectural details ripped out, linoleumed over, or ARTEX ceiling-ed without a thought to the house’s age or personality. In fact, the flat we’re renting here in Helsinki gives me mega eye-twitches about this. When I climbed a ladder to use a small loft-like storage I found in the ceiling, I could see where the original walls had been knocked down (roughly), and how the crown molding and ceiling roses were just blocked by an 80’s drop ceiling with spot lighting (my pet hate). It’s a building from 1911, curvy and Art Deco-y to the max, and the owners (or some culprit) thought it was fitting to install a bathroom with powder blue French chintz tiles and a plastic loo, and cut the gorgeous 4 meter ceiling height in half so they could apparently have 10 spotlights that highlight EVERY pore flaw right above the (80’s three-panelled) bathroom mirror…ugh. I don’t get it.
But your place- gahh…it’s a knockout! Even with bronchitis, you still manage to make it look wonderful. (Feel better, by the way).
All that black hearth needs now is some sort of neon-colored piece to make this an ultimate Anna redo! A clock or sconce, perhaps? Speaking of which, what’s the lighting like in this room?
I love the tile behind the freestanding cabinets; I hope ikea brings back a similar line.
The lighting is a disaster right now, but I’m working on that. 😉
IKEA does still sell the VARDE line, which is also freestanding.
Oh, that little paragraph about respecting the age of your house and it’s original style, while incorporating things you like and feel more actual.. it spoke so much to me!!
We are in a 1950’s bungalow, and whenever we think of the kitchen reno (that will happen some time in this decade, I hope ;)) I always try to think of ways to keep it 50’s and beautiful and not pin-upy. I want to make it more modern, but I don’t want it to scream cheap ikea 2010 in 20 years from now, when another owner will renovate…
The tiling looks great! You should be very proud. Did you do it all yourself or did Evan help? Also, I probably missed this in the past, but why did you not continue the black floor tile under the stove (I’m assuming the green is the old linoleum)?
No, the tiling is all my work—though Evan was on-hand to mix up fresh batches of thinset and make countless trips to Lowe’s. 🙂
The green under the stove is actually the original slate hearth floor, which my mother uncovered (thanks to turpentine!) under a very thick layer of blackened grease. We installed the black flooring years ago (before this blog), so I’ve never actually written about it!
Oh, I love it! And I have so much respect for you for doing this. Tiling scares me, mostly because it requires a lot of planning and that’s not my forte. That said, I’m totally envious of the bones of your home. We live in quite new construction, so while I dream of putting subway tile in it just seems like a mis-match for our cherry cabinets. Maybe one day. In the meantime, I’ll just drool over photos of other people’s homes, like yours.
I love it! Every time I see a photo of yours I feel inspired, and impatient to buy my own run down place to bring back to it’s former glory! Everybody tries to convince me it’s too much work, but such satisfying work, right??
Completely off topic: where did you get your pepper mill? I’ve been looking for a not-ugly, not too bulbous pepper mill for ages, but have come up short. Yours is lovely.
Meg, fixing up an old house is a LOT of work, but it’s definitely rewarding and satisfying. I’ve shed a lot of tears over the past 7 years, but I love this house and love working on it whenever I can. Whenever I feel tired, I think about the fact that my house is almost 100 years older than I am, and about the people who built it. They put so much care and craft and attention to detail into its construction, and the least I can do is honor that history by bringing it back to life. 🙂
I’m not sure where the pepper mill comes from! It was a gift from my mother-in-law, and it doesn’t have a maker’s mark on it. I can ask her, though! The wood is incredibly smooth, and it works beautifully.
It looks wonderful! I can’t wait to see it in person this weekend. Bernie suggests that you consider electric Runtal radiators; installing an additional thermostat would not be a problem. Your steam pipes would simply stay put, so only a minimum of plumbing work would be necessary.
OK, we’ll do whatever Bernie suggests!! 🙂 I thought a 2nd thermostat would be a hassle, but if not, I think electric is a really good solution. It’s been GREAT in the bathroom…
If flooring is in the reno plan electric radiant heat would be delicious!
Hah! No plan or desire to rip up the floor, but I agree radiant would be great. We looked into it when we did the bathroom next door, but it was crazily expensive for even very small space. Can’t even imagine what it would cost to reach 12,000 BTUs in our kitchen! (Three exterior walls, two huge windows, an exterior door, 10′ high ceiling, no insulation…)
Following this kitchen renovation has been very interesting. I looove the tiling and the black hearth! And a black Smeg would look amazing in there.
I’m so jealous! I wish someone would just come in and do something about my kitchen.
Wow-wee, it looks really, really good! I’ve been following the progress on Instagram – so it’s great to see the end result. And painting the hearth black works so well!
your tiling looks perfect! it’s so inspiring to see white subway tile + black grout. we have been considering that combo for a while but we didn’t have the guts to go for it. seeing it “in person” just convinced me! i love that you did it yourself, we (again) didn’t have the guts to do our kitchen backsplash so we hired it out but it’s obviously doable. and in a bond pattern even! do you have how-to resources you’d be willing to share, or tips to spare? i have a bathroom and laundry room screaming for help 🙂
Terreur, once you’ve watched a few YouTube tiling tutorials, the forums at John Bridge are all you need!
http://www.johnbridge.com/
Thank you so much! I’ll be sure to check it out.
I get so excited every time I see you make a new post about this kitchen tiling, so naturally I drooled the entire duration of reading this entry. The black grout is really pulling the entire room together so well! Sorry to hear you’ve been sick, though. Feel better soon!
PS: I just found the ASKER containers I used to have in my gerbils’ tank and it got me wondering if you still had mice (the pet ones, that is haha).
Awww, no…sadly all three mice have now gone to mouse heaven! Maude outlived her sisters by a full year, but unfortunately even the oldest mouse is still pretty young when it dies. I miss having little rodent friends! 🙁
:< Awr, I kind of figured that was the situation…It's been a while since that post about them. I've had some form of rodent pets on and off all my life, so I know how short their lives are…which can be heartbreaking. But they're such awesome little guys, so their presence is always worth the heartache!
I love the inspiration photo and love the black grout! Hope you’re on the mend soon. I painted and wallpapered my dining room in five days with the flu over Christmas break one year, so I know what you mean about the working taking your mind off the illness.
You’re doing an amazing job – I would totally hire you! 🙂
xo
cortnie
Amazing work! Seriously, you deserve a standing ovation. And I can see why you are proud of that corner, it looks great. Enjoy the transformed space!
It looks fantastic Anna! Your work is truly inspiring for all of us who have the pleasure of reading about it. Also, that corner looks flawless! You’ve probably mentioned this already but where did you learn how to tile like a pro?
Thanks, Jeff! All of my tiling knowledge comes from Googling whatever I need to know. 😉 The forums at John Bridge are a great resource: http://www.johnbridge.com/
Anna, this looks so amazing. I’d been following along on twitter as you coughed your way through the vacation project. (hope you are feeling better! daily roasted pears with a little maple syrup for a week can sometimes help with dry, spastic cough, but definitely not the productive type).
Anyway, I love white subway tile with a charcoal grey or black grout – it’s utterly timeless and looks amazing with nearly every decor. It’s super affordable to boot. We did subway tile (ok I hired someone to do it) in our kitchen with the red lacquer ikea cabinets and dark charcoal countertop. And our bathroom too. Unfortunately, I wasn’t courageous enough to add the dark grout. I think I used it all up with the red cabinets.
It looks lovely. Nice work!
Anna, happy new year! I’m sorry you started it so unwell. What a fab job you’ve done on your tiling. It looks AMAZING. We’ve only just had the planning permit in for our house (a new build – an exciting one, I think!!!!) and while I know it’s 2 years out from completion, I am thinking TILES. Oh. And taps. xx
Anna, this looks fantastic! I would expect nothing less coming from you! 🙂
I’m in the process of building my dream home and have taken much-needed inspiration from you. keep up the great work! and by the way, the black grout is the ingredient to your kitchen’s success. x
¡brava!
this is looking super. will you keep the paint color the same?
love the black hearth action, too.
happy new year! hope you are feeling better.
No, the walls still need to be painted and wallpapered! I despise that pale blue color. 😛 You can see my whole kitchen plan here:
http://www.doorsixteen.com/2012/11/20/kitchen-planning-for-real-this-time/
It looks really great! I really wish Ikea still carried the free-standing kitchen components like yours. They look really sharp.
Question: On the butcher block are you having it end at the back wall or “turn the corner” and end by the stove?
There’s no corner to turn! The far end of the unit on the left (in the top photo) is exactly even with the front of the stove. A counter-depth rectangle of butcherblock will completely fill that entire space.
Is there some sort of venting for your kitchen sink plumbing that you’re not showing here? Because unless there’s some sort of connection to a vent stack after your drain goes into the floor, your kitchen is in serious danger of smelling like a sewer every once in a while.
Talk to a plumber about it.
The vent stack is inside of that beautifully-tiled corner. The connection point for the kitchen sink is below the floor at basement level (our basement ceiling is open, so it’s exposed).
All of our plumbing work was done 7 years ago by a highly-skilled, licensed plumber, and was fully inspected by the city for code compliance.
Hi, Anna! You know what I (personally!) would love for you to write a post on? Toasters! I see your Dualit in the kitchen renov photos. I’ve needed to get one for forever — just a basic two-slicer, but big enough for NYC bagels, and stylish — but everytime I look at reviews on Amazon I’m overwhelmed by indecision! I was debating a Bodum in orange, but, again…mixed reviews. Hmmm…
Not that you don’t have better things to do! 🙂
DON’T GET THE BODUM. We have one in the apartment, and it’s a piece of garbage. It’s three years old now, and after year one the interior started to warp and bend, and now it toasts very unevenly. It’s just badly-made with flimsy parts inside. Major toaster regret.
On the other hand, we’ve had our Dualit for almost ten years, and it still works as well today as it did when we got it. It’s a real workhorse, and I expect it to last at least as long as I do. 😉 The slots aren’t bagel-sized, but we just squish giant bagels a little flatter and it works just fine. The thing with the Dualit is that you have to let it pre-heat before your first daily round of toast, and it doesn’t pop up when it’s done—so you do need to keep an eye on it, especially if you’re making multiple batches of toast (the third round will toast much more quickly than the first!). In that sense it’s a little less convenient, but I believe it’s the lack of features that make the Dualit less prone to breaking down. The mechanisms are simple and well-built.
Toast is probably my favorite food (really!), so I take my bread-toasting seriously. 🙂
Yikes, this is why I have such commitment issues! Okay, got it, thanks, no Bodum!
The tile looks amazing. I totally love the fact that you tiled all the way down and that you spent so much time creating that truly perfect corner. I would have said I’m not a fan of black grout but after seeing yours, I convinced that it can look spectacular!
I have a tiny house and an even smaller one-butt kitchen. It has a huge cut-out for a fridge and the last fridge I had in there was a 24 cubic-foot cabinet depth gorgeous Jenn-Air which died very close to it’s warranty had expired (of course!).
After living with a 3 cubic foot countertop fridge for nearly a year while I tried to decide it’s replacement, I finally settled on the LG 10 cubic-foot fridge:
http://www.amazon.com/LG-Electronics-LRBP1031W-Cu-Refrigerator/dp/B0006FTV2C
I loved the Smeg too but I couldn’t swallow the price of it. I have had the LG one for 2.5 years and I cannot even express the true depths of LOVE I have for it! Lots of interior space (surprisingly), looks good (my floor plan in open and you can see the fridge right when you enter), works well, is truly cabinet depth (only issue is that it should have a flat plug then it would be perfect), and I was able to use the extra space for some extra wall shelving and a spot for a garbage can (it mattered because there was no spot for one!).
The fridge we have now is an LG, and it’s been great! I think most of these fridges (including the cute one you bought) are meant to go in runs of cabinets, though, with countertops next to them and stuff like that. The thing with my kitchen is that the fridge is off all by itself, with both sides visible. It really needs to look good from all angles (well, except from behind and underneath!), and I think the Smeg is really the only fridge on the market in the US that meets that requirement.
My kitchen is actually pretty big, and the fridge we have works just fine, so if we DO buy a new one, it would be for 100% aesthetic reasons. Hence…SMEG. 😉
Love the tiling – you’ve done a beautiful job. I feel your pain about tiling too. We did our entire downstairs floor last year and I think it almost killed me of any desire for renovating or decorating! xx
Black grout is great – I used it for a kitchen of mine years ago and it aged really well unlike white grout that needs refreshing and redoing every few years – the black grout still looks fresh and neat – good choice.
I never would have imagined Ikea stand-alone kitchens to look so snazzy! Here in Germany, one must install their own kitchen when moving into an apartment (yes, just to rent), so it can get real expensive doing this every time you move (because how often is a kitchen going to have the same space from apartment to apartment?! utterly ridiculous). You’ve tempted me to give these a shot for our upcoming move – thanks for the inspiration!
I’ve read a few articles in trendy home magazines about people who are so chic, so uptown, so fabulous that rather than cook, they use the kitchens in their oh-so-moderne studios as additional storage. Witness the woman who keeps sweaters neatly folded in her oven and various home gadgets in her (unplugged) fridge. While it certainly sounds fab, let’s be clear: that’s never going to happen around here.
Haha, what? No, not here…I definitely use my kitchen for cooking!
I’m putting subway tile in my kitchen also and wanted to ask about that outside corner you’ve tiled so perfectly.
All that was available at my local home center was 3/4 round corner tiles. Is that what you used? It seemed too large of a radius for a 90 degree corner but maybe it’s an illusion?
Any quick tips would be greatly appreciated!
Yes, that’s what I used, and yes, you are correct about the radius! You can read the dirty details in my reply to Katie in the comments at this post:
http://www.doorsixteen.com/2013/01/28/the-kitchen-has-been-painted/
Love white subway tile with black grout. I used it in a past kitchen renovation and am using it again in my current kitchen renovation (always fun when you are living there!).
The grout will get discolored anyway but, more importantly, black grout shows the pattern of the tile and since I live in NYC, I love the look of our 100 year old subway tiles. (If only our subway cars looked as good).
What did you use for the corner tile? I know they have 3″ x 6″ tiles with the corner curve on the long edge, but it appears you also used a corner bead type of tile that is 6″ long but very narrow?
Where did you find the freestanding cabinets?
They came from IKEA 10+ years ago (long discontinued).