Huh. I started putting this post together 4 or 5 days ago, and I guess I thought I had already finished it? I have no idea. It’s been a weird week. I spent about 8 solid hours priming and caulking doors on Sunday. It’s amazing how an entire day can be devoured by a single, simple task like that. Job-work has been busy but unusually productive, and evenings have consisted of painting doors, eating sushi, getting my hair cut, and sleeping through my stop on the train.
Anyway, this post is about windows! Well, one window in particular, the 42″ wide one in our (future) guest bedroom.
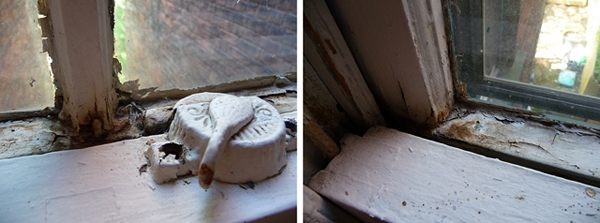
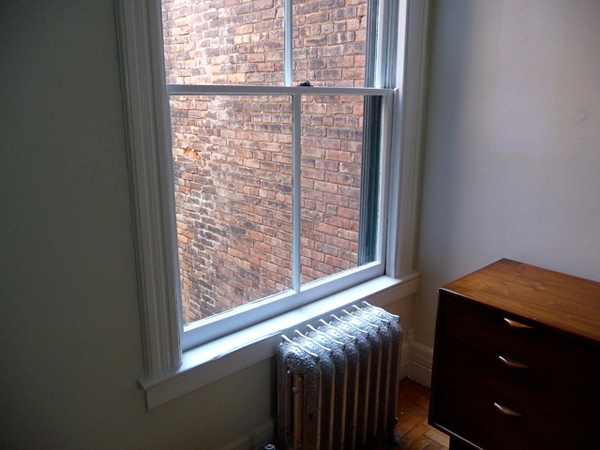
Yeah, it was looking pretty funky. Click to enlarge . . . if you dare!
I wanted to share these detailed “before” pictures to give an idea of just how bad an old sash window can LOOK while still being perfectly salvageable. It makes me sad that so many buyers of old houses will immediately have the original windows ripped out and replaced! ALL of the 15 windows in our house are original, including nearly every pane of gorgeous, wavy glass. I consider the old windows an asset that add to the value of the house as an historic structure.
The parts that comprise a traditional sash window are incredibly simple, making them easy to repair. There are no plastic parts, no fragile bits to snap or break, the wood is old-growth and rock-solid, and if you take care of them, they truly will last for hundreds (!) of years. Replacement windows, on the other hand, seldom have a life span beyond 10-25 years. With proper insulation and a good storm window in place, old windows are very nearly as energy-efficient as new ones, too. We have seen a HUGE difference in our energy costs since I started repairing the windows last summer.
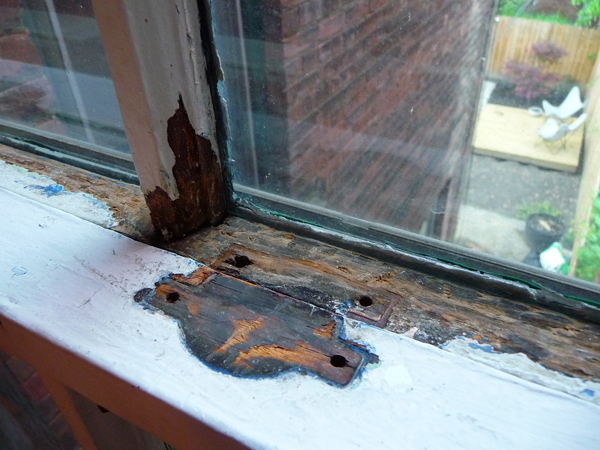
I won’t bore you with a bunch of “during” shots, but i wanted to share this one so you can see what a huge improvement just removing all of the gunked-up old caulk and peeling paint can make. It’s tedious work, to be sure, but it’s also very satisfying.
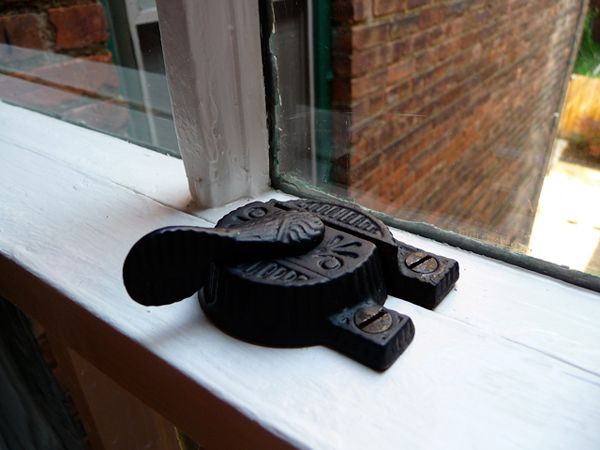

Here’s the finished window! Amazing difference, right? Eventually I’ll have to access it from the outside to properly insulate around the frame (and to repaint the exterior side, which is a whole OTHER project), but for now, it’s like a new (old) window.
There are so many resources on the internet for learning how to restore old windows, so I don’t see the point in getting TOO in-depth with the details here, but I will give you a list of links to check out if you’re interested:
→ How to Restore Sash Windows
→ Making Old Windows Energy Efficient
→ Fixing Rotted Wood with Epoxy
→ The Repair of Historic Wooden Windows
→ How to Replace Window Sash Cords (video)
→ Sash Repair Hardware


61 Comments
Do I spy an unstained deck through that windw??? 8^)
SIGH. Yes, you do, and if it would STOP RAINING for more than two days at a stretch, I’d go out here and do something about it!!!
Get off my back, you. 😉
Congratulations on the beautiful window job. I will be very excited also to see the deck in all its dark stained glory when you finish it. We also have had terrible torrential rain in the Washington area. However, the other side of the problem is Cambridge, Mass. where storms all seem to pass our daughters yard by to the south.
Well, hot damn! That looks amazing! You are so inspiring 🙂
Seeing the finished product I can see how that was totally worth it.
AWESOME post!! we are in the process of rehabbing our house’s 1880 wavy glass windows, my husband is a carpenter so that helps 🙂 Looking forward to reading about your progress…
Thanks for promoting historic restoration!! say no to vinyl!!
Great job, Anna. I have been doing the same thing, too. Only one of our windows needs internals replaced (the pulley system is shot). But the wood repair kits on the market make it easy to fix even the most “gone” wood. We have glazing too replace, when it stops raining.
Oh, please check out our new screen door. We had to build one due to the very very tall front door we have… but it came out great!
http://cottageofstone.blogspot.com/2009/06/diy-build-your-own-screen-door.html
I love how these old windows function with the rope, pulley, and counterwieght. Your’s looks great, especially the hardware.
Question: how are you removing the old caulk and paint? Are you just scraping the loose bits, or are you taking it all down to the wood?
Anna,
Thanks for this! I love to share small (in size, not effort) projects. This inspires me to take on the hardware on our windows and cabinetry. Good luck with whatever’s next!
this makes me wish we hadn’t replaced the old (50ish years) windows in our house with vinyl ones.
though i don’t think anyone was up to the task of repairing them.
sigh.
You always do such fantastic and painstakingly detailed work. Amazing!
Do you think it’s worth the effort on 1960s wood windows…with no glorious wavy windows or rope pulley system? Ours look to have been painted, oh, about a hundred times and the springs don’t hold the sashes up when we open them…
Thanks for the links and images (your sash locks are beautiful).
Of the 13 sash windows in our house, only two have been replaced. The rest are original (c. 1914), with chain pulleys and slightly wavy glass. My guess is the two “new” windows were probably installed sometime in the 80s. Unfortunately, they are in the front bedroom (ours), and are easily the LEAST efficient windows in the house (not to mention the ugliest)!
Thank you (thank you, thank you!) for this post. We have 25 80-year-old windows in our home that are all on their way to being a century old if I have anything to say about it. They absolutely add to the charm of the home but need a little TLC – so thank you for the links, resources and inspiration. Right now we have metal stormer windows but I would like to replace them with wood storm windows for curb appeal.
Anna,
Great Post. Been doing the same over on my house. On the ones I’ve finished, I reglazed and fix wood, with the storm in place there was no draft this past winter. (I also caulked around where the trim meets the wall – interior/exterior.)
I see you had one comment about parts being broken. Try here for replacement parts or just the sash cord/chain. http://www.kilianhardware.com/index.html
So inspiring! Isn’t that the best feeling to have it done right?
How did you get the window lock so tidy?
AMAZING. I wish I had an old window to save…
THANK YOU for the links!
Thank you! Ever since you showed your fabulous dining room window, I have been hoping you would do a post about your inspiring window repairs! Can I ask how long repairing a window takes you? I’m juggling home improvement with a new baby, so time is a precious commodity. Your answer will help me decide whether to tackle this this summer or wait until the kiddo is a little older.
WOW! you’re seriously amazing!
I’ve been following your blog for a while now and always find your renovations inspiring. Our original windows are long gone (and replaced with cheap crap that already needs to be replaced).
You’ve done such a nice job with your house!! This window is no exception.
puck: Wow, your screen door looks great!! I’m really impressed – that’s way beyond my skill level! (Or at least my patience level…)
Chelsea: I always remove ALL of the caulk because it’s so dry and brittle and globbed on all over the place, but if the paint is firmly bonded to the wood, I don’t scrape it all the way off. I only remove what’s loose/peeling/flaking. I do sand everything really well, though (after wood filler and/or epoxy have been applied), and use a good primer (Zinsser Bulls Eye 123) prior to re-caulking and painting.
LeilaMac: I don’t know enough about the mechanics of spring-sash windows or the quality of mid-century matierals to know if they’re worth saving. I think you’d also need to consider whether they are complementary to your house – are they original?
kim de montreal: I use the crock pot method to strip the paint from hardware, then give it a coat of Rust-Oleum Rust Reformer to bring back the black color and stop any rusting.
ej718: It really depends on the size of the window and the amount of repair work it needs, but if there’s no rotted wood anywhere, I can do the entire window in a 3-day weekend. If there’s rot or broken sash cords, I need to add an extra day. Keep in mind, though, a lot of that time is just spent waiting for paint to dry between coats – so it’s not all-consuming! 🙂
Oh, is this post timely! I’m getting ready to buy a 1920s fixer-upper and am resisting going the replacement route. The windows are in terrible shape and I think it will fall to me to fix them. I think our money is going to be spent on bigger things than the windows, so fixing them is going to be our most cost effective option.
If you want to see it, I’ve blogged a bit about it. I’ll be starting a new one, once the house actually closes.
http://nestingpair.blogspot.com/2009/02/i-think-im-in-love.html
That’s some fine looking window work. Here’s a link to more on window restoration and maintenance:
http://historichomeworks.com/forum/viewforum.php?f=16
John
http://www.HistoricHomeWorks.com
I am just about to start this job at our place and I can see it will take ages. Your results are great. Thanks for the links!
great job! it always amazes me when i see the types of things people choose to cover with paint, including your beautiful window locks. i went through a similar experience with some door hardware. click below to see: http://superette.blogspot.com/2009/04/more-stripping.html
Oh Anna, as a faithful reader I have to say that you never fail to inspire me! This is fabulous work! We have 14 original windows in our 1920 house and I just put in the order for replacements today- you are definitely making me heartsick! My only comfort is that I have someone who plans to salvage our old windows to build a greenhouse, so at least they are going to be used! Fabulous work!
You did an amazing job! I agree that it’s worth the extra effort to salvage original features of a house.
What a timely post. I just moved in to a house built in 1919 and the windows have been painted shut plus the rope on them has either been cut off or painted to the wood. It’s awful. We were thinking we’d have to replace them and I so didn’t want to go there. THanks for the great links on how to fix my windows, we won’t be dropping $350 a pop for over 25 windows now!
Wow. We have 22 windows in our dear old house and it completely overwhelms to think of re-doing them. But I will say I am looking at them in a different way now. Maybe a smidgen more appreciative of them. A smidgen. They are mostly painted shut, some rotten and leaky, all are in need of a good paint job. I may get in trouble here but I would replace them with vinyl in a heartbeat. I dream of light windows I can wash without a ladder, open to feel a breeze and not need to be painted. Ever. I know now I am not a project person so I wouldn’t go the fixer-upper route again but I sure respect those that have the patience and energy to do it! Your work is beautiful!
I forgot to ask… Will you be posting pics of your new haircut?? 🙂
I’m trying to sell my house right now and some of the windows look like your befores here. Many of the potential buyers who have come through are wary simply becuase they think the house needs new windows and the cost of that seeems prohibitive. I wish I could send this to them to show them that they don’t need to be replaced, only refurbished – and you can do it yourself!
you are just too clever.
Those are useful links, thanks. I have to do a bit of repair work this summer.
I agree about those beautiful windows. They are truly irreplaceable. The last house we lived in was built in 1930 and the windows were all original. They did not all work and I regret now not ever trying to fix them. Great job on the restoration.
Thank you for posting this along with the resources! We are buying an old 1920’s bungalow with almost all original windows, but hardly any of them open. I honestly thought we would have to slowly replace them all, but you gave me hope to restore the originals. Thank you!!
Another job well done! Have a good weekend. Try to get some rest?
Wow, what a difference! Looks so fresh and clean now.
oh this makes my heart sing. i work in preservation and sustainability for my city and it just drives me nuts when people don’t hold on to these awesome old windows. they are the eyes of the house, so changing them really changes everything. plus the embodied energy is significant and there really is no way that new windows can match the quality of old- both in craftsmanship and wood quality. if you restore your old ones, get good storm windows and take care of them you will be way ahead of the game- keep the character, and have windows that match or beat the energy ratings of cheapo vinyl ones too.
so, a big high five to you and congrats on a job well done.
big difference! Really looks wonderful!
…and yes I did notice the slots in the screws lined up!
(No deck staining this weekend I’m sure! Curse this rain!!!)
There are a lot of things about your blog that make it one I like to check up on frequently. You are a DIY kind of girl in all ways so; this last post pointed out that no matter what you photograph it looks great….good job
Best
Cindy
Hi Anna..
RE: I hope I am commenting in the right place.
Anyway, I live right in Woodstock, and if you would like to trade your Heywood-Wakefield Dresser.. I would be willing to make a trade.
I have some nice pieces that are a little more antiquey.. i.e. dark wood..
Amy
I found a “Robin Day by John Stewart Inc for Hille of London Arm Chair from 1967” on a flee market and have done a chair makeover! Thought you might like it.
Thanks for never ending inspiration.
Love Nina T O D A Y
you are so ambitious! i need to do that to my windows so bad. are you ever lazy? 🙂 love your blog.
I love to see your progress. It is so satisfying to live vicariously through you. I need to buy a house or redo our apartment so I can start working on more renovation projects. You really are an inspiration.
Keep up the fabulous work!
m
Looks great Anna. Love that hardware. They remind me of our door hinges. I love how they made even the most functional of items beautiful back then. Question: how do you protect yourself from possible lead paint hazards when you are removing paint, especially when sanding?
You are a lifesaver Anna! I wondered how you made your window look so good. Here’s a photo of our demo work on a window that we just started to repair!
http://www.flickr.com/photos/joeyandlaurenbradshaw/3623239453/
congrats on the great window job! you make a great case for preservation of windows and while it’s work, it’s worthwhile work.
Beautiful work – and painstaking too!! THANK YOU for keeping the original windows. I’m always so sad when I see a historic building with new glass. There’s so much more character (and quality) in the original. Your results are great!
ahh, great job! i’m working on becoming a little handier…
ps. i gave you an award over at my blog becauase you’re so inspirational, thank you!
Hi Anna,
Just wanted to let you know that I’ve included you in my blog awards! Check it out:
http://swankydigs.blogspot.com/2009/06/thanks-peeps.html
Love your blog!
ok lady. you could totally start your renovation/decoration biz. everytime i come here for a new post, i leave with my jaws dropped. am so impressed with your diy!!
I totally agree about saving old windows when possible. My house is 200+ years old and I love the wavy glass. As the saying goes…they just don’t make them like they used to. (Seeing vinyl windows on an old house makes me cringe!)
I wish my house had it’s windows. We got it after the aluminum window people had come through, and so had to replace the replacements. I love wavy glass. Very nice hardware- window jewelry!
I’m not sure if all of your readers are aware of the fact that often the top most pane of glass can be pulled down as well. I’ve met so many people that think that this means that their window is broken. Not so! It’s a clever cross ventilation device that I think Thomas Jefferson can be credited for (that may be hearsay). If your top most pane hasn’t been painted shut you should try pulling the top pane down 6 inches and pushing the bottom pane up 6 inches. Turns out windows from the industrial age are surprisingly eco friendly.
Hi Anna,
Congrats on your Project!!
GREEN is not Filling our Landfill with Good Working Wood Sash Units!! In FACT, Why Replace Windows, when you can “FIX Them” for a Fraction of the cost. 90% of Old windows are just in need of a Tune Up due to Wear & Tear.
Quaker City Manufacturing has helped FIX over 40 Million Satisfied Window Owners, throughout North America since 1958! Average cost to fix a window, is $34.99 & about hour of your time. Typically, wood windows made before about 1940 are built with old growth wood. The tight grain of old growth wood makes them far more durable and rot resistant than newer wood. An energy audit company estimated that if they spent $12,000 replacing their windows, they would save $600 a year. However, that means it would be 20 years before they started to recoup what they spent to replace the windows. And chances are, in 20 years or less, those new windows would need to be replaced by new windows. Some calculations have shown that it can take as much as 240 years to recoup in energy saving what was spent on installing new windows. Weatherproofing the original windows is a much better — and much greener — approach. GREAT JOB!!
http://www.windowrenu.com
Anna,
1 word: BRAVO!You did a fantastic job with this renovation.
Did you used the Abastron epoxy product listed in one of the weblink?
Also is the sash window hardware you use in your upstairs bathroom (http://www.flickr.com/photos/doorsixteen/2621404671/in/set-72157610631284298/) from rejuvenation. Just asking b/c they look different (the one on your flickr pic is ‘flatter’.
Again congrats for a great job!
Greg: This window didn’t have any rot, so I did not need to use any epoxy. When I do need epoxy, I normally use 2-part Bondo made for wood restoration.
The sash lock in my upstairs bathroom is from Home Depot and cost about $2. 🙂 The lock on this window is original to the house.
Hi Anna,
For the chrome one: $2.38 at HD vs. $15 at Rejuvenation…
However, Rejuvenation has a’vintage’ cast iron sash lock (Eastlake Sash Lock) for only $4.
Go figure…
Thank you so much for your inspiring work.
Hi,
This is my new favorite blog as of this second when I saw the window and read the text you wrote to go along! I’m as into repairing and salvage but do it with furniture, mostly. Thanks for all the info you included for my future use-I hope. ~Colleen