

I’ll be honest—I feel kind of weird posting about anything right now. We’re in the midst of a global pandemic, and I guess that makes everything feel weird? I did my nails yesterday, and I took some photos and figured it’s a good time to write a post about doing your own gel manicures at home. I mean, since we’re being told to stay home as much as possible and avoid close-contact environments…I guess it’s timely? Ugh.
Anyway, let’s just pretend everything is normal and fine and talk about manicures for a little while, and then we can go back to worrying. Yes? OK.
I used to get gel manicures every month or two in New York, where there are abundant salons offering $30 gel mani/pedi combos for walk-ins. Even in Albuquerque it was pretty easy (though not as inexpensive) to find a decent salon. In Santa Fe, though, it’s another story. I tried numerous nail salons with dubious reviews (none of the places with better reviews are accepting new clients) and the result was a series of really abysmal, overpriced gel manicures, and damaged natural nails. So about a year and a half ago, I decided I start doing them myself.

Why gel manicures, you ask? Well, I have naturally soft nails. They’re not unhealthy, they’re just soft—and they’ve been like this my whole life. Regular polish manicures only last beyond a day or two on me before they start chipping, and even then, the care I have to take to protect my manicure really isn’t worth it. I’m hard on my nails! I’m always doing stuff with my hands, and it often involves dirt or food or construction. I don’t want to baby them. Yes, I have to take some precautions to protect a gel manicure, but they’re much more durable—plus, they protect my natural nails and keep them from tearing or splitting. And I feel better about myself when my nails look nice!

I’d noticed that I seem to get the most durable gel manicure results when salons use Gelish products, so that’s what I sought out when I decided to invest in a starter kit. If you want to buy off their site, you have to be a licensed nail tech, so I checked at my local Sally Beauty and sure enough, they carry Gelish products. I wound up buying the Gelish Mini Complete Starter Kit. It seemed pricey up front, but it paid for itself after only three manicures, so…I think it’s worth it.
(Amazon and Overstock list the kit, too, and there’s also someone selling it on eBay. I’m a little wary of buying discounted beauty products from resellers I’m not familiar with, though, but I might be being overly-cautious. Or maybe not!)

There are already a ton of YouTube videos demonstrating how to correctly apply gel (and I’m not talented enough to make a better one), but I think it could be useful to go through what products you’ll need to have on hand to do your own gel manicure, and some things to keep in mind along the way. I’m mostly definitely NOT a professional nail tech, but I have had a lot of experience getting gel manicures, and I’ve always paid attention to what the techs are doing—and made mental notes about what produces the best-looking and longest-lasting results.
The first thing you’re going to need to have on hand to do a gel manicure is TIME. This isn’t a process that you can stop midway and come back to later. Even to pee. So take care of whatever you need to beforehand, put something on Netflix, and think of the time as though you’re going to the salon and will be inaccessible. It takes me about an hour from start to finish now (excluding removal of the old gel manicure—something I’ll get into in a future post—UPDATE: Here’s my post about how to safely remove your gel polish at home), but the first few times, it was more like two solid hours. On the upside, once you’re done, you’re done! There’s ZERO drying time, which is awesome.
Supplies:
✚ Gelish Mini Complete Starter Kit
(Or comparable products; as long as you have at minimum a pH bond solution, base polish, color polish, top coat, surface cleanser, and an LED light. Don’t be afraid to buy a starter kit, though—you can always replace components individually as they run out!)
✚ cuticle remover
✚ cuticle pusher
✚ cuticle nippers
✚ fine grit nail file
✚ polish clean-up brush
✚ lint-free nail wipes, or paper towel cut into small squares
Really, any brand is fine for things like nail files and cuticle pushers and stuff. I’m just linking to the type I personally like so you know what I’m talking about when I refer to different tools. I do highly recommend the Sally Hansen Instant Cuticle Remover, though! It’s never caused me any irritation, and it does a great job of loosening any bits of cuticle that might be stuck to your nail bed.

Prep:
Just like when you’re painting a room, prep is critical when painting your nails. Failure to properly prepare your nails for gel polish will lead to a manicure that looks cruddy and starts to lift or chip.
Start by removing ALL traces of nail polish, then clip your nails as needed. Use a fine-grit file to shape edges and tip to your desired shape (I’m a rounded or almond-shaped kind of gal, myself), making sure there are no rough or frayed spots anywhere.
Apply cuticle remover everywhere skin meets nail. Despite its name, cuticle remover doesn’t actually remove your cuticles! It just softens and loosens the hardened, dead bits of cuticle stuck to your nail bed, making it possible to easily push your cuticles back. I like to use a metal cuticle pusher because it requires very little pressure, but if you’re worried about damage, a wooden orange stick is fine. Once your cuticles are pushed back, wipe off any excess remover, and use your cuticle nippers to snip off any hangnails, flaky bits of skin, or anything that looks…dead. DO NOT CUT OFF YOUR CUTICLES. I can’t stress this enough. I don’t know why so many salons insist on doing this, but it’s a bad move in the long run. You risk leaving your cuticle/matrix area open to infection, and when your cuticles regrow, it’s highly likely that they won’t be smooth or even.
Finally, wash your hands really well with soap and water (feel free to refer to a WHO poster for techniques) and dry thoroughly.
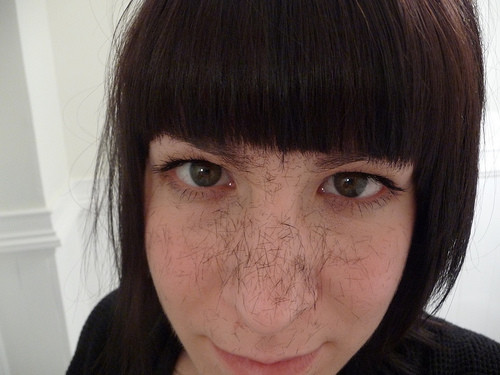
The last prep step is to clean the entire nail bed using a lint-free wipe and your Nail Surface Cleanse (included in kit). This is to remove any traces of dust, lint, and oil from your nails, so your gel products will adhere properly. They’ll look a little dehydrated (just like my nails do in the picture above), but that’s OK. It’s important that there are no oils present!
Foundation:
Brush a quick coat of pH Bond (included in kit) over each nail, including the free edge. You don’t have to be super careful with this—it’s really just to bring your nails to the correct pH level for proper gel adhesion.
Now it’s time for the fun stuff! Brush a THIN coat of Foundation (included in kit) over each nail, making sure to cap the free edge. I like to do the free edge first, then the rest of the nail. Be really really really careful to coat your entire nail, all the way to the edges—but don’t get any of the foundation on your cuticles. That’s important. If you get any polish on your skin, it’s going to make your manicure fail faster (and it’s going to look bad, and it’ll dry out your cuticles). Go slow. Remember, gel polish doesn’t dry until you cure it under your LED light, so you have plenty of time to be careful and get it right. If you do get any on your skin, though, just use your clean-up brush dipped in a bit of Nail Surface Cleanse to remove it—BEFORE you cure it. Once the polish has been cured, you won’t be able to do ANY cleanup.
The most common and easiest way to do a gel manicure without making a mess is to do four fingers on one hand; cure; four fingers on the other hand; cure; both thumbs; cure. So once you’ve done the first four fingers, stick ’em in the LED light (included in kit)! It’ll automatically shut off after 45 seconds. Then repeat on the other hand, and then both thumbs.
DO NOT TOUCH YOUR NAILS. DO NOT TOUCH ANYTHING WITH YOUR NAILS. Examine them for any bits of lint, etc., before going further. If you spot a little fuzz, carefully remove it with your cuticle nippers. Gel polish stays tacky until the last step, so it’s very easy to wind up with a bunch of lint stuck to them if you’re not super careful.

Color:
Apply your color coat in exactly the same way, curing in a 4/4/2 rotation as you go. In most cases you’ll want to apply two coats of color, but every now and then you might want to do a third coat with a sheer shade to give it a little more opacity. As long as you have 2-3 coats, you’re good. Keep the coats THIN. Thick gel polish looks bad, and it doesn’t cure properly.
Be sure you cure after each coat. Remember, this isn’t regular nail polish. You can’t just keep adding more coats! You need to cure, and then apply another layer.
The kit comes with a sparkly red and a bubble gum pink polish, which I do use occasionally, but I also bought two mini Gelish shades separately to round out my color options. One is a sheer pinkish-neutral called “Barely Buff” (not on their website, but available in-store), and the other is plain old black (“Black Shadow“). I tend to keep my at-home gel manicures on the minimalist side, so four colors is really enough for me to choose from.
Any “designs” I do are usually just dots. If you want to try (it’s easy, I promise), just put a drop of your accent color of choice on a little piece of foil, then use a toothpick to pick up the tiniest amount and dab it on your nail. You’ll need less than you think! Just a speck. I like to do a double cure (90 seconds) after any designs are added, because they tend to be a little thicker than a regular coat.

Top It Off:
After you’re done adding color, it’s time for a finishing topcoat! Again, the key using Top It Off (included in kit) is to cover the entire nail, cap the free edge, and avoid the cuticles. Go slow. Keep it thin, but make sure you’re getting coverage. When you’re sure everything is perfect, do one last cure. Acutally, make it two last cures. I feel like a little extra time at the end can’t hurt, and it helps to make sure everything is really well-cured.
Finishing Touches:
Gel manicures retain a “tacky” layer that evaporates to the top during the curing process, and it’s necessary to remove that layer when you’re 100% completely done with ALL of the curing. Just like you did at the beginning of your manicure, use a lint-free wipe and Nail Surface Cleanse to completely remove the tacky layer. (Whatever you do, though, don’t be tempted to remove the tacky layers between coats! If you do, the next coat won’t adhere properly, and you’ll be sad. Wait until you’re all done.)
Finally, finish off your fresh gel manicure by coating your cuticles with cuticle oil! The Gelish Mini Complete Starter Kit comes with a nice one, but again, any brand is fine. You’ll want to keep using cuticle oil as often as you can going forward! It keeps your nails looking healthy, and for reasons I don’t understand, it really does seem to make gel manicures last longer.
That’s it!! You can expect to get at least 10 days of solid wear out of your gel manicure, assuming you wear gloves when you wash dishes and use cleaning products and stuff like that. I can usually stretch it to two weeks, and then I need to remove the gel (a separate process that I’ll have to save for a future post—UPDATE: Here’s my post about how to safely remove your gel polish at home) and do a fresh manicure. (Sometimes I cheat and do a touch-up/refresh, but that’s yet another process that’s going to require its own post!)
Other Notes:
By the way, I should mention the issue of exposure to UVA light, which is emitted by both UV and LED nail-curing lights (LED lights expose you to less, though, because the curing time is much shorter). You can apply sunscreen to your hands before your manicure, but it’s really important to remove it completely from the nail bed itself (using Nail Surface Cleanse and a lint-free cloth) before you start applying any gel polish. If you don’t, your manicure will fail. If you want to play it a little safer, there are UV-blocking gloves that will protect all but the tips of your fingers. Keep in the mind, though, that one manicure is exposing your hands to less UVA light than going outside for a walk on a sunny day—or driving in your car with your hands on the steering wheel, for example. Most of us are probably not great about applying sunscreen to our hands regularly, especially when we’re washing them 300 times a day.
(Be safe out there, everyone. For your own sake and for the health of everyone around you!)
13 Comments
Have you ever tried SNS dip? I do that now instead of Gellish. Super robust and easier on my nails.
I haven’t done it at home, but I have had it done in salons. I don’t notice any difference in the longevity or the effect on my natural nails, but I’m sure body chemistry plays a role in that kind of thing!
I’d love to know what the best way is to take it off or change it! I was going to a salon for so long but need to save $$$!
I’ll be writing a removal post as soon as it’s time to take my current manicure off! Probably next week. 😉
Fantastic post, Anna. Great read while awaiting our Prime Minister’s Covid-19 announcement! FYI….borders now closed to non Canadians with the exception of our American neighbours.
I totally get why it seems weird to post about normal stuff right now, but this is a great break from the news. I’ve read your blog for ages and while I don’t kid myself that I know you personally, it’s still reassuring to have that continuity and to get that little snapshot of someone’s world. Especially when so many of us are at home on our own.
Apparently this thing is actually miraculous for removing gel nail polish:
https://www.amazon.com/gp/product/B07N7B82SB/
Also I think people need non-COVID-19 related content, even if it feels weird to put it out!
WHOA. I’m really curious! I’m going to have to save some pennies.
What does “cap the free edge” mean?
It just means to use the tip of the brush to coat the free edge (the part that’s not touching skin) of your nail with polish. This helps seal the edge nicely.
Looking forward to a post about touch ups/refreshing!
Thank you for the detailed instructions. I just got my starter kit in the mail today and did a manicure this evening. It looks better than I would have guessed!
WOO HOO!! It’s pretty fun, isn’t it?