
After our yellow stools arrived, Evan and I moved our kitchen island—the GROLAND from IKEA, which we’ve had pushed up against a side wall in the kitchen for the past 7 years—to the center of the room, which is where we’ve been planning to put it if/when we eventually buy the world’s cutest refrigerator. As soon as we moved it into place, though, we know it wasn’t right. It looked so tiny! Our kitchen is a very decent size for an old house (about 12×12′), but between the three doorways, two huge windows and the hearth, there’s not a lot of usable wall space. The center of the room is very important, but because the ceiling is so high (11′), anything we put there tends to look a little anemic. The yellow stools looked weirdly giant next to the GROLAND. It was just wrong.
So, we slid the island back against the side wall (which I guess makes it technically not an island but more of a peninsula) and decided we’d have to keep our eyes open for the right thing.
Lately we haven’t been doing a whole lot of thrifting and scavenging like we used to, but this past weekend I started feeling lucky and the bug hit me again in a BIG way. We spent all of Saturday driving around the Hudson Valley hitting up salvage/antique/junk shops in secret locations, but everything was either closed or devoid of anything we were interested in. Later in the afternoon, resigned to just having lunch and heading home again, we happened to wander into a mysterious-looking store we’d never noticed before with nothing on the sign out front but an engraving of an eyeball: Alms & Terra.
We weren’t even really looking for a kitchen island at that point, but there it was: A beautiful old work table that had probably spent the past 70 years in someone’s basement workshop, all beat-up wood and steel legs. Perfect. We checked the measurements to make sure it would be big enough (again, perfect), and made up our minds to bring it home with us after about 15 seconds of deliberation.
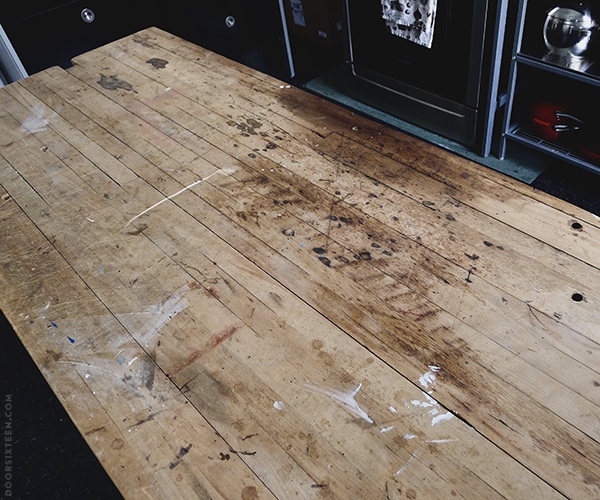
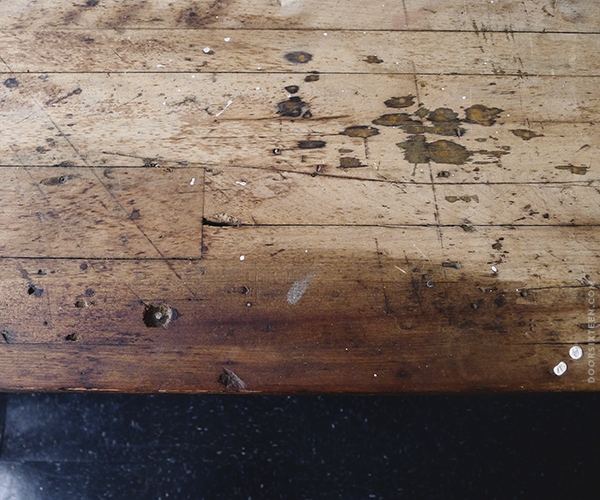
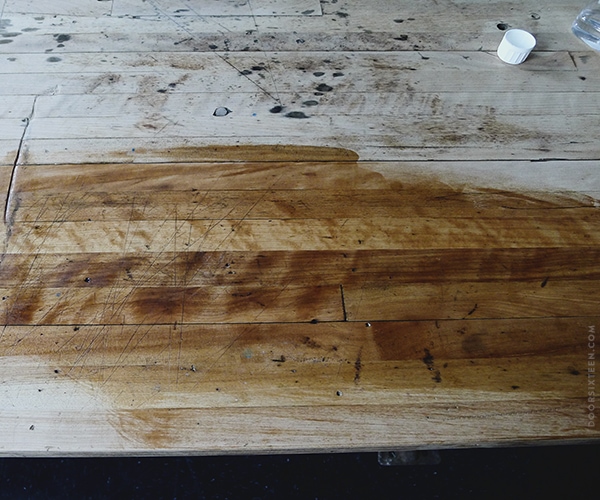
Now, I know there’s bound to be one person who’s going to see these photos and start crying about how the table was better before I fixed it up, but I’m here to tell that person: No. You’re wrong. Look, there’s patina and then there’s “patina.” The former is the loveliness that age imparts on something over the course of time and use, and the latter is a euphemism for “grungy and greasy and paint-spattered and about to fill your hands with splinters.” This table, while certainly very lovely, was closer to having a “patina” than having a patina. It needed work. Not much, but some.
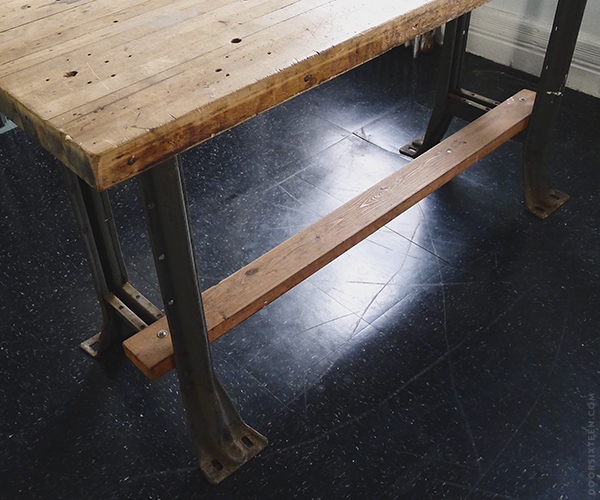
I love the legs. They’re painted a battleship gray color that I’m OK with, but they’re pretty rusty—past the point of what can be cleaned up with steel wool. Since this is going in a kitchen, I think it’s best to give the legs a nice finish. It’s too cold outside to do much about it now, but when it warms up in springtime I’ll give them a good scrubbing, a rust-proofing treatment and a couple of coats of matte black Rust-Oleum. They’ll look great.
I’m also going to take that 2×4 off the bottom and make a deeper, functional shelf to put in its place. It’ll be a good spot to have some baskets for storing placemats and candles and stuff like that.
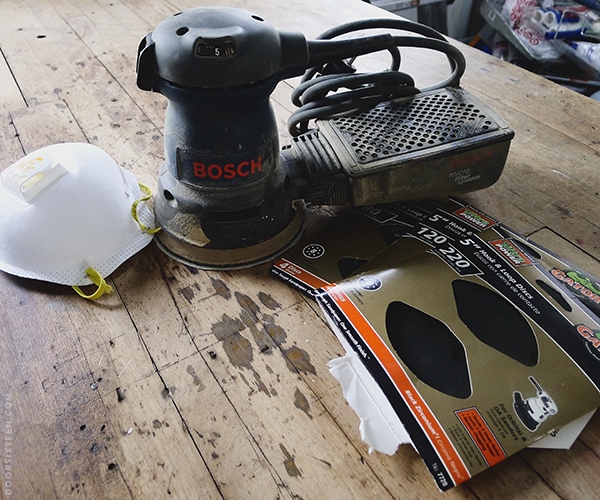
Dust mask, random orbit sander, sandpaper. I know renting tools is a great option for people who just work on occasional home projects, but when you own an old house that you’re going to be working on for at least a decade or two, buying the things you’ll be using all the time makes much more sense. We’ve had a Bosch random orbit sander (they don’t make the exact model we have anymore, but this one is very similar) for about five years, and I use it constantly. Random orbit sanders spin while moving elliptically, so you don’t get swirl marks etched in your wood. You also don’t have to worry about sanding against the grain. You can’t do super-detailed work (I use my Mouse sander for that), but for big blocks of wood like tabletops, doors and floorboards, they’re great.
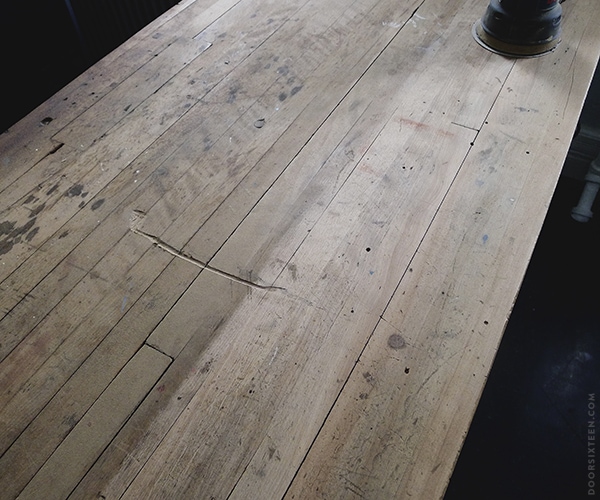
I started off doing a first pass with 80-grit sandpaper (the lower the number, the coarser the grit), then followed with two passes at 120-grit, and a finished with at least four passes at 220-grit (very fine). I just kept going until the surface of the table felt velvety-smooth. I had to spent some extra time on the areas with a lot of grease staining, but in all the entire sanding process took less than 30 minutes.*
*Excluding cleanup time, of course, which added on another two hours. If you’ve ever power-sanded anything indoors before, you know exactly what I’m talking about.
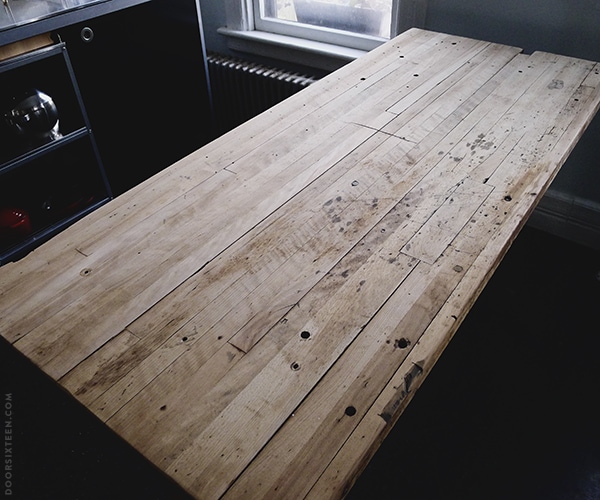
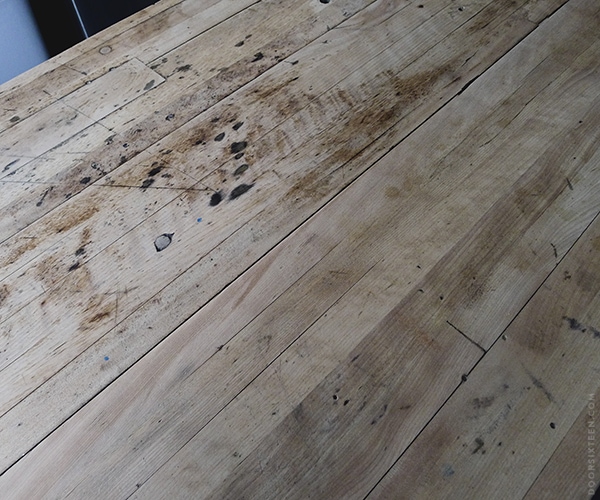
Pretty nice, yeah? The deeper stains (burns, etc.) didn’t come out, but that’s OK. All of the paint smears, grease stains and other unpleasantries took a hike, and that’s the stuff I don’t want in my kitchen. I’m no expert when it comes to identifying wood types, but based on the hardness of the wood and its smoothness post-sanding, I’m pretty certain this is maple.
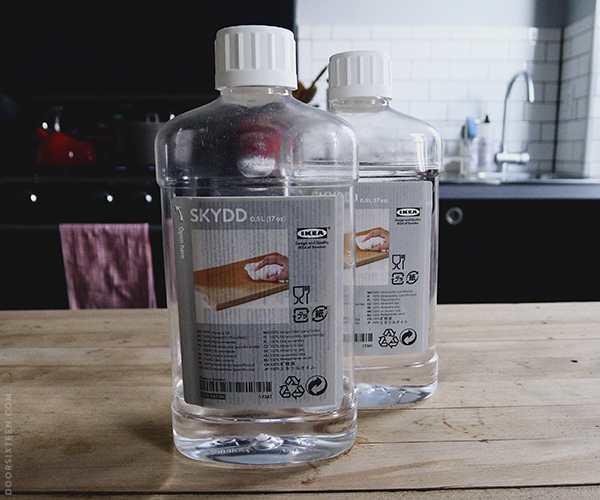
I’m not really planning to use this work table as a cutting surface because there are so many crevices that would be a huge pain to keep clean, and I have enough cutting boards and other areas of the kitchen to work directly on already. Even so, I wanted to finish the table with something food-safe. There are at least a dozen schools of thought on how best to finish wood surfaces in kitchens, and aside from the two most basic rules—don’t use anything that’s toxic to consume, and don’t use any food oils that can turn rancid—they’re all correct. For a long time I regularly treated all of my wood cutting boards, spoons, counters and salad bowls with John Boos Mystery Oil, until I realized I was paying $10+ for a small bottle of what was basically just mineral oil with some linseed and orange oils added in. I have way too much wood stuff for that to be cost-effective. SKYDD oil from IKEA is half the price—it’s just pure, food grade white mineral oil. I’ve been using it for years now, and it’s great, cheap stuff.
When I have a really thirsty/dry piece of wood, especially something that’s just been sanded, I like to “bathe” it in oil until it can’t absorb any more. I used about 10oz of mineral oil on this table initially, and I’ll repeat the application weekly for the next month or so. I just pour it on, use an old t-shirt to spread it around, and leave it alone for a few hours or overnight. Any excess is easy to just wipe off, and the finish isn’t greasy or anything like that. I’ve never felt the need to wax my kitchen wood, but some people like to—it’s all just personal preference. I like mineral oil because it’s cheap, easy and it keeps the wood protected from water/dryness and looking good. It’s also non-combustible and odorless, which is nice.
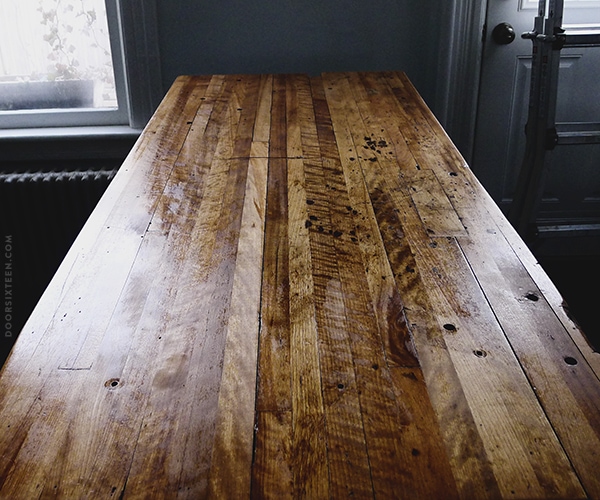
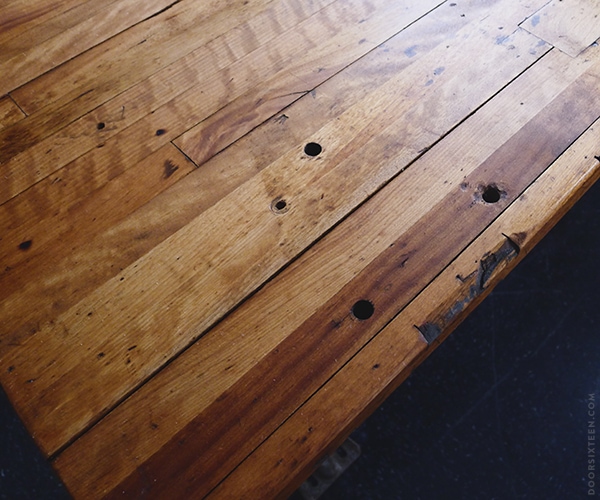
Oh, yeahhhhhh. Immediately post-oiling (top), and about two hours later. See how nice and matte the finish looks once the oil sinks in? I can’t stop touching the table. I love it so so so so so so so much. SO MUCH. This is exactly what I had envisioned having as a kitchen island. It’s going to be so great having that much prep area when I’m cooking, not to mention having a spot to sit for breakfast and coffee in the mornings. And now when we have guests over for dinner they’ll have to place to put their wine down and eat snacks while they’re hovering over my cooking!
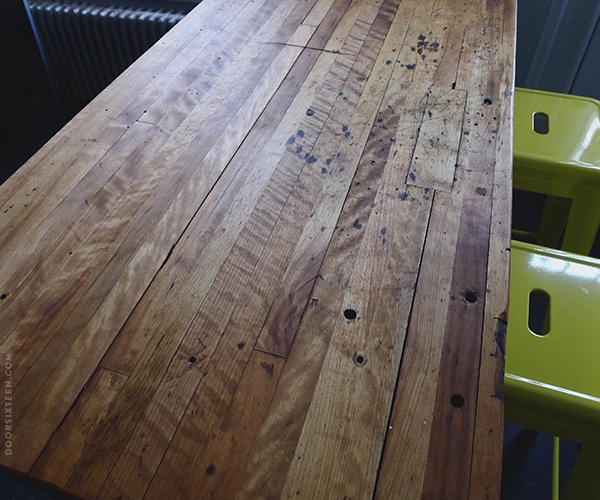
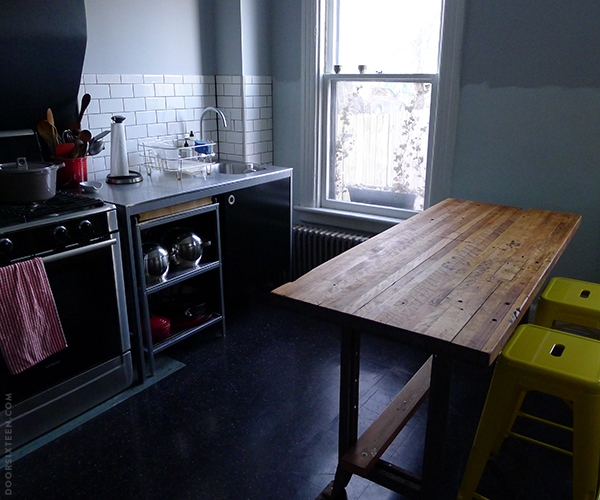
I’m very happy with how the kitchen is coming along. Now that everything is painted, wallpapering the side wall (opposite the stove) is next. In the spring the radiators will be removed and sandblasted, powder coated and re-plumbed, and I’ll finally be able to finish the tiling while they’re out. We’re also going to have to think about replacing the floor at the same time for a couple of reasons—but I’ll save that for another post. (Spoiler alert: It involves a secretly-leaking refrigerator…and insects. Sadface.) Our shelving will be delivered any day now, so I’ll finally be able to put the dishes away and put out food in the pantry…exciting stuff. Moving right along!!
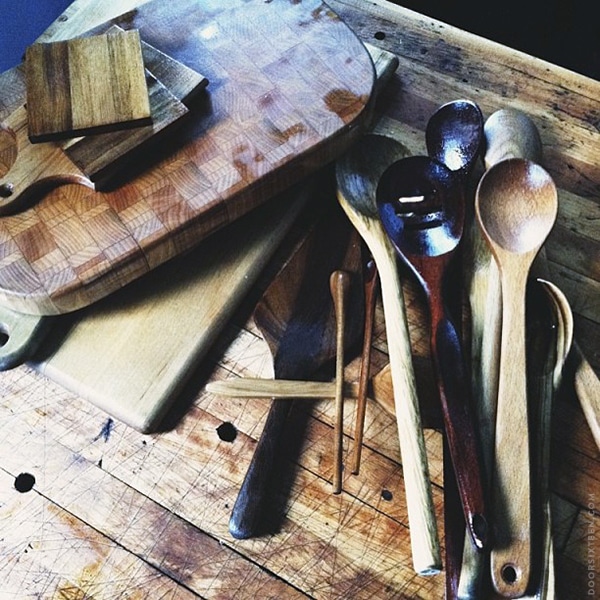
Bonus shot! Since my hands were already covered with oil, I decided to give every piece of wood in my kitchen a deep oiling. So satisfying.


109 Comments
The table looks SO GOOD. When you first posted a snapshot of the original table I was really worried about that oil stain (because it’s totally logical to worry about other people’s furniture, really) but you did a great job cleaning everything up. Love how your kitchen is coming together.
OMG IT’S SO PRETTY I’M GONNA THROW UP.
All of it is looking so, so great.
The wood IS good. I love that you were feeling lucky and then really did get lucky. You did an amazing job on it. I’m worried that your beautiful stools are too tall for its height though. Will it be okay?
jbhat
Nope, they’re counter-height stool, so they’re exactly right. Maybe the photo makes them look too tall? Dunno, but they’re the height they should be, don’t worry.
ok, phew!
jbhat
Okay lady, you basically found my dream table. That’s exactly the type of work table I’m hoping to find for my kitchen reno. And for those who will cry about the “patina”… well, they’re not eating off it.
I might as well just give up and accept that my renovated kitchen is going to share a lot in common with yours… black grouted subway tiles, open shelving, and a big rustic work table. But hey, these Victorian houses just lend themselves so well to a particular look, don’t they?
that table is such a fantastic find! i’m also a big fan of oiling/waxing my wooden utensils, it’s so satisfying when the wood turn so smooth and velvety.
Well, I am just completely jealous! My husband and I have been on the hunt for the last 5 months or so for a gorgeous work table like this one you found. I know ours is out there somewhere…
Is the island in the middle of the room or against the window between the door and the window?
It looks great!
We’re keeping it where it is in these photos, so no, it won’t be up against a window.
I was dubious when I saw the unfinished table in your instagram, but you were totally right. It looks great — perfect.
Wow, wow, wow! Looks great!
Love the table. Where did you put the fridge? Personally I would like a small under the counter fridge for my 9 by 12 foot kitchen with two windows and two doors in it. I basically have no wall space. I think Americans buy way too big fridges — I have more cabinet space in my fridge than I do in my cabinets.
Off to oil my wooden spoons now. Cheers
I might be wrong but it could be a central heating thing–when I lived in the UK everywhere I lived was damned freezing…you could leave anything in a cupboard for that reason! Haha.
nice. so nice. that table must have been waiting for you at that store….
i also love that sensation of oiling “thirsty” wood. did you sand+oil the sides as well?
It looks amazing! nice work. I’m dying to do my front door – thanks for the inspiration!
PERFECTION!
And I have to thank you. I’m sitting here picturing how effing beautiful those legs are going to be in all their matte black glory when it hit me! I have this great bench made of a thick piece of REALLY OLD wood on top of this great rusty metal base. I’ve been hanging on to it for years, but it hasn’t really found its home with all our inherited mid century furniture. Um…until now, you’re a genius. I can’t wait to sand it down, oil the hell out of it, and give the legs a nice coat of matte black paint. Btw, what paint will you use?
Thanks again!
Kate, I like Rust-Oleum. There’s a link in the post the exact kind I use. 🙂 Have fun with your bench, it sounds great!!
Wow, wow, and more wow! The table is perfect to spend hours drinking Nespresso at.
such a great table and such a great post! I’m inspired.
one, first, i heart that table. seriously – any wood that is a little beat up with some character is a-okay in my book. and it looks perfect in your space. per. fect.
second, such a timely post as i’ve been wondering how best to oil some pieces i’ve found recently (yes, i can and do google but your advice is always extra reassuring!) yesterday, actually, i just picked up a gorgeous handmade wood chopping board at the thrift shop and a few weeks ago a handmade rolling pin – i *thought* they might be maple but now i’m pretty sure they are as it looks just like your table did after sanding (very light) and they’re extremely smooth…i’d describe them as velvety too. i love them but want them both a bit darker and have been wondering if staining then oiling would be the way…now i know just some oil will give it the colour i want. when i’m next at ikea will definitely pick up that oil.
awesome post.
It looks awesome! I personally don’t like using mineral oil, since it’s petroleum-based, but I know it’s the go-to for most people (and cheap). I found some stuff made of beeswax and carnauba wax, but it’s definitely more expensive ($13 for 10 oz) and I don’t have many wooden items that need food-grade oil.
My mother had an old farm table that was 100+ years old that had a similar sort of feel that this does. I wish I had room for it in my house, but she gave it to a family friend when she moved.
This table is downright gorgeous! Great find, and great job on the restoration.
Jaimie, I was thinking the exact same thing about mineral oil. What’s the beeswax and carnauba wax stuff you found, and where did you get it? Thanks!
It’s gorgeous and anyone who liked it better before is crazy. Besides, you probably sanded off god-knows-what that you didn’t want in your food.
That is simply GORGEOUS!
It looks amazing, Anna! I’m loving the mix of different materials! Beautiful!
omg! LOVE IT!!!!!
hope it’s not bad manners – but how much?
it’s perfect.
About the same price as a big kitchen island from IKEA.
Wow, just wow. It’s absolutely gorgeous and the perfect addition to your kitchen! Thanks for the inspiration!
Beautiful job! I love the rustic, industrial look with contemporary pieces. I really love your kitchen.
I can see why you love it so, so , so much! What a great find.
So beautiful and practical! Anna, you should seriously consider setting up a little decorating/renovating business. Anyway, if I had a house I’d let you renovate it… Have a great week!
In all of my spare time? 😉 In all seriousness, as much as I love working on my own house, I don’t really have a desire to work on other people’s. I’m a very, very slow renovator, and for me it’s all about the reward of getting to live in and with the fruit of my labors.
And that’s why I’m a graphic designer. 🙂
Bravo! It looks amazing. It really warms up the space beautifully.
It never occurred to me to oil my wooden spoons, but now I’m intrigued. I have always put them in the dishwasher though. Would that still be kosher post-oiling?
Well, it’s OK to put your wooden spoons in the dishwasher if you don’t care about them, but if you want them to last…you really need to handwash (using the bare minimum of detergent) and oil regularly. Dishwashers and wood are a bad combo.
Awesome new addition! It’s so so beautiful. Great lucky find!
OOH that table is gorgeous!!! I think your updates to it really helped bring out it’s beauty.
Fabulous!
xo Moorea
What a beauty!
What a great find. It came out gorgeous and really matches with what you have going on in your home already. The ReStore has tons of great stuff too.
PERFECT. OH WOW…OH WOW! The finnish you gave it is also perfect! Have you been sleeping at your house this week just to be able to pet it?! So sorry about the insects, and sorry you will have to remove this floor, I really liked it. I curious to see what is going to replace it though.
Very nice! A surface with a lot of character.
Keep in mind that mineral oil, while stable, is a laxative.
The amount of mineral oil that could conceivably wind up transferring from inside the countertop into any food I’d be preparing nearby would be miniscule at best. That’s really not a concern at all.
Hee.
I was thinking more of the spoons. I wasn’t trying to be alarmist, just wanted to share some info.
Oh, it’s OK! I’ve been using mineral oil on my spoons for about 18 years now, though, and really…it’s a non-issue. The amount of oil that transfers from within a spoon into your food is infinitesimal.
Looks great! I’m looking at the picture of the legs thinking “those look familiar” so I went into our basement to look at the workbench that came with the house and I think it’s the same one! Well it’s really two together to make it double the length. If I ever find myself needing a kitchen island more than a work bench, I now know where to look!
Love this table and project! I have oiling questions! I love the mineral oil from IKEA too. What do you do afterwards with the rag you use for oiling? Do you wash it? Toss it? For some reason I’ve always felt nervous about putting a rag soaked with mineral oil through the wash… So I’ve been using paper towels but sometimes they flake apart and it feels wasteful.
Gorgeous! The table really is perfect for that space.
As for food safe oils for wood, I was at a wood spoon making class last year and we mixed up a batch with a combination of mineral oil, beeswax, coconut oil, and a sprig of rosemary. the beeswax thickened it up which in turn feels like i use less/lasts longer. Just in case you are interested.
Olive oil is good, too:)
Actually, olive oil and other food oils (walnut oil being an exception) are not recommended for use on wood as they will go rancid as they oxidize.
ew! that’s nasty…guess I will pay for this sooner rather than later:(
It looks amazing! The carpenters working at our construction site better watch out…I’m going to be looking at their beat up work benches with different eyes now 😉
OMG this is freakin awesome! So jealous. Isn’t the best when you find that perfect piece!
Another fabulous detail in your kitchen, I really love how it is coming together.
I also wanted to thank you for the inspiration, each time I see your light grey walls I like them more and am now thinking something similar may work in my (rental) kitchen – I have wanted to paint the tobacco stained yellow/white walls since I moved in 2 years ago, but I haven’t as I knew white walls would make the tobacco stained white cabinets look even grungier, but a dark color wouldn’t work as the kitchen doesn’t get a lot of natural light. I think I might be going to my local home improvement store tomorrow!
Oooh, tobacco stains are the worst. 🙁 What are the cabinets made of? Maybe they can be cleaned with a special product?
I think if I were going to combine a gray with something that’s yellowed, I’d go for something on the warm side. The light gray I used in my kitchen (Filtered Shade) is very cool, and I’d worry it might make the cabinets look even MORE yellow. Just something to keep in mind.
Good luck!!
Thanks for that thought, I will get some samples before I buy a whole kitchen’s worth of paint!
The cabinets are Ikea and I have tried everything – from regular household cleaning products to lemon juice, to bicarbonate of soda and washing soda to magic sponge, to… I can’t even remember how many times I have tried cleaning them over the past 2 years, to no avail, the previous tenant was a serious smoker 🙁 If anyone has any amazing suggestions, I would love to hear them!
Sorry Louize, I was going to suggest a Magic Eraser if the surface wasn’t wood! They are only mostly-magical, I guess…I have yet to find anything they can’t get clean, they’re my secret weapon! Is painting the cabinets out of the equation?
Have you used Vim or Comet? Both are toxic but hopefully you’d only need to expose yourself once. I think that Magic Eraser is a sham! Grrrrr.
I disagree with anyone who would think that looked better before! It’s absolutely gorgeous, especially after adding the oil to it. I love making old things new again, so I really admire that you all do so much of the work yourselves.
I am freaking out about how amazing this looks. Like from a shelter magazine…in France or somethin!!!! It’s crazy to think that the table found its perfect owner after years of love and use from someone else who was forced to pass it on…is that too sappy?!
That’s how I feel about my whole house! I don’t care if it’s sappy. 🙂
Me too! I love the fact that my house has a history that stretches backward, and that it will (Ihope) stretch beyond my family’s life in it as well. Stewardship rather than “ownership” is part of the charm!
This is a beautiful addition to your kitchen!
GOOOOORGEOUS table!! Amazing what some oil will do. I bought a nice cutting board from Williams-Sonoma, but after oiling it (every day for a week, then once a month for the first year, per the instructions) it is ridiculously beautiful. Anyway. I love your table!!
What a find! I’m jealous!!
Oh MAN that is nice! That is totally going to be awesome for the morning coffee and snacking with friends while making dinners. Just wonderful.
Love love LOVE IT! Must admit I’m “borrowing” some of your ideas for my upcoming kitchen makeover 🙂
Lovely work, Anna. I’m nowhere near owning my own place or even furnishing and unfurnished rental, and as such you’re making me all sorts of jealous, but I’m instead going to take this as inspiration for the time when I can steal your ideas, and food for thought now: like how to take care of the small wooden things I do actually own.
Dear Anna, your kitchen is turning out fabulous! I so love your new table. Thanks so much for this post, I really don’t know much about wood and I learned a lot. Wish we had an Ikea locally (sad face). I need a tutorial on cutting boards, if you have time. I just have a cheap plastic piece of shit from the dollar store. It gets so gross, I throw it out every couple of months. Of late, I am agonizing about bacteria and how wasteful this is. Could we have some words of wisdom? I’ve been trying to eat healthier and eliminate toxins. Thank you!
I’m sure if you’ve been doing any research already then you already know that plastic cutting boards harbor bacteria and are very bad for knives! Wood cutting boards (maple in particular) are naturally anti-bacterial, much safer and hard-wearing than plastic. (Here’s a PDF of a lengthy study by the Food Research Institute/Department of Food Microbiology and Toxicology, if you want to read it…or you can Google and find loads of references to its findings.)
So yes, my words of wisdom would be to buy yourself a good-quality maple cutting board. 🙂 There are good tips on how to clean and care for it on the John Boos website:
http://www.johnboos.com/content/1/54
I gasped out loud when I saw your new table. Scared the kids and the cats. It is beautiful! What a great find.
what would you use on a hardwood floor that the finish is worn off, but you didnt want to sand etc? I used to use howards wood keepers and the floor looked fantastic, velvety etc, but then i read the cautions http://www.howardproducts.com/products.php
do you think that just mineral oil would be ok?
thanks!
Julie
Hi Julie, I was going to suggest Howard Restor-A-Shine. I’m not familiar with their Wood Keepers product you mentioned, so I don’t know anything about the precautions.
I can’t even begin to imagine how much mineral oil you’d have to buy to coat a floor! Honestly I don’t think it would be hard-wearing enough to really be worth it. Have you looked into something like Waterlox? (How much of the finish is worn off?)
Great find, Anna! It looks pretty massive. Do you guys have a vehicle large enough to haul large pieces? I’ve had to pass on items I’ve found before because of the logistics of trying to get something so large back home. I guess if I really loved something I’d find a way to make it work. I was just wondering if you guys are more prepared for something like this then I am. Do you roll up with a big van and packing supplies and just pop it in the back and go? Or do you have to go out and rent a truck/hire a mover?
We have a Subaru Forester. Not huge by any means, but we crammed some pretty big stuff in it. 🙂 In this case, the owner of the shop was kind enough to deliver it to us at the end of his workday in his truck.
Honestly it’s not something we think about much since we don’t really have a lot of particularly large items in our house. The older things mostly came with us when we first moved in (via moving van), and most of the newer stuff is from IKEA and was assembled on-site.
That island is INSANE! Perfect combination of form and function, and sexy to boot!
I made a kitchen island a few years back, but it’s so bland compared to yours:
http://thenonconsumeradvocate.com/2010/11/my-island-dreams-dont-involve-balmy-breezes/
Gorgeous.
Awesome ! Looks great in the kitchen. Good job !
Loud echoes of all the “Fantastic”, “Gorgeous”, and “Spectacular!!!” comments above.
It is also possible (though I really don’t know how to tell from a photo, either) that your table is of chestnut wood. It’s similar to maple, and was the hard wood of choice for things like workbenches, from first settlers until the trees died out in the early 20th century.
Either way, you’ve created an enviably lovely kitchen, and I do!
Like I said, I’m definitely no wood expert, but I’m also thinking maple because of the age of the table’s legs. I did some research, and it looks like they’re probably from the 1940s. Of course the table could’ve been made from old wood, but I think most of the chestnut trees in New York were wiped out by disease by then.
It’s definitely maple. You can tell by how after it’s finished some of the strips are ‘curly.’ This type of maple is prized for use in guitars, violins, etc. It’s also used quite often in high-end cutting boards and table tops. Your table looks very good.
I really love your “new” island. All the work you put into it will be so worth it when you are cooking/eating/prepping/drinking coffee there in the years to come. Also speaking of cooking/eating, I just got “Vegucated” and am now transitioning from a vegetarian diet to vegan. I’ve always loved your blog and now I’m extra excited/inspired for all your great cooking/recipe posts that are sure to come out of your renovated kitchen. Cheers – CT
What a great find Anna! And thank you so much for mentioning the oil you use.
I bought one of those IKEA island on wheels – the least expensive one – over a year ago, but have never oiled it at all. I was wondering what to use on it, seems rather embarrassingly obvious that IKEA has the right product! Great to know I can use it on my chopping boards too.
M.xx
This is beautiful! The end result looks amazing and I love all of the marks on it from previous use. The great table combined with the yellow stools (the same color as my current kitchen walls) and your gray walls really is beautiful and classic and I can imagine how great it will be to enjoy your coffee there every morning. I really enjoy your home updates, Anna. Thanks for sharing.
love your results! understand the dif between “patina” & patina…especially since you’re using it with/for food etc. i was curious what the other side looked like. I thought the underneath might have less grunge to remove. and thanks for continuing to show us your beautiful home…
The underside is coated with the same gray paint that’s on the legs!
I have a thing for wood tables! And i must say, you did a great job on this table. You really took time doing the cleaning part but it turned out beautifully! I’m absolutely sure you are happy with the results. Thanks for sharing.
Stunning! You did an amazing job, it looks just perfect in there. Just perfect!
The table turned out beautifully. I love mineral oil, it’s a staple at my house. There is so much you can do with it.
We pulled up our carpets a couple years ago to expose the hardwood floors underneath. They are really stained, so we’ve left them alone to patina. I use mineral oil on them to condition them and they look great. Rustic, but great. It is a lot of work doing a whole living room, but the results are worth it. Both in looks and to the health of human and animal in the house.
Great job, and thanks for sharing all your ideas and projects. This blog is such an inspiration for me.
Wow, that’s great to know. Is there any particular reason you chose to use mineral oil over something like linseed oil or Waterlox?
That’s a gorgeous table! We’ve been using mineral oil on our wood as well…especially after I read that linseed oil can spontaneously combust and has burned some homes to the ground! Crazy.
Blimey. That is a beautiful, beautiful table you have just made. Wow!
I love how it turned out! It’s beautiful Anna! Great job!
i’m just seeing this now…i LOVE it. looks so good in there, anna! what a gorgeous find. xo
Anna! This looks so glorious, I can barely stand it – what an AWESOME find!! So happy for you…!! xox
This is so bad-ass. I have a 10′ carpenters bench from the 50’s that I salvaged from a work-shop and need to bring into my kitchen. Thanks for the pointers on resurfacing the countertop!
Love this so much! Really loving those stools with it as well! I’m curious to know what you think of those? (As far as quality, etc) I need yellow side chairs for my kitchen, but the Industry West site has been sold out for weeks! I’m contemplating buying white ones (locally) and getting them powder coated myself! (I might even try spray painting first bc I do have previous luck with spray painting over powder coated items).
This is an incredible piece. And the stools are a nice touch. I think I’m going to have to pin this onto my Pinterest board called “tables” – props.
wow, the table turned out great! I love your kitchen
You really do spoil us by supplying such fab detail. I can’t believe your luck, stumbling across such a beauty. I’ve revisited this a post just to stare.
WOW! That’s amazing! I need some of that SKYDD stuff!!!!
Gorgeous kitchen! I’m so jealous. I’m about to start renovating my kitchen, but don’t have a space this big to work with. I’m going white subway tile with dark grout. Great find on the table too! You did a beautiful job refinishing it. I have a quick question about whether you like your range or not and who’s the maker? That’s one of my last items I need to get for my kitchen. Eekk! Can’t wait to see more kitchen posts! Thanks!
Thanks, Stephie! The range is from Siemens, which is the same brand as Bosch. It’s 7 years old now, though, and I don’t think Siemens appliances are sold in the US any longer. You could check the current Bosch ranges to see if they still make something similar. 🙂
I’ve always loved your temporary kitchen, so it is a lot of fun watching it morph into a permanent kitchen. And thanks for the tip on the Ikea mineral oil – oiling my cutting boards was something I’ve been meaning to do forever (along with plans to make “spoon butter”) but hadn’t gotten around to it. Once you posted this, I added it to my Ikea list and got all the wood kitchen things oiled this morning.
LOVE this table! I want one just like it… nevermind I have nowhere to put it!
OMG! Love, love, love your table. I have a 75+ yr old drafting table given to me by my dad and it’s dear to my heart. But the top is very dry and I’m so glad to see the results of using Skydd wood treatment. Thanks for spreading the word!
I absolutely LOOOOVE your table!!!!! I wish I had it….
And thanks so so much for the tutorial, we just bought a wood table too but it’s super dry and absorbing absolutely EVERYTHING… I had no clue how to/which kind of finish to apply, but this tutorial is super helpful!!! Thanks!!!
Anna, I’ve been admiring this tutorial since you posted it. I know it’s been a while, but in case you’re still checking or answering questions: after you treat the table with oil, do wet water glasses, etc. leave water rings?
I refinished my dining table and used Ikea Skydd oil as a finish, but after several coats of oil we noticed that an ice cream bowl was getting condensation on the outside of it, and that was leaving a water ring on the table. I think I’m fine with it (patina!), but it made me wonder if I did something wrong. Have you ever had that issue?
Hi SLG, no, I haven’t, but that could be due in part to the type of wood—not to mention the overall existing wear to the table.