Now that the floor demolition is complete, we’re in a bit of a race for time to get a new floor in place and have the radiators reconnected. Fall in upstate New York is an unpredictable thing; sometimes that first frost and freezing temperatures sneak up on you earlier than you’re expecting. It’s already down to 66°F today — I’m wearing a scarf and not sweating profusely! Between busy work schedules, the holidays this month and traveling plans next month (more on that later!), we don’t have a lot of weekends free to get the work done. I’m panicking a little, but we’ll make it happen.
First of all: We’re definitely going to put in new wood plank floors and paint them. That’s the vision I’ve had for the kitchen for a while, and even though salvaging the original subfloor didn’t work out, it’s what I still want. Aside from painted wood floors looking nice, it’s a very budget-friendly option. The pine T&G flooring we used in lieu of beadboard in the upstairs bathroom was about $1/SF — tough to beat. In an ideal world, we’d continue the same black pennyround floor from the downstairs bathroom into the kitchen (the rooms are side by side), but it’s just not in the budget. And that’s OK.
What I’m trying to figure out now is exactly how I want to paint the floor. For a long time I was thinking solid gloss black, but that might have just been because I’m so used to seeing the kitchen with a black floor already. Now that I’ve seen the floors with white paint (albeit primer over grossness), I can’t stop thinking about other possibilities. I definitely don’t want to do solid white, but…
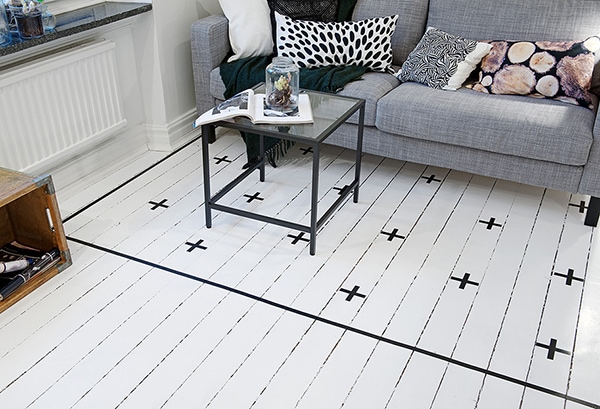
Photo by Frederick J. Karlsson for Alvhem / Styling by Sarah Widman (via sfgirlbybay)
Yeah. That looks really good. I’m picturing a pattern-filled rectangle around the big wood work island, sort of like a faux rug. I even love this exact pattern as-is (surprise, hah). I can see it also looking verrrrrry nice in reverse — white on black — or with colored crosses like the pattern in my sidebar. It would be so easy, too. If I ever wanted a change, I wouldn’t feel badly about painting over it and doing something new.
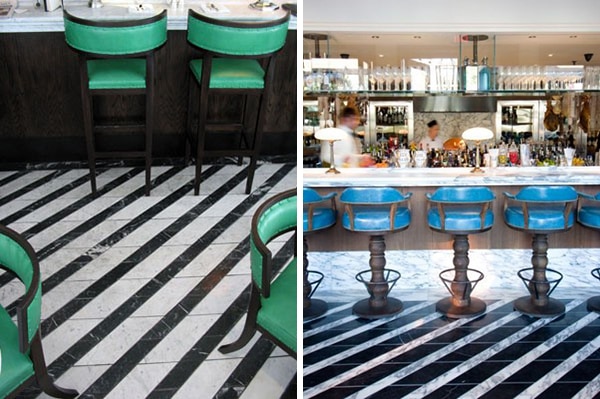
L: Cecconi’s Mayfair London, interior by Ilse Crawford / R: Cecconi’s West Hollywood, interior by Martin Brudnizki
These floors are actually inlaid marble, not paint, which would also be really nice but would cost 400 billion dollars. I could do something like this with paint, though! I love that the thinner stripes run diagonal to the line of the wider “boards.” It would take forever to measure, mark and tape off the stripes, but it wouldn’t be particularly complicated. Just time-consuming. I could probably knock it out in an overnight, though, since it’s only two colors.
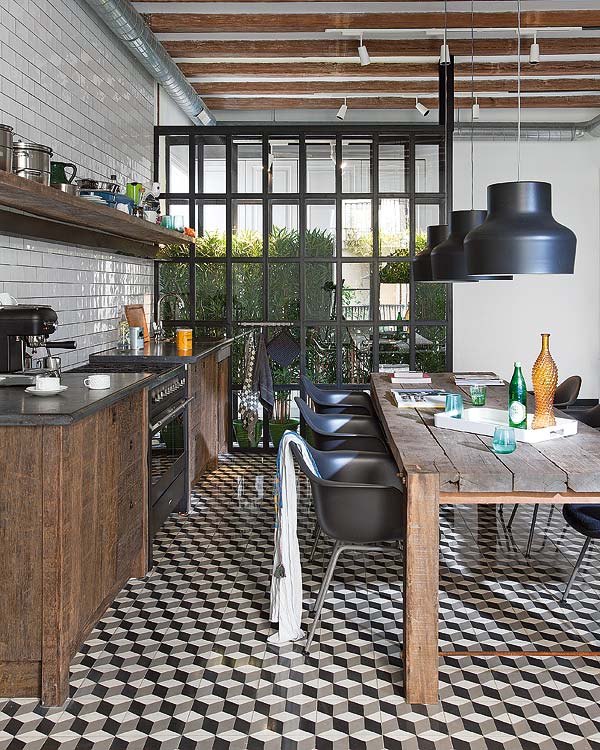
Photo from Micasa / Interior design by Egue y Seta studio
Speaking of time-consuming, can you imagine if I tried to paint THIS pattern on the floor? I posted about this Barcelona kitchen back in January, and I still can’t stop thinking about it. We actually priced out how much it would be to use those cement tiles in our kitchen, and it came out to more than $3000…which is obviously just not happening.
Seriously though, could I do it with paint? I mean of course I’m technically capable of doing it, but the three questions that immediately come to mind are (a) Will I wind up spending $3000 on painter’s tape?, (b) Will my brain melt out of my head? and (c) Will I ever sleep/eat/talk/laugh again, or is the rest of my life going to be devoted to painting rhombuses parallelograms on my kitchen floor?
In other words, I kinda really want to attempt it.

109 Comments
I’ve been still thinking about that floor too. Like checkerboard tiles only ten squillion times more interesting. I’d imagine you could get some stencils laser cut and then maybe spray paint.
Definitely stencil! You’d probably still go cross-eyed, but you wouldn’t need miles of painter’s tape
Hmmm, I question whether I’d really be able to get a super-crisp edge consistently throughout the whole floor on a three-color, intricate geometric pattern with a stencil. Do you know of any examples I can look at?
Maybe you could paint larger rhombuses. Then it would only be half of the rest of your life! In all seriousness though, I love your kitchen and can’t wait to see what you decide!
Hah! I thought about that, but given the scale of my kitchen (it’s about 11×13′), I think a smaller-scale pattern is better.
Anna,
I wonder if you could find a stencil? I know they have fairly large sheets sometimes. Also, I think there ‘s a stencil company in Brooklyn that perhaps could make it? I don’t live in NY but I think I read about them. Seems like it could be computer generated. Good luck.
Instead of attempting to do it all with painters tape, you could make a stencil or two for the black and grey rhombuses, and then paint them in a section at a time. It would save you on painter’s tape and probably shave a few hours off the total project.
And ….several people already covered that whole stencil thing. 😛
so cool! i cannot wait to see!
Great inspiration! I like the idea of painted patterned floors. I assume you’d use a really tough/durable enamel? I think we are going to use cork tiles in our kitchen (eventually), but I kind of want them in a dark color to ground the space.
Yes, we used BM Floor & Patio paint in our office and the floor is still totally chip-free after almost 5 years!
http://www.doorsixteen.com/2009/01/26/white-painted-floor-back-room/
I see everyone’s pro-rhombus here (and I’m not averse to it!) but I do love the idea of black with white crosses. That would look tres fab.
This isn’t quite like the tiles but…
http://www.royaldesignstudio.com/collections/moroccan-stencils/products/all-the-angles-moroccan-stencil
There’s also this one:
http://www.royaldesignstudio.com/collections/moroccan-stencils/products/endless-moorish-circles-moroccan-stencil
Also, here is an example of using a stencil on the floor on d*s. Granted I think the lace design would be a little more forgiving.
http://www.designsponge.com/2009/02/lacey-floors-and-lots-of-red.html
I know you will come up with something great!
Oh, funny, I don’t like any of those stencils (for my house, at least), but I was looking at this one on that site last night:
http://www.royaldesignstudio.com/collections/modern-stencils/products/step-up-triangles-stencil
I still have my doubts about a stencil working for something as complex as the tumbling blocks pattern, though — I think the key to getting it to look really sharp would be having perfect edges and corners, and from photos of I’ve looked at of real-life stenciled patterns, I don’t know if that’s possible.
what about painting a rhombus “rug?” that way you could start small (or, smaller, at least), get the feel of how crazy it’s going to make you, and go from there.
LOVE that floor!! But I’m with you, a stencil may be tough to get really clean lines. Painters tape may be your best bet!
There’s a house with a gorgeous painted patterned foyer… 3rd rowhome to the right of old M&O on Washington St. They did a Goyard-esque pattern on the floor. So cool!
Something to consider: new flooring that is site-finished will likely not show the cracks between the boards (since that’s really a result of years of shrinking/swelling, etc.), so your paint job will probably be sans those little separations. Are pre-finished floors in the base color you like an option? Does that change how you feel about doing an intricate pattern? I’ll be excited to see what you come up with. I’m certain it’ll be divine.
Kati, we’re going to leave slight gaps between the boards for that reason. We did that on the bathroom walls, too. They definitely will not be prefinished — I don’t like the perfectly smooth surface. Given the age of my house, wood floors that look new would be really out of place.
Yeah, I’m commenting on my own post!
This could be kind of amazing…
http://www.royaldesignstudio.com/collections/allover-japanese-stencils/products/akita-allover-stencil
Or…HMMMMM
http://www.royaldesignstudio.com/collections/allover-modern-stencils/products/herringbone-shuffle-stencil
What about Herringbone Shuffle in black and white and shades of gr(e/a)y? Or have you thought about using your own design so that your floor would be unique (well until others copied it)?
I’ve seen some great stencilled floors with just a base colour and a top colour. The stencil pattern looks best when it isn’t uniform so that is looks faded/worn in some areas. Stencils can be a nightmare to use though.
You could do the fastest floor ever by going all Jackson Pollock. 😉
Do you have a laser level? I use mine for hanging pictures but one would also be SO helpful taping off straight lines across your kitchen floor. Might even make that last pattern doable… just a thought.
We did have one, but we returned it because it sucked. Can you recommend an affordable (under $30) one that works well?
check out this floor-I really like it. It’s definitely more subtle than your pics though.
http://www.designsponge.com/2013/09/oh-joy-studio-tour.html
Yes, very pretty! My kitchen is much too small for such a large-scale design, though.
Hi Anna, I was thinking about that one: http://www.lovelyetc.com/2012/01/amazing-painted-floors-how-to.html. Nice color-combination – and you could replace the floral part with something more geometric?!
See, I think it’s the fact that the tumbling blocks pattern is so geometric (not to mention three colors) that would make it a nightmare to stencil. Patterns like the one you linked to are much more forgiving when it comes to soft edges, and corners don’t need to align perfectly. I’m having a very hard time seeing how a stencil would make more sense than tape, especially considering I’d have to wash the stencil and let each section dry completely before moving on. It sounds like a nightmare! I’d love to see a real-world example of someone stenciling something that complex.
Yes, you are right – the floral patterns are way more forgiving – but do you really need that particular pattern with three different colors?
Only one color could look quite nice (in my opinion) as well:
http://www.mr-mr.fr/groundby?kohanasession=75f684c00357c456e9b3ea2c0d65ba27
…Otherwise Brian Leaver seems to be your man:
http://www.brianleaver.com/brian-leaver-painted-floors.html#images/brian-leaver-painted-floors/brian-leaver-painted-floors-10.jpg
Well, the three colors are necessary to achieve that 3-dimensional look, which is what I love so much about that particular pattern.
That green floor is AMAZING. And there’s no way he got those results using a stencil. 😉
The floor you love with tiles is actually an old quilt pattern. I believe it’s called tumbling blocks. There are stencils out there in this pattern in different sizes. Getting sharp edges with stencils is easy with a little practice. There would be three different stencils with registration marks to keep the design straight & be able to line up the stencil for the next color as you paint one color at a time.
Lisa Mair of Vermont and others stencil floorcloths in this pattern on canvas
that are beautiful. I’ve done several myself on canvas & floors. I’d say it’s worth a try if it’s the design you love the most.
Peg, do you have an photo of a real-world photo example of this type of pattern or similiar being stenciled on a (wood) floor? Stenciling fabric is a very different process because the receiving material is absorbent. I wasn’t able to find tumbling blocks stencils (I spent a lot of time looking for them last night…), but I’d have to get them custom-made anyway to correspond to the widths of the floorboards.
I don’t doubt that stenciling wood floors is possible (I’ve seen it done to great effect!), I’m just having a very hard time understanding what the benefit would be when dealing with a pattern this complex and geometric. It seems like it would take much, much longer than taping/rolling. Can you shed some light on what I’d be gaining? I’m trying to understand, since everyone commenting seems to REALLY want me to use stencils, haha.
Anna,
Check out this floor http://www.apartmenttherapy.com/trend-watch-tumbling-block-rou-154833 linked to
http://www.apartmenttherapy.com/a-diy-painted-patterned-floor-122445
It appears the person who painted this floor is in Brooklyn. Maybe you can find out more info on stenciling floors from them.
I agree painting canvas is much different than wood, but when I was painting/stenciling canvas I started by using several coats of BM paint wet sanded between coats for a smooth finish to start applying the stencil design. For floors a good coat or two of primer as well as a coat or two of the main color of the design made it a smooth process and allowed me to only use two of the stencils as the third was already there in the main color. The registration marks used correctly truly make it an easy process. Sore knees and back were a problem but the finished project made it worth it!
Unfortunately his blog is now password-protected, but from looking at the process photos on Apartment Therapy, it sure looks like he used tape…not a stencil! This is pretty much exactly what I was envisioning doing:
http://p-ec2.staticat.com/51b1eeb174c5b61ff5000ba1._w.540_s.fit_.jpg
I know everyone commenting on this post REALLY REALLY REALLY wants me to use a stencil, but I honestly think tape is the way to go for this type of pattern. (And I’m not even sure I’m going to do that pattern anyway, it was just one of three options, hahaha…)
OK, here’s the whole process:
http://mdashing.squarespace.com/home/2010/7/19/mats-hemingway-inspired-diyflooring.html
So it’s sort of a stencil/tape combo, then. The big sheets of contact paper make SO much more sense to me than using a tiny stencil, as does using tape for the third color.
Thanks for linking to this, Peg! Funny that he cites Hemingway’s bathroom floor as his inspiration — I did a post about that same floor 6 years ago:
http://www.doorsixteen.com/2007/11/30/hemingways-bathroom-key-west/
Ah ha! I’ll be anxiously awaiting a post on what you decide to do and the process! Best of luck on the project!
I think trying to do that bottom pattern with painter’s tape would be crazy-inducing. You could do a stencil for a first layer and hand-paint to neaten it up/make it look more solid, but oh, the crazy again.
I really like that step-up triangle stencil you linked to. And I like the painted rug, too. I can’t condone the crazy though, especially if your neck is already bothering you.
I vote rhombuses! The crossed-eyes would be totally worth it.
Diamond?
http://3.bp.blogspot.com/-i79ovKiYg90/T4TO5gIT9MI/AAAAAAAAQqs/L2S3IqHVz78/s1600/Diamond-painted-wood-floor.jpg
http://www.amcondo.com/wp-content/uploads/2013/01/Tile-Floor-Patterns-With-White-And-Black-Inset.jpg
Victorian?
http://www.originalstyle.com/en/victorian-floor-tile-patterns
Good luck!
I just found this http://1.bp.blogspot.com/-BkILdRfvz3A/UbBbFkhKN6I/AAAAAAAA20U/a6ES_jvbxY4/s640/projekt-home.blogspot.com2298412_original.jpg and this http://3.bp.blogspot.com/-uw8gZxh7KUE/UbBa0AmnajI/AAAAAAAA2zY/yxv8cLq9x8k/s640/projekt-home.blogspot.com-2296370_original.jpg from here http://achadosdedecoracao.blogspot.pt/2013/06/decoracao-de-casa-ou-apartamento-com.html
My vote is for floor imitating sidebar.
What’s that?
Oh, you mean the pattern in my sidebar! Yeah, I think that would be really fun. 🙂
Like SO fun! Sidebar city!
I’m definitely thinking about it. Would be SO cute with the yellow stools…
Really diggin’ that first floor!
I say go for it. It would be a crowning achievement!
We’re also painting a pine floor, albeit an old, currently heavily, sloppily polyurethaned one. I want to do something more interesting than super white floors, super white walls, super white ceiling, and one soot (black) wall in the bedroom. (I realize now this is EXACTLY like yours, thought I was original.) I think painting the floor black would be redundant and cave-like.
I actually just saw something very similar here:
http://emiliejohnson.blogspot.co.uk/2011/10/blocks.html
the other day. I think this is what you get if you paint the whole floor one color and then stencil the other two. I think it looks fine from afar but this would drive me crazy i think.
But this pattern is PERFECT so can you work your magic and make the mistakes and figure it out so I don’t have to???
!!!!!!!!!!!!! Someone did it! With a stencil! I want to see his stencil, since it sounds like he made it himself.
I am in awe. So much patience.
Thank you SO much for sharing this link, Leo!
You’re very welcome, haha.
Ive been brainstorming a stencil, my best guess is to make some zig-zags that you would put together, like this: https://dl.dropboxusercontent.com/u/29676373/floor%20stencil.pdf
(the black being the stencil)
You would just paint the whole floor the base color, stencil, and rotate 120º.
Currently I’m trying unsuccessfully to find a pre-made stencil that would work but it’s hard…
OK, I see where you’re going with that stencil. It hurts my brain a little, but I understand it (I think!). I’m still not convinced that tape wouldn’t be easier in the long run, considering each time you had to move the stencil you’d have to wait for the paint to completely dry first…whereas with tape you could work your way around the whole room and even easily do a second coat.
Someone higher up in the comments said that pre-made tumbling blocks templates exist, but I haven’t been able to find one, either. Let me know if you do!
OH also, although I LOVE those cement tiles, you may be able to get the same effect slightly cheaper with those Dwell pattern tiles from Heath Ceramics.
But I guess if $10/sqft penny tile is out of the question, then $30+ likely is too…
We can dream
Haha, I think this is the first time Heath tiles have ever been suggested as a cost-saving option!!
Yeah, we’re trying to keep the total floor budget under $200.
This reminded me of the Tex Porcelain Tile designed by Raw Edges Studio – probably even more expensive, but they have really nice options for color and finish.
I like the last one the best. I keep reading the comments about the stencils but I keep thinking that the lines would not end up being very crisp with those.
Just now, on a scrap piece of paper, I attempted to lay out the pattern… Wow! Complicated!
Also I think trying to tape this off will be a nightmare – just on one ’tile” you need 5 vertical lines and each side required 4 diagonal lines. That *would* end up being almost $3000 in tape! 😉
I have never done this before but maybe it might work:
Use a laser-level and a long piece of straight lumber or a straight edge and draw the lines with a pencil.
I would paint the different areas free-hand and then finish the edges with some sort of a straight edge (a piece of thin plastic or a ruler). Again, I don’t know if it will work but I believe it would be easier than taping, peeling, and taping again. I would be OK with a free-hand look but from what I see on your blog I don’t think you would like that. 🙂
I keep thinking of Nicole from Making it Lovely and her painting her porch in the middle of winter, while pregnant. I’m curios to know how long it took her.
Haha, oh, Nicole and that porch! Yeah, it took her a really, REALLY long time. It did come out great, but like you mentioned, a freehand approach is much more forgiving when you’re talking about an organic design like the one she painted versus something as precise and geometric as the tumbling blocks.
The first one!
Anna,
I think that you could have good success by changing your approach a bit…don’t think about individual blocks, rather, parallel rows of diamonds. First one (mid tone) then the other in the other angle (darker). So instead of laying out the edges of the boxes it’s the through-lines of the diagonals that comprise the shaded areas. That way you can create a good stencil of 8-10 diamonds and I think if you work carefully and with a quite dry brush you can get the crisp lines you want. Plus the registration would be easier and more regular this way. In other words if you can do parallel stripes why not parallel rows of stenciled diamonds?
Good luck!
Yes!
It’s just lines of diamonds really. You could even get a repeat diamond patterned stencil and tape up every second vertical (long?) row of diamonds, and they should fit together. You just need to use the same stencil on different angles for each colour/tone. Now I really want to do this with some cork flooring I’ve got!
Something like this:
http://www.stencil-library.com/search-all-stencils/005032-XX00000-1/diamondrepeatstencil.html?q=diamond
Hi Michelle, yeah, that’s what I was referring to when I said painting rhombuses — that’s what the pattern is comprised of. I still don’t see what the advantage of using a stencil would be, though!
You could start with this stencil and modify it a little: http://www.stencil1.com/stencils/2827/geometric-3d-repeat-pattern.html
They also have a chevron pattern stencil which seems like it would be your style: http://www.stencil1.com/featured/3751/chevron-repeat-pattern.html
I know nothing about this stencil company, so I’m not endorsing it! Just came across it in a google search.
I actually own that first stencil! I bought it a couple of years ago intending to use it (with spray paint) on my cement basement floor. It’s cool for what it is, but definitely not the right thing for the kitchen — it’s much too “casual” a look, for lack of a better word.
I’m sure you’ve already though of this, but why not checkered floors? There’s something of the op-art to them (although nearly as interesting as the tile pattern) and they are also a classic style for kitchen flooring. But they would be far easier to draw out than the tumbling blocks.
The only example I can think of is this (third photo down):
http://design-shimmer.blogspot.com/2011/05/four.html
but you could, of course, make the squares much smaller.
The floor that Leo linked to above looks amazing; the painter clearly wasn’t going for perfect edges and corners, which is part of its charm. His overall aesthetic is a bit different from yours though.
I don’t like checkerboard floors! I know they’re classic and everything, but they always remind me of ’50s-themed diners, which is an aesthetic I completely loathe.
Ha ha, I should have guessed that you hated them. I associate them with very old European floors (http://roselandgreene.blogspot.com/2011/11/check-floor.html) or Morocco (http://roselandgreene.blogspot.com/2010/02/ultimate.html), but of course, they’re ’50s too. The perils of being a classic.
Good luck with whatever you create!
Part of me sickeningly wants to see you attempt those rhombuses…
ME TOOOOOOOOO, hahaha
Wow! I love the tumbling block pattern, but doing this with tape would be a nightmare, wouldn’t it? You’d have to cut off all the tape ends on a precise angle, no?
I keep thinking, you could cut out (or have lasered out or whatever) a two rhombus shape (actually a large number of them) and stick them down somehow, maybe spray them with light adhesive. 3M makes something akin to the adhesive on post-its. You do your first colour, mask with the two rhombus mask, then you roll over those with your second colour, turn them 120 degrees and roll over for the third colour. As this is a crazy ass sunday morning idea, it’s probably not feasable.
Oh, no no no nooooooooo! You just tape off the negative space — the angles are created by the position of the tape, no cutting required. I’ve done some pretty complex stuff with painter’s tape. It’s not that hard once you draw up a plan. It’s just time. Lots of time. Not much skill required, though!
And yes, as nice and neat as all of these stencil ideas sound, I think what everyone is forgetting is that every single time you pick up that stencil, you have to wash it off AND wait for the floor to dry completely before you put it back down again. That, frankly, sounds like a total nightmare to me and much more time consuming.
Do you have a steady enough hand to do them freehand? You could use a chalk line (after you’ve painted the first color with rollers all over) to paint the second color and then make new chalk lines for the 3rd color. You’d need to do it in sections, but you could do the parts under/near cabinets and radiators first so you could put the kitchen back together. Then you’d just (!) have several project days of more painting.
Otherwise I think the web sidebar design would look wonderful. Good luck with the decsion, I know you’ll make it gorgeous.
I looove that Barcelona kitchen, but I also really like the painted rug idea- and it wouldn’t be as much of a commitment… something you can feel free to change up… I use mostly stencils for wall finishes, but I’ve done some floors and they’re easier. You would definitely need more than one stencil if you want to go that way. Probably three stencils would do- one you’re using, one that’s drying, and one that someone else is washing. You can cut the stencils yourself with an exacto. Just make sure the cut outs are the same on all three! The benefit of stencils over tape is that you can keep the pattern for touch ups or another project… blue tape is $$$$$$$!!!!!
I made a screen cap of the paragraph before [and of] the words, “In other words, I kinda really want to attempt it.”
The way you put that into words: That however daunting, you’d still want to try. And more than likely will.
In conclusion, I’m a fool!
Ok. My two cents. Because all this is so fun:) what about some kind of vinyl decal that’s circuit/cricket [or WTFever those things are called] di-cut. That way you just peel up as you paint. Perhaps more complicated and expensive than tape? I tried.
Whatever the task, I say go for it. It will be amazing. I find similar projects to be incredibly therapeutic! Design does a body good. Ok, maybe not for neck injuries, but everything else..
Oh, and whatever you do… Seal the heck out of it when your done. Do not let all my previous unsealed/unprotected paint, grout, etc jobs be in vain!
Mel, that’s similar to the contact paper solution linked to in another comment — no need to get a decal cut! 🙂
Not to confuse you, but…. have you considered triangles? I know you love them and maybe it would be a little less complex as the Barcelona-floor.
I have been thinking about black floors a bit lately (also because of Daniel’s kitchen floor) I wasn’t sure if it would be something for me/ us only to realise that we have had a really really very very darkblue floor downstairs, for the last ten years (I just never thought of it as black). Funny.
Whatever you do, take care of your neck, have fun and good luck.
Yeah, I linked to a triangle pattern in some comment or another here…
I love the crosses, white one black would look so nice. And true that you could paint over it when you got bored (really true of any pattern, but I loved that you pointed it out because it’s like, hey, why not do something silly or cute or wild! Because you don’t have to live with it forever if you tire of it. And the crosses are definitely cute).
But regarding the tumbling blocks, Mat from Brooklyn with the red/yellow/parquet clearly did it in the most efficient way. (Clearly the goal, especially with a floor but also IMO with walls, is to mask everything at once and then paint everything as once. A stencil you have to move is just dumb for large surfaces.)
I was going to suggest choosing contact paper diamonds over tape before I read that. I use contact paper for EVERYTHING (most recently for glass etching) and it peels off so cleanly, no ripping or residue. But I had not thought that you COULD do the last color without removing the first set of contact paper diamonds by using tape! That guy is a genius. It allows you to quickly roll both colors one and two, and use either a brush or very wee roller to do color three by hand! And the bigger you can make the diamonds, the easier/faster it will be.
I agree! I think that makes the most sense. I know the person who runs the blog his project was featured on before AT (m-dashing), so I’m going to see if I can hit him up for advice. 🙂
They sell large sheets of the stencil material, don’t they? So you could paint multiple rhombuses with each lay-down? And if you make the back tacky with something like basic spray mount (not the super adhesive kind) you should get a clean line…and if you think of each color as though you’re doing separations for printing – maybe even layout the pattern in Illustrator and print each layer/color out then trim? You could have multiple stencils going at a time so you weren’t doing each cube, drying cleaning each time, right?
Sorry, just keep thinking of it like a printing issue – and how can we surmount press limitations, hahaha!
I don’t think a stencil or computers are necessary at all — tape measure, straight edge, pencil, contact paper and tape! 🙂
As much as I love the tumbling block floor — I feel like the question is not *could* you do it (I haven’t a doubt that you could make it happen) — but could you do it — and everything else on your kitchen to-do list — in the amount of time you have to accomplish thingst before the weather turns?
If you’re set on an all over pattern — maybe just go for a simpler pattern? I’ve always loved this wall — and feel like it could make a great floor if done in a black/grey/white scheme: http://www.designsponge.com/2013/05/best-of-rainbow-colors-at-home.html … or maybe a painted herringbone pattern?
Of the three, I’m voting for the first one — but inverted so that it’s white on black — it’s simple and gorgeous and I think it adds to the rest of the kitchen while letting the rest of it’s greatness (tile, fixtures, island, etc) shine. Plus — as you mentioned, if you wanna paint over it — no serious heartache.
And no brain melting.
tumbling blocks would be perfect. as long as you drew it out on the floor first, i think tape would be fine.
another thought; you could stain your wood various shades of black and grey with iron sulphate then lay your floor in a herringbone pattern.
i saw this moments after i commented
http://www.apartmenttherapy.com/crazy-colorful-parquet-194332
I too have been completely obsessed with that encaustic tile from the Barcelona kitchen ever since you posted it as well! Tumbling blocks is one of my favorite patterns. Such a fun post to read the comments of and I can’t wait to see what you do. I’m just bummed that tile is so expensive…
http://instagram.com/p/dezvwvuUN8/
I’ve made the tumbling blocks pattern out of wood for a store display at Anthropologie. It could be done as flooring quite easily. I made these shapes out of three seperate pieces. Then, masked each piece once. It’s only two shapes with different paint colors. In protoyping it, I found that trying to do the whole thing with masking tape was a terrible pain and getting lines to match up was a huge frustration. Cutting the pieces individually turned out to be much easier in the long run.
Good luck with whatever you decide. I appreciate the inspiration your blog provides and wanted to try and help you a bit for a change.
Hi Kenneth! Thanks for the suggestion — I’m a little confused, though. What are you suggesting the pieces are cut out of? Wood? And then nailing them to the subfloor…? I’m not sure I understand!
Yes ma’am. When I made the wall display, it was made from luan underlayment. For a floor you would use a thicker wood. Once you have the angles of each cut figured out, the cutting goes incredibly quick. You could skin your subfloor with underlayment and then put your block pieces down with wood glue like you would tile. Someday when you get tired of it, pull the whole thing up and you have your subfloor unharmed.
Feel free to email me if you had other questions. I could show you some process photos I took while working on the project as well.
Wowza. Yeah, I’m sure that could be great if done right, but 150 SF of super-intricate inlaid wood flooring is wayyyyyy beyond what I’m capable of. I’m sure it would be much more feasible in a temporary wall installation like the display you created, or if this was in a much smaller kitchen/confined area, but I think this kind of thing really needs to be properly done in order to be durable as permanent flooring in a full kitchen. The floor we install isn’t going to be temporary.
I appreciate the suggestion, though!!
(That said, if you want to come over and attempt it yourself, you are more than welcome! I’ll make a whole pot of coffee for you every morning and night, hahaha.)
Dammit. Now I can’t stop thinking about it…
I’d be down. Bummer about that commute though.
Just a simple black or white flooring would be excellent, or perhaps a black floor with dispersed small white crosses would be lovely – just buy 2 wool cushions to put on the yellow steel stools (less cold on your bum in winter) in the black & white (or light grey, or medium grey) pattern of your choice. Heck, you can even get the cubes version:
http://www.etsy.com/listing/130117238/pair-of-geometric-pillows-geometric
The rest of the time you can actually walk with Bruno in the park & enjoy a latte, instead of coming down with a chronic painting backcramp – much more enjoyable :o) !
hmm link seems wonky, perhaps this is better :
http://img0.etsystatic.com/013/0/6373048/il_570xN.451608232_lu8v.jpg
http://img0.etsystatic.com/009/0/6373048/il_570xN.451617424_fsc9.jpg
Just promise one thing? If you do end up doing the tumbling blocks, please show us the whole process. I’ve looked and looked (and looked!) at Mat’s contact paper thing and am still having trouble getting my head round how he did it. 🙂
http://arcd.org/wp-content/uploads/2012/09/IMG_2085.jpg
these ladies drew their outlines and taped off their tumbling blocks.
The foyer of the building I work in has those geometric tiles, I love walking over them every day. So great! Too bad they’re almost always covered by nasty industrial mats.
stencil. repetitive plus sign design. it’s SO YOU.
Why don’t you save up and get the actual cement tile? Maybe they can be found discounted?
Because: (a) We need to put a new floor in before heating season starts, which is (b) not enough time to save up $3000+ dollars, especially considering that (c) we also need a new boiler, and that (d) even if I did have $3000 in pocket, I wouldn’t want to put it toward a kitchen floor — I’d much rather repair our windows and rebuild/paint all of the rotting exterior casings. We’re very conscientious about how we spend money on the house. This is a long-term renovation approaching the 8-year mark, and we’re nowhere near the end. There are so many other major things that need to be done — the kitchen floor isn’t a broken boiler, you know what I mean? Priorities. 😉
That said, if you can find a source for those cement tiles that would bring the total in under $500 (still more than we’ve allotted, but we could figure something out), I’m all ears!
Normally, I can’t stand people who list things with a), b), c), d). They’re right up there with people who say “Quite frankly…” but I’ve been reading your blog for over 5 years and I really admire everything you’ve done and you’ve been a wonderful source of information and inspiration for me as I approach year 6 of renovations on my 1902 Victorian. We just replaced our 1971 furnace last January 3rd and had no heat leading up to thru December. So I get the financial frustration. Maybe the encaustic tile people would consider a sponsored ad/thing for the escher tiles? The stencil thing just sounds so backbreaking to me but I can also see it being oddly meditative. Anyway, I can relate to your situation so I’m sorry if the comment came across too “blithely”?
Love the patterned floors, so simple yet they just add that nice touch of elegance.
This isn’t a patterned floor, but when I saw this kitchen I thought of your space immediately. This is basically my dream kitchen: http://thedesignfiles.net/2013/09/sydney-home-leanne-carter-taylor-and-trent-carter-brugman/
I think if I tried to paint that many rhombuses there would be a lot of crying. GOOD LUCK! x
Hi Anna,
I know I’m a little late in the floor debate, but I just came across this picture of a kitchen with your dreamfloor in it and had to think of you. Maybe just tiling/painting a small area would be the solution?
http://www.ignant.de/2013/09/12/casas-reais/
Can’t wait for the outcome anyhow.
best
Heidi
That third picture of the floors is a trip. I like the vintage table in that picture too! Cool stuff.
I think the floor in the Barcelona kitchen is drool worthy but could lead to some heartache if not done properly so I was thinking you could come “practice” on my floors first. What do you think, very generous of me, no?!
Also, I’m sure that I am the seventy first billionth person to say this to you, but you and Jessica Walsh from Forty Days of Dating look so similar. Wait a minute, she’s also an artist, lives in NY, clearly talented… – what kind of Superman stunt is this?!
This is apparently a stencil but I can’t find the original source (Le Sigh).
http://www.pinterest.com/pin/94153448433162855/
Having said that, I actually like the subtle pattern created by painting the boards white – the lines between each one, maybe with some additional + + + + in one area, creates a nice subtle but textured floor. Then again, I’m pretty lazy 🙂
I loved the photos and your writing!! Amazing!! Thank’s! Simona