
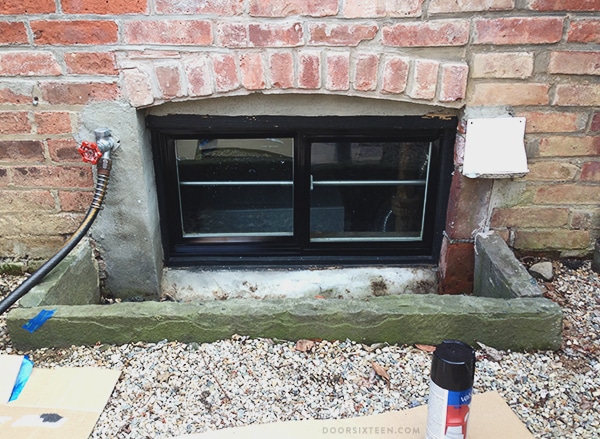
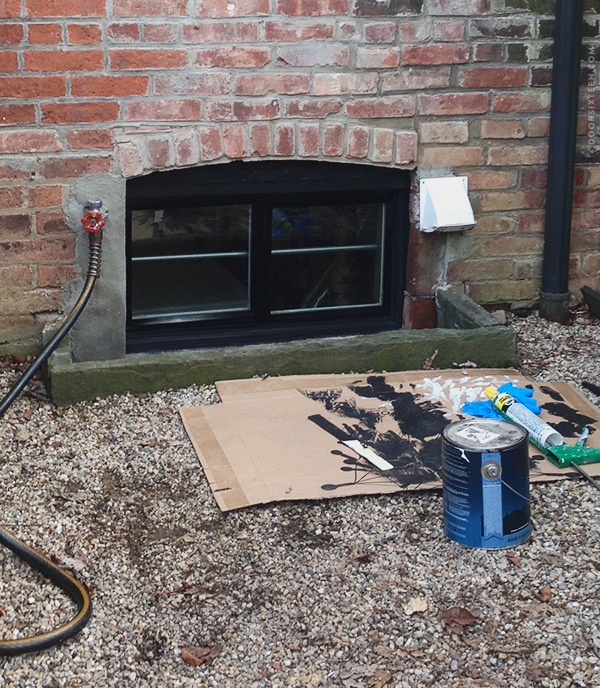
I started in on my back garden to-do list over the weekend! The forecast was for temperatures in the high 60s with clear skies both days, so I figured it was a good time to take on the white vinyl basement window that’s been sticking out like a sore thumb for years. On Saturday morning we went out to buy supplies, and after a nice lunch at Caffe Macchiato (they have a new vegan menu—very exciting) and a stroll around Washington’s Headquarters, I got to work.
The first step was giving the entire window and the wood casing a thorough scrubbing. It took me a while to figure out how to remove that screen on the left—I almost gave up, and then I realized you just have to push it outward from inside. Heh. I used TSP substitute and warm water to make sure the entire area was totally free from any kind of oils, grease or anything else that could interfere with the paint’s adhesion. Regardless of what I’m painting, I’ve made it a standard part of my prep work to always clean with TSP substitute first. I don’t have a preferred brand, but I like the kinds that can be diluted with water better. (Note: TSP substitute will also dull the gloss of most finishes. That’s a good thing if you’re planning to paint, but a bad thing otherwise. Don’t use it as a cleaning product unless you’re in prep mode!)
Once every was super-clean inside and out, I forced myself to walk away and let it dry completely overnight. Water is the enemy of spray paint—even more so than dust or dirt—and as tempting as it was to put a first coat on right away, I knew I’d regret it.
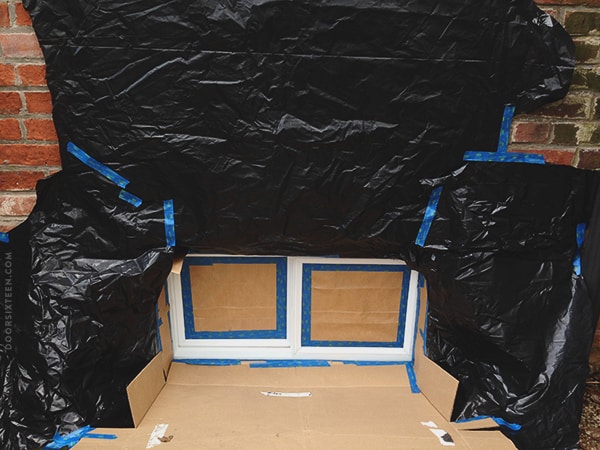
The next morning, I spent about an hour masking off everything I didn’t want to get paint on. I wasn’t too worried about overspray getting on the brick since the window well is recessed, but I taped up some plastic anyway. Ideally this would all have happened before the window was installed (actually no, ideally we would have installed a black window, but I think our choices were limited to white or almond…), but what can you do.
Side note: I keep seeing a person wearing a sumo wrestler costume wig (with blue barrettes) and a pair of white glasses.
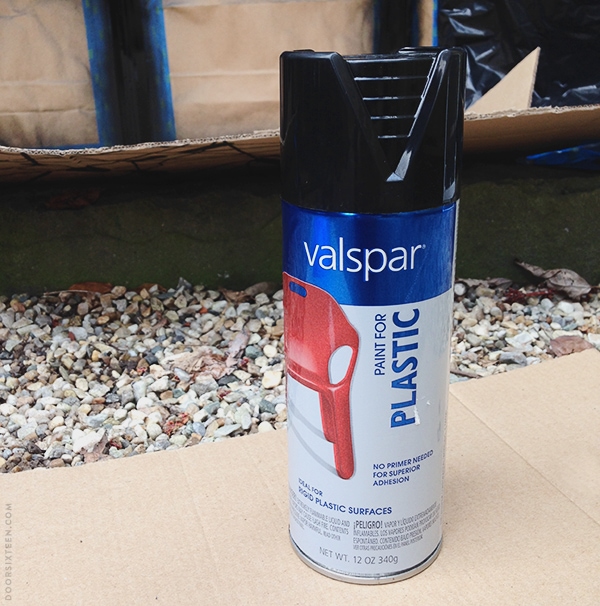
I’m usually a Rust-Oleum devotee when it comes to spray paint, but for some reason my Lowe’s doesn’t carry their plastic spray paint line. Lowe’s own Valspar plastic spray paint gets perfectly good reviews, so I let go of my brand loyalty in favor of not having to also go to Home Depot. The color choice were extremely blah, so I’m glad I just needed plain old black. It cost about $5.
Note that the can says, “no primer needed.” That’s the truth. In my experience, if a can of spray paint says it doesn’t require primer, you’re better off without it. Not using primer goes against everything I believe in when it comes to painting, but it’s truly not needed in some cases. This spray paint is formulated to bond directly with the substrate. Skip the primer.
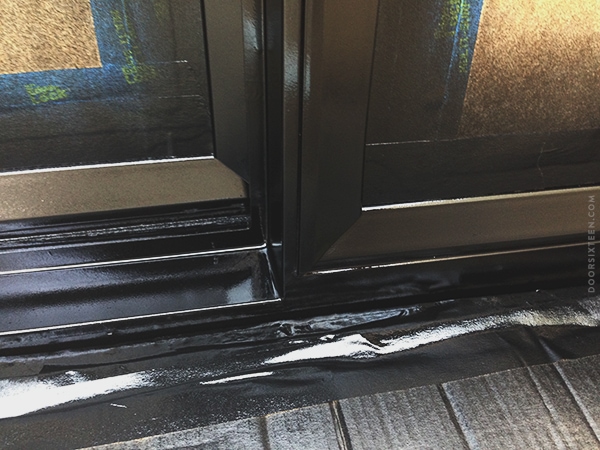
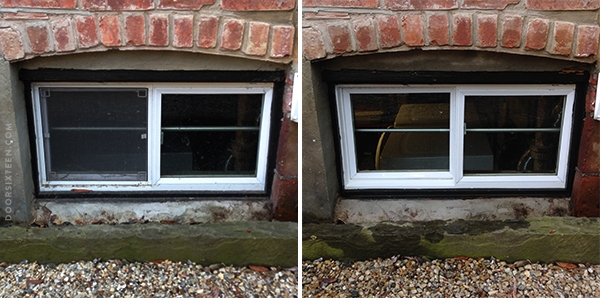
I tried to get a close-up shot so you can see how nice the finish is, but it was so sunny out and the gloss black is really reflective, so it’s hard to tell. It really did come out looking like a factory-finished black window. Do avoid dripping, I did four very thin coats in all, 10 minutes apart.
Then we went to lunch at Tito Santana Taqueria (the new tofu scramble tacos are REALLY GOOD) and took a long walk through Beacon while the paint dried.
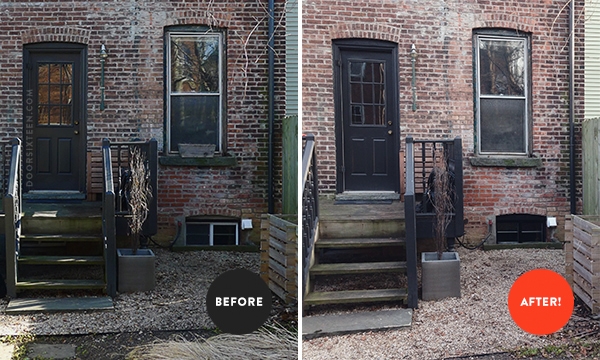
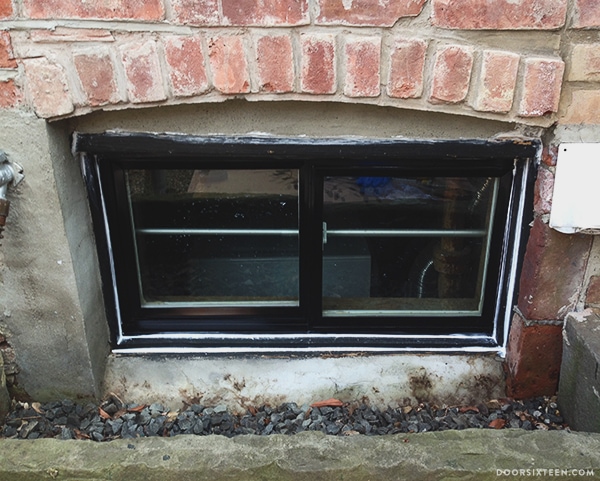
Ta-da! The vinyl came out looking great. Nice and smooth. Unfortunately, because the window is double-glazed, there’s no way to paint the white plastic area between the two panes of glass. Of course I’d prefer to not see any white there are all, but it’s not a huge deal. It’s not noticeable from a few steps back.
Obviously it’s too early for me to comment on the durability of the spray paint over time, but I’m not too concerned. We don’t open and close this window, so any wear would come from exposure to the elements. I’ll keep an eye on it, and I’ll report back.
The paint on the wood casing was looking kind of rough and peel-y (I didn’t paint it initially, our contractor did after installing the window…which was part of a major structural repair job on the back of the house), and it had never been caulked properly, so it was as good a time as any to get the whole window in good shape. I used indoor/outdoor caulk that I had on hand. Check the label when you’re caulking exterior windows—it should be able to adhere to vinyl, wood, and masonry.
Fortunately we had half a can of our exterior paint (Benjamin Moore’s Black Beauty, Aura semi-gloss) stashed in the basement! I decided to paint the concrete arch at the top of the window, too. That arch was originally wood, and that piece is painted to match the rest of the casings on all of our other windows and doors. It makes sense to have this window match the others! I don’t know why it never occurred to me to paint that arch before.
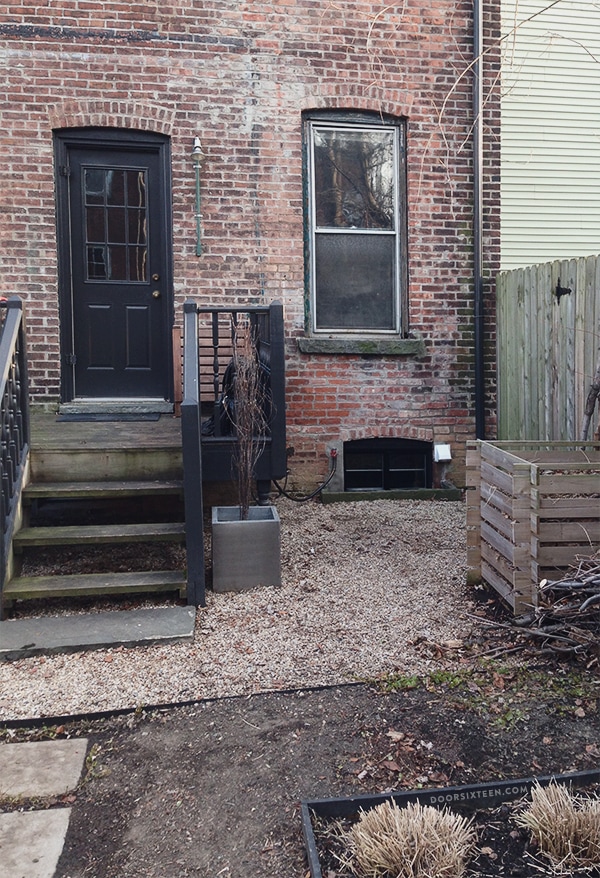
Ta-daaaa! Yes, I realize this is a very subtle improvement, but it makes me feel good to have crossed off one of my spring/summer to-do list items already. Of course, the dryer vent hood now looks extra-extra terrible, so I should probably go ahead and cough up the bucks and order a copper replacement. I’ll justify spending $75 on a vent hood by reminding myself that the rest of this little project only cost $5.
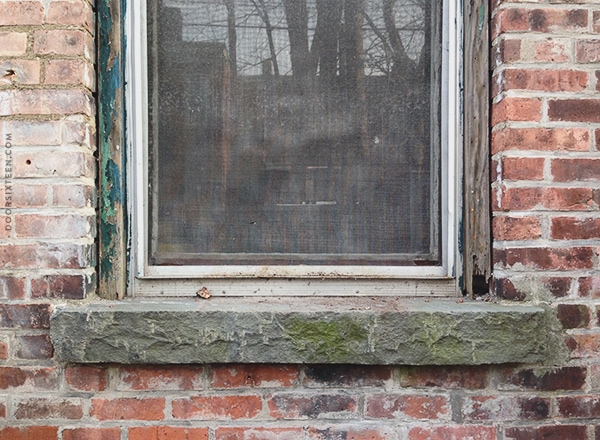
Speaking of looking terrible by comparison, THIS is what our windows look like up close. Oy. We can’t rehabilitate them all ourselves because we’d need scaffolding for the upper windows (and anything we do at the front of the house requires prior historic guideline board approval and a building permit—yes, even just to paint a window), but I certainly can and most definitely should fix up the windows I can reach with a ladder at the back of the house. I’m adding the two kitchen windows to my to-do list! I know it’s a drop in the bucket considering we have 15 windows, but it’s a start—and it’ll look nice from the garden.
EDIT: I just found a couple of before-before photos I never blogged before, and figured it made sense to add them to this post…
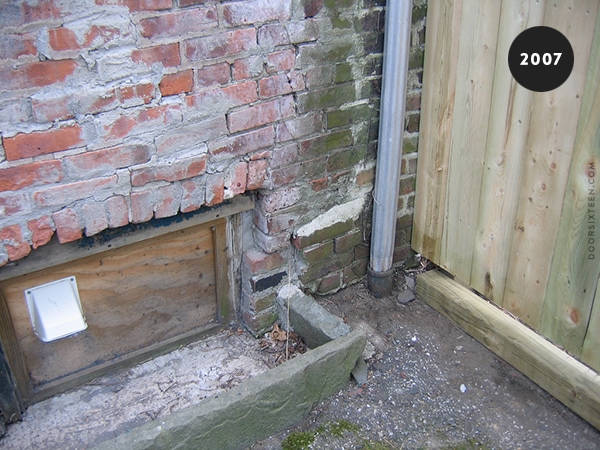
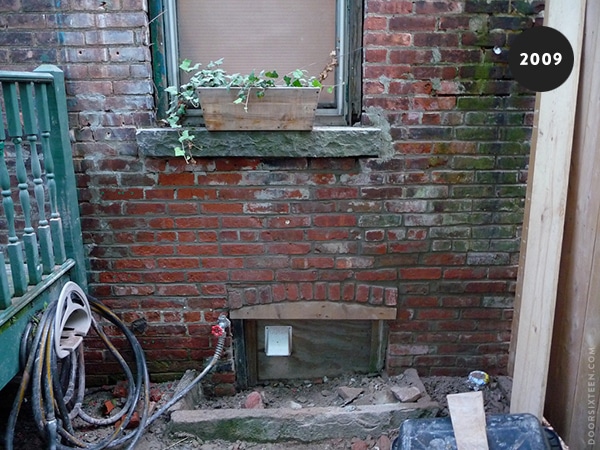
Wow. That photo from 2007 makes me feel so heavy and sad. I don’t know why I didn’t really blog about a lot of the work that was done on our house back then. It felt very overwhelming and scary at the time. The back of the house was in danger of collapsing—those bricks could be pulled out by hand, and if you pressed on the exterior walls, they’d move. Years of ice buildup on the back of the house (caused by a rotted-out gutter and blocked downspout) caused the mortar to fail, and misguided attempts to patch the area with cement instead of mortar led to deterioration of the bricks. The 2009 photo shows the same corner after being rebuilt using all of the original bricks! They had to dig down about 6 feet below ground level to stabilize and waterproof the foundation. After that photo was taken, the entire back of the house was cleaned and the rest of bricks were repointed (and, of course, a new window was installed). Comparing the 2007 photo to the ones above it from 2014 makes me very emotional. You lose perspective sometimes after you’ve been working on an old house for years and years. It’s easy to forget how far you’ve come when you see it every day.


46 Comments
Well done – I hate doing that kind of work but it always feels so great afterwards! 🙂
Much better! The first thing I did when we bought our house was paint our MAROON bulkhead a deep brown to blend into the landscape on the back of the house. My husband thought it was going to be the biggest waste of time/effort but now it looks so much better. And on more than one occasion when I pull into the driveway and see that totally unoffensive bulkhead, I think to myself, “I am SO glad I painted that!”
Also, every time I hear about someone needing to repair/replace windows, I thank my lucky stars that our 1948 house came with brand new Pella WOOD replacement windows. Real wood muntins too! No vinyl or aluminum and they are super energy efficient and sound proofing as well! We looked at few homes that needed new windows and the price quotes we got were gut-wrenching.
Wow, that’s great! Fortunately we still have ALL of our original wood windows (basement excepted) from 1890, most of them still with the original glass, so they can be repaired and easily last another 100+ years. I’m very glad we didn’t wind up in a situation where we’d be looking at having to replace a bunch of vinyl or aluminum windows. It wasn’t something I had much awareness of yet when we were looking at houses, but I’m so so so grateful to have wood.
Now, the aluminum storm windows, on the other hand…ugh. I’ve very tempted to just get rid of them completely. I like sweaters…
I love projects like this. So easy to push off, but once you finally do them they have such a huge impact!
Question, why TSP substitute and not TSP?
Emily, real TSP (trisodium phosphate) is rarely used for cleaning these days—it’s environmentally horrible. Here’s an article that explains the difference between TSP and TSP substitute:
http://www.ask.com/explore/what-tsp-cleaner
It looks great! So professional 🙂
I have horrible, brown, PVC front door and I gave up any hopes to make them look better until I read your post today.
Good cleaning is a must but I also read that you have to sand it before applying paint – have you sanded the window?
Check the label on the paint you’re planning to use and see what’s recommended. The spray paint I used requires cleaning and de-glossing, both of which TSP substitute takes care of.
looks so much better!!
why not just paint the vent and save the $75??
Because we really, really wanted something copper on the back of the house, and we couldn’t afford to do the downspout. The vent hood will look great—just a little something special in a spot that needs it.
I’m with Kate! Spray paint the vent until you are ready to spend for the copper cover of your dreams.
It’s been eight years! Pretty sure I’m ready. Hah. Also, I’m sick of the hood falling off the house, but I haven’t wanted to drill into the brick because it’s not permanent. At some point you kind of have to give up the stopgaps and go for what you want.
No kidding! Get that damn dryer vent and never look back. What’s $75.00 in the grand scheme of things? It’s not like you are crazy spendy all the time. And it’s going to be so pretty back there adding a little bit of pizazz. I spent $35 on a brass doorbell because I love it and it’s just a little gorgeous surprise.
Nice…looking good ‘lil window. And on a completely unrelated note….you’ve got me hooked on Bron/Broen. I just finished the first season. It was SO good. Did you find the second season? I just did a preliminary search and found it on a site called “Daily Motion.” It seems they have the entire season, but I haven’t checked too closely. Just thought of you when I found it. Thanks for telling me about it. Best wishes, Katie
Also. LOVE the sumo wrestler! I see it!
Hi Katie, yes, I did watch the second season on DailyMotion! The entire season is there. Two things: Install AdBlock plus first so you don’t lose your mind—you can easily turn it off when you’re not watching the show. (I don’t like to keep it on all the time, personally.) Also, note that the episodes on DailyMotion come from Norwegian TV. The English subtitles are not great—there are a lot of grammatical errors, and I personally found that distracting. If the second season winds up on Hulu, I’m SURE the subtitles will be redone. If you can’t wait, though… 😉
Wow, that looks great! Sometimes the smallest things make all the difference… nice work!!
Don’t fear the historic preservation folks at the city. You’ve taken a conservative approach to your windows and they will appreciate it. Speaking as a City Planner who staffs my local Historic Preservation Commission, an approach that conserves as much as original material as possible makes us swoon. Our city has embarked on a large scale facade renovation project and after a month long fight with the contractor over the use of vinyl replacement windows I sent him to your blog. After looking at how you’ve repaired your windows they finally seemed to get it.
Hi Tricia, I don’t fear the board at all! We already went through the whole process of presenting our plans and getting approval years ago. That approval has since expired, though, and repairing our windows is the only exterior project that remains. The city absolutely DOES require an active building permit in order to paint (and this is reinforced with fines), and obtaining the permit requires current historic board approval. I’m not concerned that the board would reject our paint color or anything like that, I just don’t have the time to deal with the whole process right now. It’s time-consuming and difficult to work our schedules around it.
Hi Anna. Thanks for the tips for watching on Daily Motion. While it’s likely I’ll be bothered by the grammatical errors, I may have to make a sacrifice and go ahead anyway! Need my Broen fix!
I love seeing the transformation. It is wonderful what a little paint can do.
Wow, something so small makes such an impact, you’d never guess. Looks great! Good luck with the rest of the windows.
Here’s a great video on how to do an epoxy repair on that bit of rotten wood around your window.
I know you could have found that yourself (along with a dozen others on the internet), but it popped to mind when I saw that picture. Let us know how it all goes whenever you get around to it!
Oh yeah, repairing rot with epoxy and I go way back. I’ve already done the insides of most of the windows, and the floor in the back room is probably 50% epoxy, haha. 😉 Some of the casings do need to come out, though, at least in part.
Well done–those little jobs with all the prep and clean up seem almost as major as the big ones. Have you considered painting the dryer vent black too? Enjoy your blog and watching your thoughtful changes on your home and apartment.
Yes, that’s what I said I was replacing with copper. 🙂
To repair in kind, like for like, and repaint to match the existing color (Black) doesn’t require COA from the ARC or a permit from Builing Inspector.
That kind of thing comes under the heading of routine maintenance.
Just to take that rotten wood piece, in the photo out and put in a new piece = maintenance.
If you take the windows out completely and REPLACE them with a new window then you need a COA.
I took the most of sashes out in my own home, stripped them, fixed/repaired broken mullions and a rotten bottom rail, re-glazed and repainted, and put them back in.
From the 2nd floor I leaned out the opening and used an extension ladder. I also put on new storm windows, the old alumninum ones had broken mechanisms. Time consuming and I still have several to go in the process but they look and work so much better when done.
If you need a supplier for window parts I have one.
Yes, you would need a permit for scaffold should you choose to use one.
I would spray paint the dryer vent black until I could get the new one.
🙂
Hi, Brigidanne! 🙂 I’ve actually never painted the windows, so it’s definitely not an in-kind repair. The current window color (I’m guessing from at least 30 years ago) is green. We were approved to paint them black back when we went through the approval process (5 or 6 years ago), but the time limit has long since expired. I’d take a chance and just go for it, but the last time we did that (repairing mortar at porch level around the downspout—no ladder, even!), someone called the building dept and they issued a stop work order. In my mind that was an in-kind repair, but I guess I was wrong. It seems kind of crazy to me that I can’t do regular maintenance on the front of the house without going through the entire process each time, but I guess I understand the intent of the rules. It’s just frustrating when our time is so limited.
Hi Anna,
After we rebuilt our diamond pane wood-sash windows in our Chicago-area 1888 Victorian, I found a company in Iowa (?) that makes the original old-fashioned wood framed storm windows. (I think it was these guys, but not sure as I passed the records on when we sold the house: http://www.adamsarch.com/)
I was able to ditch the terrible triple-track aluminum storms and loved the look, plus they kept us nice and warm! of course, you have to swap the storms out during the summer, but I felt it was a small amount of effort & worth it for the period look & lowered heating bills. 🙂
Anna,
Found your blog thru a google alert. Looks like you did a good job on preparing the window for paint. Does the Valspar paint have reflective pigments in it. PVC will distort at 160 F.
Hi Abe, I have no idea, but you can read more about the spray paint here:
http://www.valsparpaint.com/en/find-the-right-product/interior/spray-paint/plastic-paint.html
When I do projects like this I joke that it’s for my pretend blog which I call “The Inoffensive Decorator.” These projects will never dazzle anyone, but it’s just one less eyesore to live with.
Nice job!
Ahh . . .
The little projects can be the most satisfying. Maybe because they tend to be quick and cheap, but still have an impact. The window looks great!
The sumo wrestler comment had me completely cracking up! Ha! Love it. Congrats on marking off something on your list! Looks great.
Yes, I second Jaimie’s comment. Love these little projects that have such a big impact. Very nice.
I loved your very honest post “weighty” from a while back. Would you consider posting an update on how things have unfolded?
Found your blog & website a few years ago because
Of your dad’s work & a pic of you with him. Neither disappoint- bonus finding
Restoration tips & your mom’s art. And. Honoring the swedish heritage.
Jamptland, klovsjo to Nebraska. Musicians not artists but so many lovely relatives!
This is fantastic/terrible news. I never realised you could paint vinyl windows. I’vw put off the job of dealing with our whole front door and window situation for years because I thought we needed to put proper wooden sash windows back in which would cost about €6,000. So. Huh. Now I’ve no excuse. Great job.
Hi Anna! I know this comment isn’t really relevant to this particular post, but I just read an article about these designers and their work (some of the textiles in particular) instantly made me think of you. Check out Piano Nobile (http://www.studiopianonobile.com).
just found a tutorial advising not to paint over vinyl with dark colors. which, of course, led me to spend about an hour getting sucked into the wonderful spiral that is your blog (i really want those colorful raindrop leggings!!) before i found this post back that i had apparently bookmarked somewhere in my little brain: a year in – how is the black spraypaint holding up on the vinyl?
Still looks perfect, Kara!
Fantastic! Thanks for the bringing hope to our dismal hideous white vinyl window problem!
Could I ask how the vinyl basement window painting has held up 15 months later?
Thanks for the inspiration!
Wow, it’s a popular day for this post! The paint has held up perfectly, still looks like the day it was painted.
Hi Anna, I love this project and am considering to do something similar. I was wondering how the paint held up so far? Does it resist the weather? Is it easy to clean? Any advice for someone who might give it a shot? Thanks in advance!
Interesting post!
I know this post is from several years back, I’m wondering how well it’s held up?
Hi Jessica, we sold the house more than two years ago, so I’m afraid I’m not able to tell you.