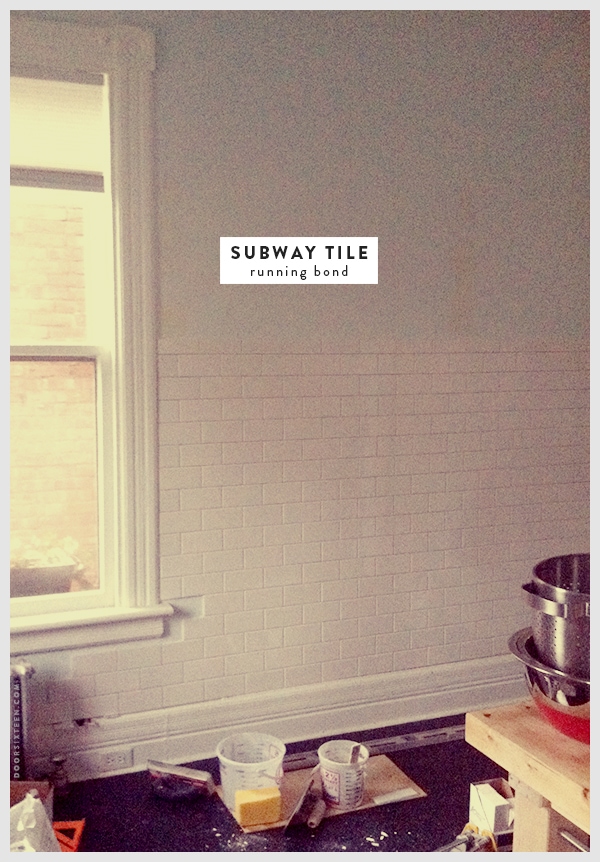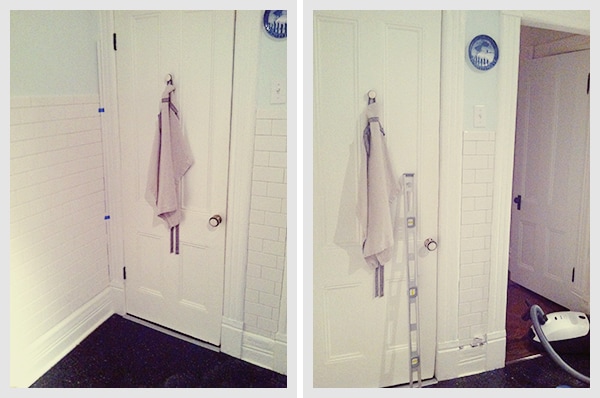
I feel like I’m just going to start every post about the kitchen renovation the same way: These photos are terrible. I’m sorry. The good news is that they make last week’s terrible photos look downright professional by comparison! I was so engrossed in the tile work to bother walking 15 feet to get my camera, and low-light iPhone photos…grain city. Oh well. I threw some adjustment layers, borders and type on them, which I’m pretty sure is the secret to good blog photography. (No?)
It may not look like I got that much done, but I actually tiled for more hours this week than last. There were a lot of cuts to make in the edge tiles! We did finally give in and buy a cheap-o wet tile saw, but it made us feel like we were either going to lose fingers or burn the house down, so we’re sticking with a guillotine-style manual cutter and nippers for now. That takes forever.
As you can see, I’m still avoiding that tricky area around the windowsill. I think I need to get one of those little hand-saws for tile that looks like a coping saw. That’s an actual thing, right? I haven’t seen them at Lowe’s/Home Depot, but I’ll look at a tile store next weekend. There are only a few areas in the room where the cuts are really detailed, so doing them by hand seems reasonable enough. I’d rather cut the tile than under-cut the sill.

The other thing that took F-O-R-E-V-E-R was tiling this little strip of wall between the pantry and the kitchen entryway. The logistics of laying out 6″ tile in a running bond pattern in a 7 ½″ space made my head hurt. I opted to set the whole section off-center to avoid (a) tiny strips of tile on either side, or (b) having some kind of weird centered geometric pattern effect once the dark grout goes in. I think it looks just fine. Please don’t tell me if it doesn’t.
The eagle-eyed obsessives in the audience may have noticed that this little strip is also one row lower than the height of the tile on wall to its left. That’s because of the electrical switch. Call me lazy, but I really don’t want to have to open the wall, deal with a fire stop, move the electrical box and replaster the old hole just for the sake of one row of tile. I’m surprisingly OK with this non-solution.
Aside from updating my tiling progress, I wanted to share my two big renovation rules—both of which I made sure to stick to this weekend.
1. Have a “renovation outfit” that fits you and looks OK.
After seven years of renovating the same house, I can tell you the least motivating thing I face on renovation days is the prospect of having to change into ill-fitting old jeans and a giant t-shirt with a stupid logo on it. Gross clothes make you feel, well, gross. You can roll your eyes all you want, but not feeling hideous while you’re ripping paneling off a wall in a filthy basement goes a long way. You can buy a pair of jeans (Diva skinnies are my go-to jeans for dirty work), a soft t-shirt and a lightweight hoodie from Old Navy for less than $50. You don’t have to worry about them getting dirty or stained, and they’ll last through years of renovation projects. Worth it.
2. Periodically stop and clean up your workspace.
I can’t stress this enough. A messy environment makes for messy work when you’re talking about stuff like tiling and wallpapering, because you’ll be getting thinset and grout and paste and paper scraps all over the place, and chances are good that you’ll wind up ruining something or other as a result. Working in a mess just makes everything so much harder, anyway—you can’t spread out easily when you need to measure something big, and you’re constantly stepping around (or in) debris. I force myself to stop what I’m doing every now and then and clean up. I bag up trash, I move tools I’m done with to their storage spots, I organize screws and nails, I sweep (and vacuum, if necessary) and I wash my hands. It seems like pain to stop in the middle of a project, but again…worth it.


56 Comments
You make it look so easy! Like the tips- i also follow the outfit rule. If you look like crap you’ll feel like it, although my husband thinks its utter madness i always stick to this rule!
I can’t agree with this enough. Having been in a renovation zone for over a decade now – a state of perpetual renovation – I can’t no longer bear to feel perpetually grungy either in my clothes or in the space. Also, you do notice that the best craftspeople and sub-contractors always tidy their spaces and tools at the end of a day/job. It takes time but it seems to accompany efficiency and accuracy. Nice job by the way.
This looks lovely! It brings such a nice feeling into the kitchen, and I can’t wait to see it with the black grout. I also cannot tell you enough how much I agree with rule #2 for your renovation rules! It makes things so much easier if you keep your work area clean as you go, and it is such a nice feeling when you finally wrap up for the day to not have a whole day’s cumulative mess sitting there glaring at you like a nasty goblin.
The tiling is looking fantastic, can’t wait to see it with the dark grout. Are you good with tile nippers? http://www.mcmaster.com/#tile-nippers/=kjbhsv
They take a little practice but can get a really good finished look for tricky spots.
I’m learning the hard way about cleaning up after projects. My (new) kitten got into my sewing project last night…pins, pattern pieces, interfacing, cord, thread have been scattered throughout the house. Feeling bad, as I never even thought about it, I’m fairly systematic with my sewing, and although I leave it out while doing a project, I always tidy it up at the end of the night (key word, ‘tidy’ not put clean). Lessons learned. No one got hurt, but the pattern was ruined.
Shall take your advice on the outfit rule, as I often look and sound like a crazy bag lady while reno-ing/projecting – and always seem to run into a crush while wandering the aimless isles of HD.
Yeah, I mentioned my nippers in the post! I’m not particularly good at using them, but I can do a (mostly) straight line or a simple curve if I score really well first. I don’t think nippers work well for very detailed work, though—fingers crossed that a wee coping saw will do the trick. 🙂
Dope, see that now.
Never used a coping saw for tiling – good luck, you’ve got the patience, and it will turn out brilliantly. 🙂
one thing we highly neglected during renovating our apartment: cleaning up after a day’s work.
it. was. terrible! but spending hours every night after working a full day left us exhausted, and that was the last on our minds at the end of the day, and the first thing we saw/did when we walked in the next….
tile looks great, and thanks for the tips!
cheers 🙂
I painted our side-front door (this is a Vermont thing, NO ONE uses the actual front door) this weekend, and grabbed a gross company hoodie we’d been meaning to toss and put it on as a smock over my actual clothes. It worked really well! Secret comfy clothes underneath!
Wow, that subway tile is gorgeous – and your kitchen already looks amazing 🙂 I’m sure once everything’s in place that row lower tile will be entirely unnoticeable, I didn’t even catch it at first.
I should probably stop pointing it out to everyone, right? 😉
I cannot agree more – especially on the outfit. I can’t remember how many times I would have to head off to the hardware store dressed like some horror show. And you ALWAYS run into someone you know at the hardware store GUARANTEED!
You just changed my world with that outfit tip. Permission to buy a new outfit and more motivation to do dirty projects—thank you!
This is looking so boss, girl… exciting!!
And that outfit thing? Oh, yes. Resounding yes. Like, a hells to the yes. (That clean-up thing is a must, too. Smarty.)
Never thought of it before, but feeling sexy while grouting or painting or DIY-ing in general is definitely the main rule every woman should follow 🙂 And doing it in a clean spot might make you feel like a star.
Great advise
Hmmm, “sexy” seems to be pushing it a bit (I’m not sure I’ve ever felt “sexy” in my entire life…), but if that helps you get the job done, do whatever you need to!
I definitely didn’t mean to suggest that my rules are just meant for women, though. They’re non-gender-specific.
Sexy, neat, tidy… whatever. Mind my english, it may sound better in my head.. :S But, the minute you care about your outfit, you’re trying to look good, hence sexy, no? (Must check the meaning then…)
Anyway, whatever the reason, great tips to take on account Anna!
No worries, I didn’t realize English wasn’t your first language! Yeah, making yourself feel “sexy” would imply that you want to be sexually appealing while renovating, and…that’s really not what I meant. 😉 It’s just semantics, though, I understand what you’re saying!
Hahaha! No, I’m not that weird… 🙂
BTW, your kitchen is turning out amazing, great job! Here in Spain we got tiled kitchens and bathrooms from top to bottom on every wall. Non-tiled trend it’s starting to pop – I think because it’s cheaper, but specially if you’re a renter, having walls to paint would be great in spite of the grease an all – still can’t get out of my mind your first NY apartment black kitchen wall!
And I think I’ll be envious of your subway tile in a while either… 🙂
It looks great! I’ve also found that stopping and cleaning up the area works really well for moving. When I moved out of my apartment, I was super bummed and overwhelmed until I picked up trash, took it out, moved everything to the center of the room, and vacuumed around it. A little extra work but my morale went way up.
wow looks awesome! my partner who is a tilesetter read this post over my shoulder and had some comments/tips that i thought i’d pass on…
-a wet saw will not definitely cut you as long as water is going through it… he has freaked people out on job sites by sticking his hand right against it (it’s a little abrasive but won’t cut skin). wet saws are by nature really safe to use (even cheap-o ones that seem a little freaky at first)
-for cutting around the window sill, he recommends making a template out of cardboard (wet saw, coping saw or a diamond-blade grinder would all work equally well for these cuts)
-if you end up wanting to fill in the last row below the windowsill (instead of under-cutting), he says it’s totally possible to trim 3×6 to fit. try cutting the tile down to size horizontally with the wet saw so that the off-cut (waste side) is smaller than the good side. that way when you cut right on your line, the good side is less likely to split.
if you have any other specific questions, he’s always happy to check out pictures & weigh in!
Thanks, Parker (and Parker’s partner)! Yeah, it’s just that one tile I’m procrastinating about—the one that needs to be at the bottom right of the windowsill. I’m fine cutting the ones to go underneath with the guillotine cutter.
The tile saw was pretty terrifying!! I was actually more scared of cutting myself on the tile than the blade. I’m not usually scared of power tools, but this thing was freaking me out! It was vibrating like crazy and the cuts were anything but smooth. Maybe we were doing something wrong?
Best vacuum cleaner, ever.
Yes!
the tile is looking great…i really liked your kitchen before, would not have thought it needed changing, but now i am really looking forward to seeing this renovation finished.
Thanks, Laura. We’re not really changing that much…adding the tile is really the biggest part of it. 🙂
Is there not a tool lending library in your town or in NYC that you can use? Maybe it’s a bit California-socialist of us, but the Oakland Public Library has a tool lending branch where you can borrow tools for free. http://www.oaklandlibrary.org/locations/tool-lending-library/tool-list-lending-guidelines
I’m 99.99% certain that the Newburgh public library doesn’t lend out tools, but what a cool idea!
Really though, it doesn’t make sense for us to rent tools. We’re seven years and counting into this renovation—I would lose my mind if we didn’t have our own stuff.
I was thinking the same thing, but in the Bay Area there are Home Depot “Pro” stores (where normal people can go too) that rent tools by the day. Very great when you need a steamer to remove wallpaper that is a one time deal. Maybe in your area the normal Home Depots might rent tools?
Yes, most chain hardware/home stores have some kind of tool rental program. I’ve never been in a situation where doing so would be practical or cost-effective, though. My mother & stepfather live a few miles away and also own a lot of specialty tools and equipment, so when we’ve needed things like large compressors for nail guns we’ve borrowed from them.
I’d rather just pay $15 for the little coping saw and own it than have to go back and rent it every weekend for the next 4 months. 😉
We have free tool lending libraries in Portland, OR too, but they’re run by neighborhood volunteers. One of them expanded into kitchen tool rentals as well!
http://www.septl.org
http://www.kitchenshare.org/
Amy! I’m glad you commented because now I remember I was supposed to report back to you about the grout! I checked the old bag of (true black) grout I used for the bathroom and vestibule floors, and it’s Polyblend sanded grout in Charcoal. The only problem there is that subway tiles have too tight a joint to use sanded grout, and they don’t make the Charcoal color in a non-sanded mix. Bummer!
I wound up buying a bag of Tec non-sanded grout in Raven. I’m going to give it a little test-drive in an inconspicuous spot next weekend and see how it looks when it’s dry. I’ll let you know.
Personally, I’m OK even if it’s dark gray. I think it’ll read as black next to the white tiles, anyway.
I think that Tec had good reviews on the John Bridge forums! I was also reading that using distilled water may help when using black grout so the pH isn’t messed with, which I guess could change the color.
I suppose there are also grout renewal products that can be applied later if the grout lines aren’t as dark as you want them. It would be kind of annoying to fill in all the lines though!
Love the tile. Here’s a link to something Moomin you might like:
http://www.etsy.com/listing/107582053/moomin-silicon-mold-mould-ice-cubic-cup?ref=fp_treasury_4
Cheers!
Hey Anna, I was thinking it might be easier to undercut the sill rather than cut the tile. looks like that little piece on the upper left would snap off if you try to cut…..just an idea
Yeah, that’s the approach I was talking about taking in my last post. The tiles are only 22 cents each, though, so I might as well give it a shot. 😉
Love your tip about the outfit! It’s so true that it makes a long day of renovating easier when you don’t look like hell – at least when you get started. I have done quite a few tile designs and always mock them up in CAD so my eye can catch weird patterns and anomalies, and I think you handled the tile between the two doorways in the best way possible.
I read that if you buy your tiles from Lowes, they will actually cut them for you if you bring in your receipt. Something to think about!
Oh, that’s interesting! I imagine that makes more sense for someone doing a smaller tiling job (or using much larger tiles), though. I can’t really see us driving 40 minutes back and forth every time we need one of our little 3×6″ tiles cut, you know? Also, no matter how many cardboard templates you make, there are always adjustments that need to be made on the fly…especially in an old house where nothing is square.
Anna — it looks awesome. So exciting! Quick question about the renovation outfit thing. When you wear it, does it magically inspire motivation and get you in the zone? 😉
Maybe if I only got a new outfit…
IT DOES. No, really. Once I’m in my “work clothes,” there aren’t really any excuses. Being prepared and ready to go is an excellent motivator!
Your tile looks great! Some questions: is the top row of tile a different shape? Like an edge cap tile? Do you listen to music or the radio while you’re doing a job like this? I’m with you on keeping things tidy. I have a metro shelf unit on casters that I keep everything on in (citrus) boxes with painter tape labels. I can roll it from room to room as I’m working (right now, mainly painting, 1911 dutch colonial.) Regarding my outfit, not that presentable, but comfortable, and always a heavy cotton t-shirt that I can get paint on. Do you ever have to wear knee-pads? I do and they drive me crazy, twisting around, bunching my pant legs, but they do the job. Enjoying your progress!
Yes, the top row of tile has a bullnose (curved) edge, and it’s 2×6″ (rather than 3×6″). That’s so you don’t have a hard, unfinished edge at the top where the tile ends. I always listen to something while I’m working—either music or public radio. And no, I’ve never worn knee pads.
Looks great so far! I wonder if you could find the tools for around the windowsill on here: http://neighborgoods.net Might be nice to try to borrow instead of buy for a limited number of projects.
Thanks, Melanie. That website doesn’t service Newburgh, but I have neighbors and family with tools.
It’s really just one little hand saw that I need, and I’d like to have one anyway. In this case, it makes more sense for me to spend $10-15 on the tool than to keep having to borrow one over and over and over again.
Instead of cutting the tile intricately around the window sill, why not notch the back of the sill against the wall to allow a tile to slide behind it?
Hi Ron, yes, that’s what I meant by under-cutting. Like I said to Lindsay, though, at 22¢ per tile, I’d rather give cutting tile a try or two before I start Dremeling into the sill/wall.
Wow, I envy you for your skill in tiling. The other day I saw these tiles in someone’s kitchen on TV (in Germany) and thought immediately “How come that they got Anna’s tiles?! ;-)))
I only wondered, why did you tile the narrow area between the two doors all together? Any need? *please don’t beat me now*
Am I seeing a Rocal Copenhagen plate hanging in the corner there? Which year? As I see only one, probably the year you met? ;-)))) I am thinking of getting one of “our” year …. as they are available for almost nothing …. but the design that year wasn’t my favourite ;-)))
Looking forward to seeing what the kitchen will look like in regard to tools etc.
Haha! No beatings, I promise. 😉 I’m actually tiling the entire perimeter of the room (all four walls) and painting the area above the tile black, so if I don’t do that little strip it’ll look very strange. I want to have a continuous (or at least visually continuous!) line of tile around the entire room.
And yes, good eye, that is indeed a Royal Copenhagen plate! It was my Danish grandmother’s. It’s from 1911! 🙂
WOW! I love this. So glad I just came across your blog 🙂
Tiling looks great. Love your reno rules.
I have a wet saw and didn’t have any problem ! Make sure to fill the bin that’s underneath with enough water, otherwise you get a firework ! Also, if you have a Dremel, there’s a little tool made specifically for tile cutting. I used it to tile in my powder room and it worked great (it’s a bit expensive though, 15€ here in France, just for the accessory). Good luck !
Oh yeah, we definitely have water in it. We’re obviously either doing something wrong or our expectations are too high. Or our tile is too small…
We do have a Dremel, but it’s battery-operated and sadly not powerful enough to do much of anything. I think we bought one of those attachments when we were working on our bathroom a few years ago and had no luck.
I’m sure the little hand saw will be just fine. 🙂
Love the idea of a renovating outfit. Why hadn’t I thought of that before?
Also, another lover of the Royal Copenhagen dish displayed.
You’re giving women everywhere. We’re all gorgeous handywomen in heels. Okay, maybe not the heels part LOL 🙂 And did I read correctly in a previous comment about a tool lending library?? Umm.. AWESOME!
HOPE. Giving women hope. OOPS 🙂
NOTHING I’ve written here should be interpreted as being directed at women! This is all non-gender specific.