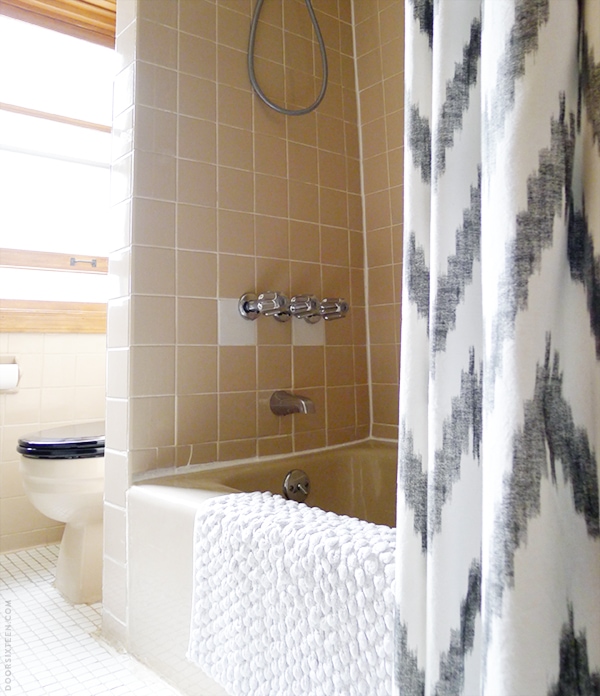
Remember the pinkish-tan/Band-Aid bathroom in my apartment? I’m still doing the best I can (short of gutting the whole thing) to make it feel cleaner, fresher and generally less awful, and my latest improvement measure was taking care of the undeniably revolting perma-mildew situation inside the bathtub/shower area.
I realize the photo above might not look like much of an “after,” but let’s consider where we started:
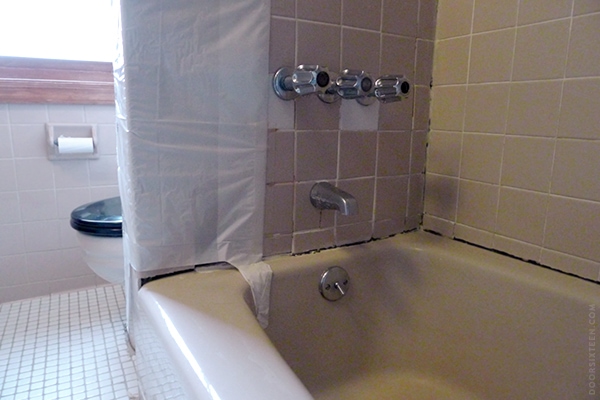
I know. It was really gross. Believe me, even after scrubbing everything with bleach and hot water, this was as clean as it got. There were loose tiles (hence the taped-up garbage bag, an attempt to keep water from getting inside of the wall) and failing grout, and nearly all of the caulk had gone permanently black. The outer layer of caulk was actually clear silicone, and I’m thinking the mildew likely came from the first layer of caulk having been applied over even older “infected” caulk without properly preparing the area first.
Want to take a closer look?
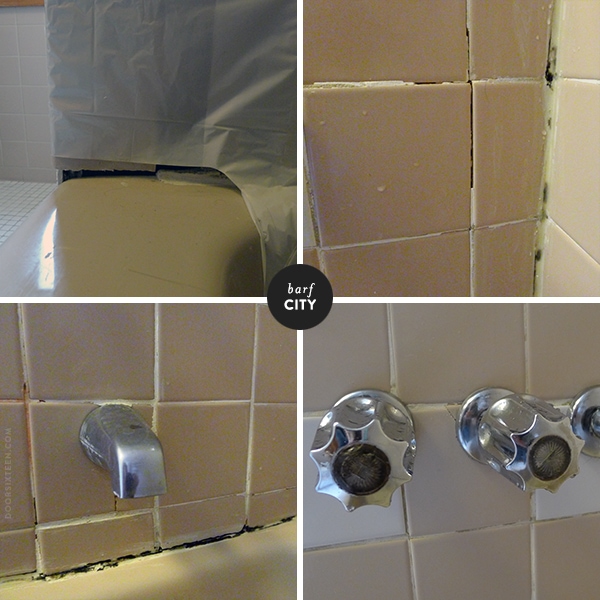
I’m sorry. Truly. There was even some of that extra-creepy reddish mold growing on the grout, which I learned in the course of putting this post together is called Serratia marcescens, which “manifests as a pink discoloration and slimy film feeding off phosphorus-containing materials or fatty substances such as soap and shampoo residue.” I don’t want that in my bathroom, especially not anywhere near my naked body. Incidentally, it’s thought that S. marcescens is behind the appearance of “blood” on the Eucharist in the early 13th century that led to the Feast of Corpus Christi. Well, then! I don’t know about you, but I think discovering the blood of Christ on your bathroom walls is a pretty good indication that it’s time to re-grout.
And yes, we did readily step into this shower every morning for months, because what else were we going to do? You need a span of at least 2 1/2 days to address both grout and caulk, and when you don’t have a second bathroom available, it can be tricky to plan out the whole thing. I wound up with a work-free summer Friday and a weekend where I needed to be in the city, though, so I resigned myself to a few days of personal griminess and just went for it.
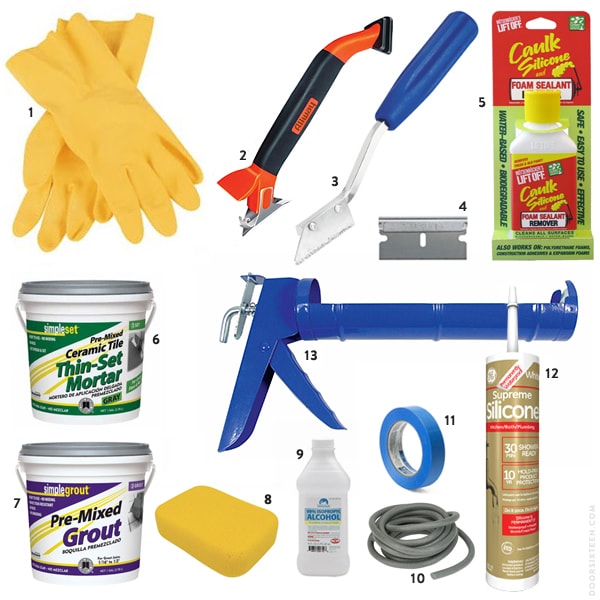
Tools + Materials!
Since I know what it’s like to have lived in apartments with gross caulk and grout during a time before I learned how to remedy the problem permanently (I distinctly recall attempting to paint over discolored caulk in my first apartment’s bathroom…), I thought I’d include a list of supplies. I’m not even making any brand recommendations because I honestly just used what was available at the cruddy hardware store closest to our apartment. I didn’t want to bring materials from house because I’m in the midst of using them in the kitchen renovation, and the last thing I need is to discover I’ve left something I need at the apartment.
This is about $60 worth of supplies, give or take. Not so bad, considering things like grout saws and caulk guns are good to own for future projects.
1. Rubber gloves. Wear them.
2. Caulk tool. Forget about the rubber triangle end, the magic is in the metal part. It’s perfect for scraping out out caulk. You really need to get ALL of the old caulk out, too.
3. Grout saw. These little guys are perfect for filing out grout between tiles. I know it seems really tedious, but once you get going it’s not so bad. If the old grout is really loose, just file it all out. If it’s just stained (not moldy), you can get away with leaving some (NOT ALL!) of the old grout intact. As long as get at least 2/3 of it out, the new grout will have enough of a free edge on the tile to grab onto. If there are some areas where the grout is totally fine (as it was in most of my shower), you can leave it alone — just be aware that you can’t “skim” over it with new grout, and new/old colors may not match perfectly.
4. Razor blade. No home renovation project is possible without one. There’s always going to be some kind of residue that needs to be cleaned up or a caulk edge that needs its seal broken, and you’ll want to have a blade handy.
5. Silicone caulk remover. I wound up not having to use this, but I have in the past. If there’s caulk residue that just won’t budge, this will help loosen it up.
6. Pre-mixed thinset. If you have loose tiles, you need to remove them completely, scrape off the old mortar, and re-set them. Ordinarily I would advise against using the pre-mixed stuff, but for doing repair work or just setting a few tiles (as opposed to a whole bathroom), it’s fine. A small tub is cheap and it gets the job done.
7. Pre-mixed grout. Ditto the above when it comes to grout. For bigger jobs I always mix my own grout, but pre-mixed is fine for repairs. Make sure you check the joint size indicated on the tub to make sure it’ll work with your tiles.
8. Tiling sponge. Regular dish sponges tend to fall apart and even leave colored residue on grout. Get a nice, big tiling sponge for doing your wipe-downs. It’s worth it.
9. Rubbing alcohol. After you’ve removed all traces of old caulk, wipe everything down with alcohol. It’ll help prepare the area for good caulk adhesion.
10. Backer rod. You might not need this, but if you have any large/wide gaps to caulk, you’ll want to cram some of this stuff in the space first. Otherwise, you’ll just be unloading endless amounts of caulk into the abyss. Backer rod is a wonderful thing.
11. Painter’s tape. Silicone caulk is much messier than latex/acrylic caulk, and it’s tough to get a nice edge, especially if you’re filling in an irregular space between tiles that appear to have been cut with soccer cleats. Taping off the edges (like I did here) helps a lot. Just make sure you pull off the tape slowwwwwly and carefully right after you smooth out the bead — don’t wait for the caulk to dry.
12. Good-quality silicone caulk. Make sure you buy caulk that’s meant to be used in showers/wet areas. I usually buy whatever makes the most amazing claims on the packing, like 30 minute drying time or 10 year mildew-resistance. In my experience, caulk that comes in a cartridge-style tube is much easier to work with than the stuff in a squeezy-tube. Which brings me to the final item…
13. Caulk gun. You don’t need to get anything fancy. A cheapo, no-frills, $7 caulk gun is just fine.
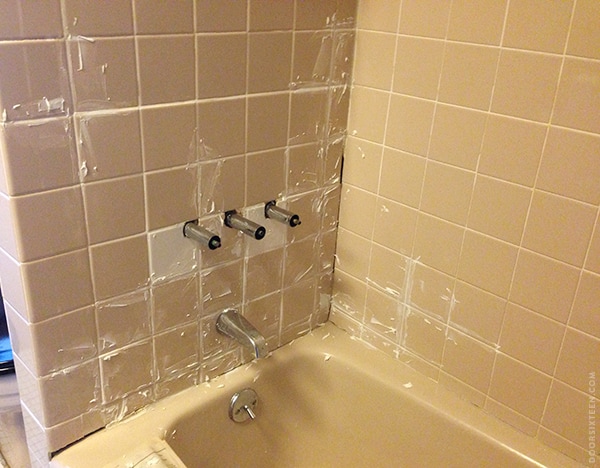
I wish I had more process photos, but it was 90°F in the bathroom and I was just trying to get through the whole thing as fast as possible. Stopping to take off my gloves and take pictures just wasn’t working out.
The first thing I did was give the whole shower area a good scrubbing with bleach. Ordinarily bleach should be avoided on grout because it will cause the bonding agents to fail over time, but when you’re dealing with mildew and mold and stuff like that, bleach is sort of the only answer.
Then I started stripping out the caulk, which was the most time-consuming and gross part of the whole project. I did it in stages — the easy stuff before the grout, the tough stuff while the grout was drying. Ideally you’d just do it all at once, but I was fed up.
Next, I sawed out the bad grout and removed the loose tiles (most of which just sort of fell off the wall while I was sawing the grout). I scraped and sanded the old mortar off the tiles, washed them with bleach and water for good measure, and re-set them. I didn’t bother using a notched trowel because mine was at the house and I didn’t want to buy a new one, so I just used a screwdriver to “draw” some ridges in the new thinset before pressing them into place.
And then, grout! Again, I’m doing it “wrong” here, but it’s not a big deal when you’re only doing a small area. When you’re grouting a whole wall you should use a tile float to really get the grout into the gaps, but you know what else works really well for a repair job? An old credit card and a finger. Yep.
Then I wiped everything down and let the grout dry overnight while I resumed stripped caulk…
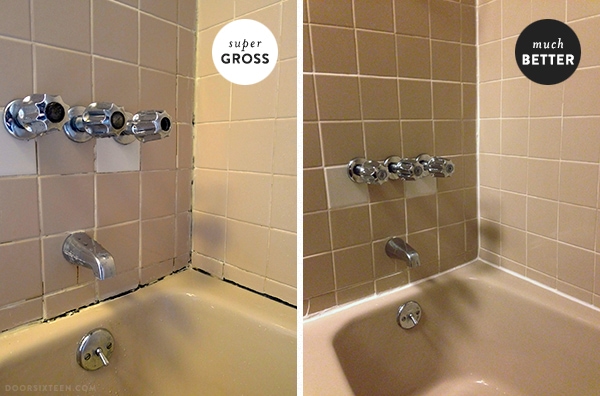
The next day, NEW CAULK! I love caulking. It’s so satisfying. I wiped everything down with alcohol, stuffed backer rod into the big gaps, taped off the edges and did my thing. I know it looks kind of janky, but that’s really because the tiles were so unevenly cut and there were some gaps that were super wide. It’s not like this bathroom is going to win any beauty contests, so my goal was really just to get everything clean, fresh and watertight.
It really does look SO much better now. Yeah, I still hate the color and it’s still an ugly bathroom, but it’s clean. Getting into the shower doesn’t feel like a potential health threat anymore. I’m also not worried about water getting into the wall now, which in turn eases my concerns about the entire bathtub eventually crashing through rotted joists and falling into the apartment below us. I think about these things.
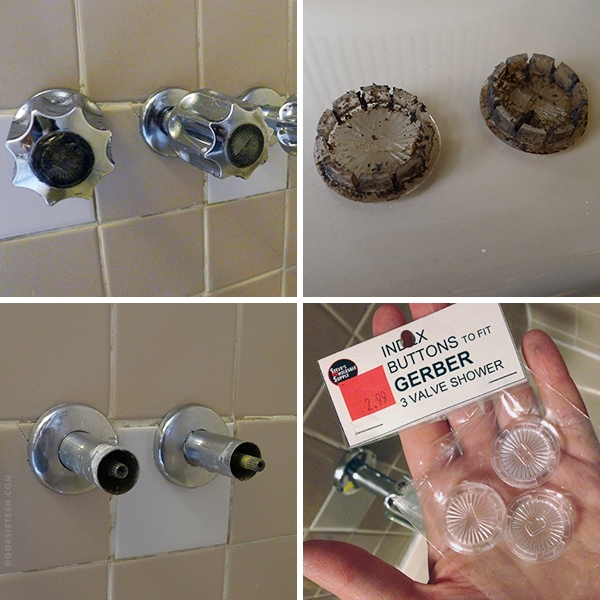
The other things I took care of while I was dealing with the grout were the knobs. The handles were all wiggly and loose, and there was nasty black gunk setting up shop behind the little plastic “buttons” on the fronts. Those buttons pop out really easily with the edge of a knife or screwdriver, and, assuming you have standard-style fixtures in a common brand, you can replace them very cheaply. They’re called index buttons — just search for the brand of your faucet. You’ll be amazed what’s still readily available even for very old fixtures. We found exactly what we needed on the rack at the cruddy local hardware store, no special order required.
Anyway, once you pop off the buttons, you can easily unscrew the whole handle — just stick a screwdriver inside. There was all kind of ick inside of the backs of the handles, so I gave them a good scrubbing (yes, again with bleach — sometimes you gotta). I pulled the escutcheons forward (there’s a tiny screw underneath), re-caulked the edge where the tile meets the stop tube (again to prevent water from getting into the wall), cleaned everything really well, and tightened it all back up again.
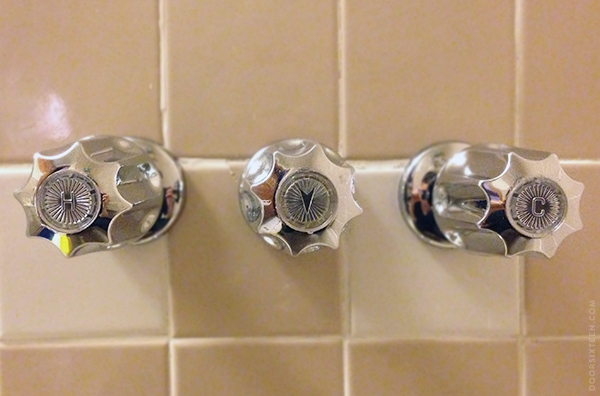
Ahhhhh, so much better! The faucet handles are now not only clean and shiny, they’re also non-wiggly and easy to shut off. I’m so glad I took the time to take care of the handles. It really wasn’t a big deal, and it makes such a huge difference in our daily existence. Nobody needs to live with black grime under their index buttons.
You can totally do this — the caulking and grouting and the faucet tune-up. It’s not hard AT ALL. If you’re at all unsure about how to disassemble the trim on your faucet, you have the entire internet at your disposal. I know I’ve said this a million times, but the only reason I know how to do any of this is because someone else did it before me and took the time to write about it — or, even better, make a YouTube video — and put it online. Also, the Reader’s Digest Complete Do-It-Yourself Manual. It’s literally the only book I own about home repair, and I refer to it constantly.
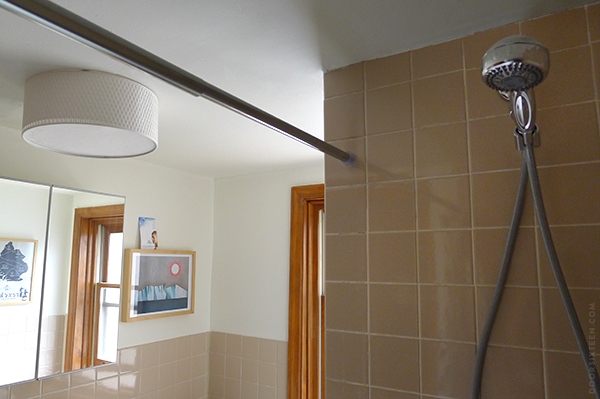
Oh! One last thing — a new shower head! This was Evan’s project, as it has been in the other apartments we’ve lived in together. Unless you’re renting a newly-renovated apartment, chances are the shower head could use replacing. It’s such an easy fix, and it makes an enormous difference. I personally really like having a hose attachment because it makes cleaning the tub soooooo much easier (not to mention how nice it is for giving plants showers and rinsing out hair dye). The one we bought isn’t anything special, but it was less than 25 bucks and it gets the job done. All you need to install it is a wrench and plumber’s tape (don’t believe the line on the package about not needing tape — that’s a lie), and the whole thing takes 15 minutes, tops.
If you want to see more of the apartment bathroom, I wrote about the other improvements I’ve been making a couple of months ago. What’s left? Three things, none of which are a rush: Find the perfect rug to disguise the ugly floor tiles, replace the toilet flush valve assembly (it’s got a leaky flapper) and fix up the peeling laminate on the sink cabinet.
p.s. I’m having some issues with my spam-blocking plugin. If you try to leave a comment and run into any problems, would you mind dropping me an email or tweeting to me? Thank you!



61 Comments
Do your landlords know how lucky they are to have you? I know you do this stuff more for your own peace of mind/ comfort, but seriously. Wow.
I’m sure they don’t notice!!
Seriously that looks like a TON of work, great job! And I agree- your landlords are so lucky to have you!
Wow, what an improvement. Our bathroom is about the same as your before. The grout is all crumbling away. Our tub is not even remotely level. I really want to just rip out the whole bathroom and start fresh. Maybe some grout and caulk will at least make it bearable until then.
Thank you for posting this. My bathrooms are not as bad but there are definitely some icky spots that need the grout replaced. Fun fact, S. marcescens reeks when you grow it on a plate (agar plate, for microbiology lab).
My gag reflexes while reading this post was in full force but I forged through knowing that it was all coming to a happy ending. I commend you, truly, for having the balls to get up close and personal, fixing the details where I on the other hand would’ve taken a sledgehammer and whacked at it from the distance and told someone to install me a brand new bathroom.
Love the title “Barf City” – made me laugh. Glad everything is going along so well!
We have the very same pink tub and tile. Our landlord’s handyman was in last week to fix a bad leak in the faucet, and he said if it didn’t work they’d have to tear the whole thing out and replace it. Well, you can imagine how many fingers I had crossed. I hate that gnarly pink bathroom… Band-Aid pink is the perfect descriptor. Alas, he fixed the leak and we are stuck with it. Congrats on getting that done, it must feel fantastic!
thanks for this! I ran into problems at my old house because I did not know about backer rod. Dur. Now my current house looks like your apartment, but I’m not nearly as squeamish as I should be about it. Perhaps it was the disgusting rental house I lived in in-between houses. But the hard part is finding 2 days to do it. We DO have an extra bathroom but one is occupied by children and just no. I also didn’t know they had premixed mortar. Maybe I can fix my floor tiles so they don’t come with me when I walk with bare wet feet? hehe. Love your blog!
Oof, takes me back to the year I lived in a shoddy townhouse where the WHOLE bathroom was ugly, tiny marble tiles. It even had a built in shower door — oy was it a pain to clean! And even clean, still looked gross! Bravo to you for biting the bullet and tackling it yourself. I imagine showering feels much better now!
eeeewwwww!!! What a major improvement, oh my stars!
I love your blog — thanks so much for sharing all this info and photos.
btw — I’ve changed a couple of toilet flappers/valves in the last year — as long as you drain out the water first, and follow the steps on the instructions, it’s actually pretty easy once you’re in there. It seems crazy complicated and intimidating when looking at the packaging (well, it did to me), but the steps were pretty clear. GOod luck and thanks again for your blog.
Thank you SO much! I had no idea about backer rod–we have a huge caulk gap to deal with and this info is extremely helpful. Your “after” is beautiful.
thanks for the post: very informative! i had no idea bleach can break down grout. i use a bleach-based product on my bathroom: i figured you want to get things as sanitized as possible in there! what do you normally use to clean your tub?
I usually clean the tub and shower area with Mrs. Meyers bathroom cleaner. The key to keeping it from getting icky in the first place though is to rinse everything off well post-shower (another reason I like a hose attachment), and then dry the inside of the shower (especially where the tile meets the tub) with a cloth. We keep a stack of cheap washcloths in the bathroom just for that purpose.
If the tub itself ever needs deep-cleaning, I use Barkeepers Friend. It works really well on water spots on chrome or stainless steel, too!
Thank you for this – I’ve been staring at my nasty bathroom for three years, and I own my house. I’ve been so afraid to totally mess it up that I haven’t tackled this project yet – I only need to deal with moldy caulk too, my tiles are fine. Thanks, maybe I won’t be such a wimp now.
Same here, but I’ve been dealing with my gross bathroom for 2.5 years. Anna: thanks for making it look so easy. Now if I could only figure out how to lay a new floor since my laminate is barf city!
What a lovely final photo. This is inspiring me to finally tackle recaulking my own tub (again), which desperately needs it. Question: how long do you go without getting the new caulk wet? I’m never sure whether to believe the claims on the package. I want the caulk to last as long as possible…but then I also want to shower as soon as possible.
I go by the package! The kind I used only needed 30 minutes. I’ve never had an issue with the package being wrong.
Grout is another story, though — I really do like to let it dry for at least 48 hours, preferably longer. I kept plastic taped over the area I re-grouted for a few days just for good measure.
It looks great! One question — do you seal your grout? I’ve been meaning to regrout our bathroom tile (I think learning what that orange gunk is will finally get me to do it) but I’m wondering how important/desirable the sealing step is. Thanks!
Mariana, I didn’t bother sealing the grout at the apartment because I only did a small area and it’s REALLY bright white compared to the older grout…there’s not much point. I have sealed all of the grout at the house, though, and I am positive it’s made a difference. Our shower has white tiles and white grout, and it all still looks brand new after 5 years.
FYI…..if you cannot find replacement hot/cold buttons I’ve had great success soaking mine in hot water and oxyclean. Works great on my stainless kitchen sink too (especially the gross stopper/strainer part!)…..just fill sink and let soak awhile. Nothing as satisfying as de-gunking 🙂
I would have just cleaned them, but one was missing completely and the other two were pretty badly cracked — worth the $3. 😉
Totally inspiring. Maybe I CAN tackle our 1920 bathroom tile.
Very impressive work, Anna!
Thank you for this.
Really, thank you.
I just moved into a “luxury” apartment a couple months ago, and my shower is definitely in similar condition. I’ve tried to combat the mildew as much as I can, but re-caulking the tub might be my only option now.
The mildew around my bedroom window, however – that’s going to be a long battle with me and the landlord. Can’t wait for that conversation!
Oh dear, mildew around a bedroom window is worrisome. I think it would be in your landlord’s best interest to repair whatever leak is causing that…hopefully…!
We interrupt this program for a nerdy typeface inquiry! This question is completely unrelated to home renovation, but: what is the name of the font that you incorporate into the majority of your photos? Looks a lot like Futura (and maybe it is)?
Nice tub work, btw!
It’s Brandon Grotesque — also answered on my FAQ page. 😉
Thanks for posting this! I live in an old brownstone with a hands-off landlord, so we’re in a similar position… I’m not quite convinced that I want to fix his bathroom, but this is inspiring! I might just replace the old caulk and not deal with the grout. Fresh, white caulk may get me through.
Those of us who know gross apartment bathrooms can see that a real transformation took place. Congrats.
Can you give a source on the shower curtain and bath mat? Thanks!
Hi Becky, I don’t remember where I got the bath mat (CB2, maybe? I’ve had it for years), but the shower curtain was from West Elm. You can see the whole bathroom in this post:
http://www.doorsixteen.com/2013/06/29/the-new-apartment-bathroom/
Thanks, Anna!
It’s kind of shocking the landlord didn’t have that fixed before you all moved in, but you did a super good job fixing it. (I don’t know if you’re still considering doing a row of black pencil tiles on top of the tan ones, but it’d look great!)
He said he didn’t have time, but that he could take care of it when it was convenient for us — I told him not to worry about it. After all, I know who did the last caulking job, and, well…I’d rather just do it myself and have it be done right. 😉
Wow Anna, you are a brave girl. I need to take a lesson from you! We have the same gross tile issues, only ours is in that jadite/mint green. I don’t hate the green, but the calk. uhhhh nasty. This looks so amazing! Great job and as everyone else has mentioned your landlord is a very lucky person!
OMG– It looks like the old tub/tile from my home in Brookfield,Wis was transported to your apartment–even the hardware is the same! You did a great job and I had a complete tear down bathroom remodel done 5yrs ago. Was more than worth it! Now the best room in the house.
Looks so great! I’m gearing up to do this to our 1932 tiled bathroom and needed the motivation.
In college I moved into a condo and the shower was SO disgusting. I sprayed the whole thing with cleanser, came back a few minutes later and it looked straight out of a horror flick. I just so happened to be taking a micro-biology class at the time and so we cultured it and it was S. marcescense. Applied learning at it’s best!
This just may motivate me to work on my rental’s shower tile and faucet. It looks so much better!
Aaah, SO satisfying! It’s these little things that really make such a HUGE difference! (And it’s not so little, really.)
Oh my god! The mildew behind the knobs. I can’t even. How were you able to shower there without freaking out? I salute you and your mad bathroom skills, Anna.
Now that you’ve practiced, you can come do mine! I’ve got the Jesus mold, too. : /
SO much better!! I need to do this in the new house we just bought… the caulk/grouting is horrific. Thankfully we have extra bathrooms to use in the time-being! We renovated the bathroom in our townhouse last year and had to go to the stinkin’ rec center every night to shower. So I know the feeling!!
Wow, thank you for posting about this. Your bathroom is almost an exact replica–same tile and shower doors (saw your other post)– of the one in my Mom’s house (built about 46 years ago) and the tub area has gotten into the same shape. (As my Dad aged he did not want to make any changes!)
You make it look like a project I can tackle–once I get the bathroom done in my own home!
Great blog, by the way.
Wow… this is inspiring. I should try this in my apartment. Your landlord should deduct some of your rent after doing this. Huge improvement.
I really like our West Elm Zig Zag bathmat, nice and thick so it doesn’t move around on you. But I noticed you have the shower curtain that semi-matches so that might be a little much in a small space. Heres the bathmat: http://www.westelm.com/products/2987659/
I’m happy with our bathmat, I don’t want to replace it! 🙂
Totally off-topic, but what kind of hair dye do you use?
It’s been a long time (years) since I’ve dyed my hair, but to bleach the ends I use Quick Blue powder + 20vol peroxide, followed by Wella Color Charm toner in Pale Blonde.
Thanks, Anna!
Ugh, I need to redo the caulk in my bathroom. When we did the walk through with our landlord that was the only thing I asked him to do (redid the caulk in my old apartment, no interest in doing it again and no time either…) and of course it hasn’t been done. 13 months later, I should probably suck it up and take care of business!
Wow that looks SO much better!! I am going to have to get that book for my hubby for his birthday. As new homeowners we have a project list a MILE long to tackle. Thanks for the resource!
Great work! And also great patience! I would probably try to do it as soon as a I moved in and miss the time then to do many other nicer things in the apartment…
you probably already know about this, but you can reglaze/refinish that bathroom tile. it’s the same process used for refinishing old cast iron tubs. we have a large bathroom that was covered in peach/maroon tile and now it’s bright white and so, so much better! also it gets rid of the grout which makes cleaning a breeze. my friend just did it herself in her own bathroom (we hired someone). something to consider if you hate the color of that tile but don’t want to invest a lot of money re-doing it right now.
Hi Angela, yeah, I discussed that in another post…to sum up, the tiles and the walls behind them need an enormous amount of work (hence the plastic bag taped to the wall), and epoxy coating would really just be covering up a bad problem. I’d rather fix what’s here now and then think about doing a true renovation job down the road if we keep the apartment for a long time and the landlord is agreeable. I’m not a huge fan of cover-ups in these types of situations.
So glad we have a clawfoot tub and bead board, lol. Great tutorial, thank you so much. Such a lot of work in this very clear post. I think I could actually do this now if I needed to.
Thank you for providing these steps. The last photo makes me determined to start cleaning my bathroom, I crave the clean feeling. You must be happy with your results. Great job!
Thank you for providing these tips, they were really helpful!
You are amazing. I don’t know how I found you but I’m a thousand times grateful for the internets for this reason! I’m about to start this tonight on our new SF apartment and your post helped me A LOT. Keep on keepin’ on my friend.
Thank you so much for this! I’m a renter, and I always thought that when the bathroom got like this, it was time to move. Ha. I am so impressed with your grit and feel empowered to tackle some dumb rental problems now!
This is SO my (rental) apartment! I’m planning on tackling the caulk and grout this weekend, and your post is incredibly helpful! Thank you for sharing your insights.
WOW!!! You did an excellent job! So proud of you! Your landlord should be so happy he/she has someone like you as their tenant. We have also being doing alot in this place as it takes forever to get the landlord to do anything. So this is encouraging – thank you for sharing – God bless