
The fourth installment in my birthday tribute to my house is devoted entirely to one part of one room, the three windows in the bowed front of the living room.
There are 15 windows at Door Sixteen, and all of them are original to the house. All but three or four panes within are the original, hand-blown wavy glass, too, which never fails to amaze me—in 120 years, even boarded-up with plywood, that most fragile part of the house stayed intact. I can get pretty emotional about stuff like that. My house is a trooper.
Still, though, all of the windows were badly in need of repair when the house became ours. So far I’ve completely overhauled eleven of them, and plan to address the remaining three this spring. It’s time-consuming work, for sure, but really worth it. Somehow I managed to stretch out the repair of the three windows in the living room for just about five years from start to finish! Here’s a photo chronology…
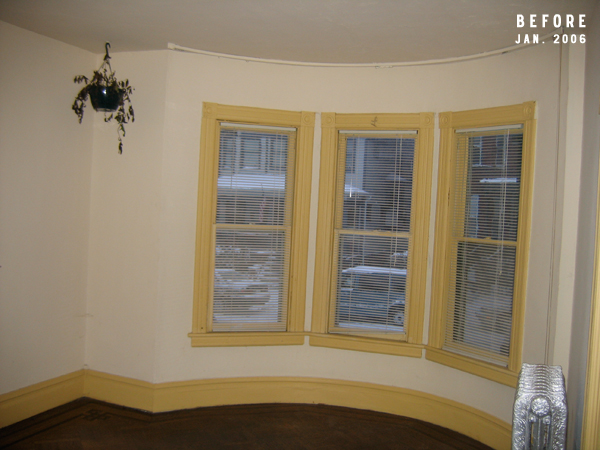
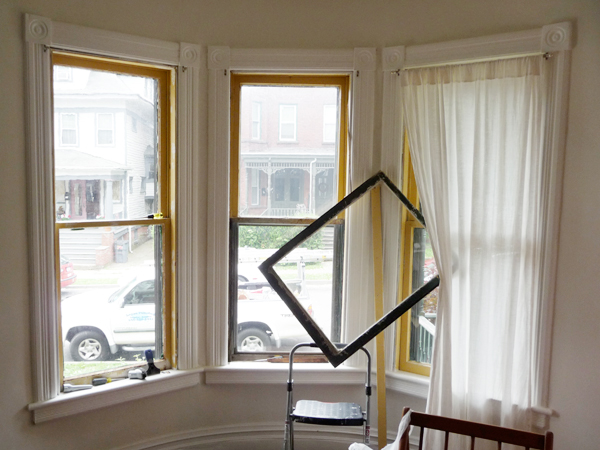
I still cringe when I see that paint. Walls the color of spoiled mayonnaise with flat, goldenrod trim. It was awful stuff—not just the color, but that it was globbed on top of layers of peeling paint and seemingly applied with a dirty mop. And how sad is that dead hanging plant? I remember the hook it was hanging from being nearly impossible to remove from the ceiling.
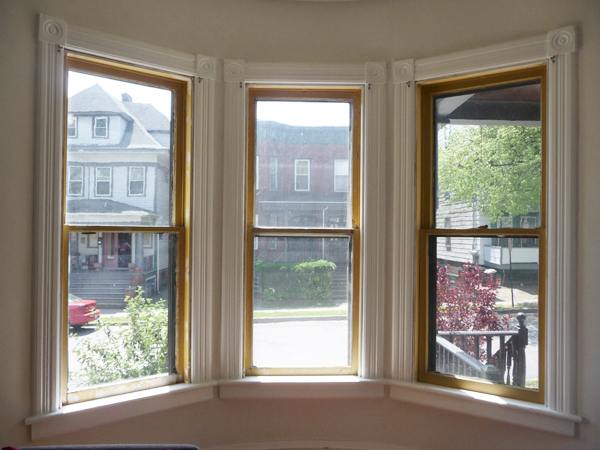
Right after buying the house, I scraped off as much loose paint as I could from the window casings and painted them white (Benjamin Moore Simply White, satin finish—the same as all of the rest of the white woodwork in the house). I didn’t paint the sashes, though, since I knew they required major repair work that I didn’t yet feel confident enough to undertake. Adding another layer of paint to the mix would just have made everything harder in the long run, so I decided to leave them as-is “for a few weeks”. HAH! In reality, time stretched out to over three years before I even came near those windows again.
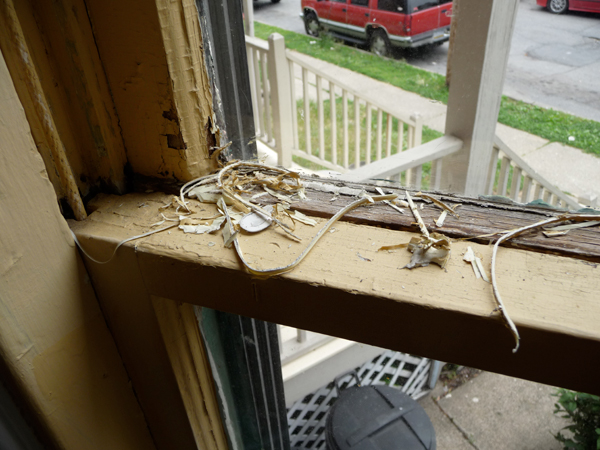
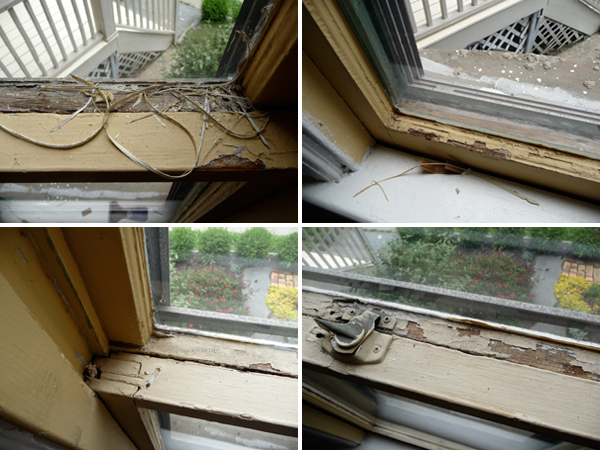
And then I just couldn’t take it anymore.
Out came the chisels, the razor blades, the scrapers, the tiny sander, and the dozens of other implements that I use to remove layers of paint, caulk, dried-out glazing, and other crud (and yes, on went the dust mask and goggles and out came the HEPA-filtered vacuum). With very old wood, sometimes it’s better to not completely remove all of the paint from the surface. That last layer of paint is sometimes so well-bonded to the wood (let’s face it, lead paint was nothing if not ultra-durable) that scraping it off can take a surprising amount of the wood itself along with it, especially if the wood has been damaged by sun or water over the years. I tend to take a minimalist approach to refinishing woodwork—I remove whatever paint is loose, peeling or chalky, and leave the rest.
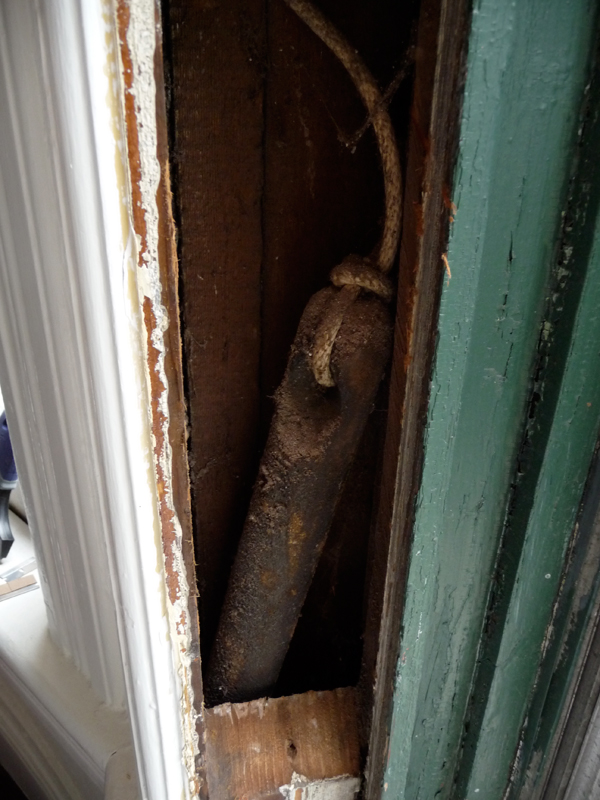
This is the point you hit where there’s no turning back. If you’re fixing up your old windows, that’s the time to replace the old sash cords. Thankfully, whoever invented weighted sash windows thought to design a little door inside of the sash channel so they can be accessed easily (kind of). I won’t get into specific instructions here (check this old post for links that can take you to better sites to see how it’s done), but it’s not too scary. I promise. You really just need to know what you’re doing. In other words, have a computer nearby so you can frantically Google “replace sash cord tie knot” when you realize you have absolutely NO idea how to reattach the weight to your new cord.
(Also, make sure you actually have new cord—nylon clothesline is just fine—before you wind up with a dangling sash and a big open hole in your house. I am an idiot, and didn’t. Oops. I’m still not exactly sure how I thought it was going to magically materialize in the basement despite never having bought any.)


This is how you securely tie a sash cord onto a sash weight. You can thank me later.
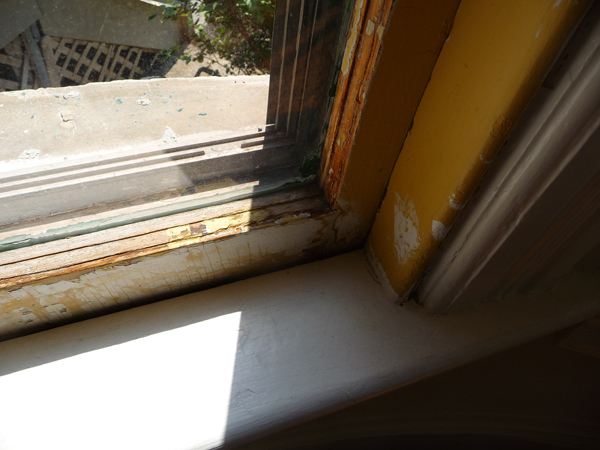
Loose paint gone, old caulk scraped out, damaged areas filled with Ready Patch, everything sanded and smoothed, sash cords replaced and window stops in place…and then it all just stayed like this for another entire year. I don’t know why I didn’t just move onto repainting the windows right then. I should have.
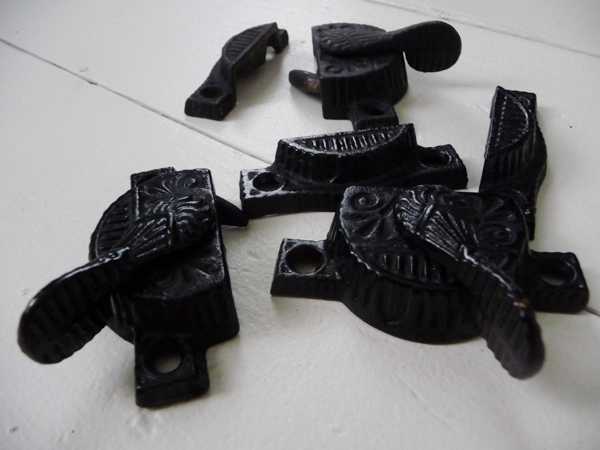
In April 2010, I finally got around to stripping all of the paint off of the original cast iron sash locks (I use the crockpot method for stripping hardware). They were quite rusty and corroded, so I gave them my usual treatment—a coat of of Rust-Oleum Rust Reformer in flat black. I’ve used it on hinges, locks, backplates, and all sorts of other “active” parts over the years, and it’s never so much as gotten a chip or scratch. It really doesn’t look or act like paint, and it goes on so thinly that all of the decorative detail stays crisp.
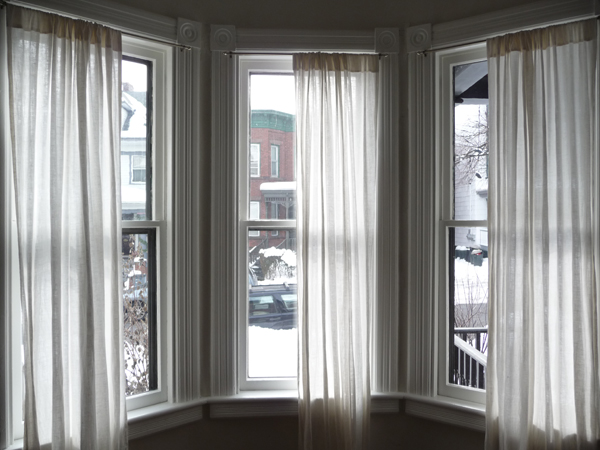
Around the same time, I managed to paint the sashes, too, but I didn’t take a photo at the time (too exhausted and sick of it all, probably). This is how they looked up until a couple of weeks ago.
Ugh, so grainy! I’m sorry, I know nothing about taking properly-lighted photographs.
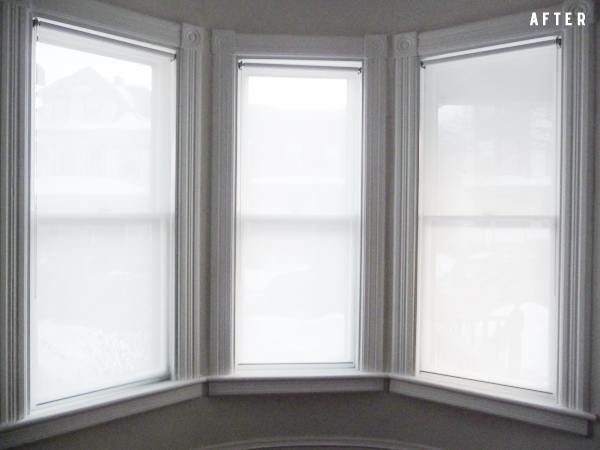
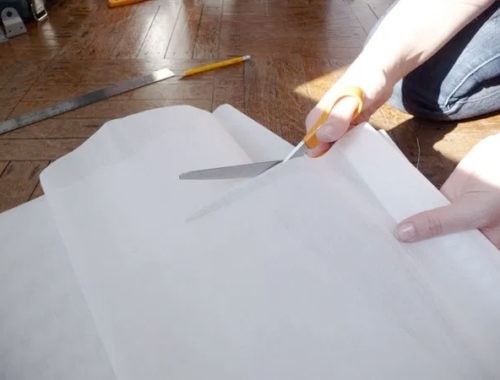
Of course, as soon as the sashes were all white and clean and pretty, the curtains I’d been using to hide them just seemed excessive. I’ve tried to love curtains, but I think I’m just not that kind of girl. I like shades and blinds. Simple. When you have three tall windows so close to each other, it’s easy to wind up with a wall of fabric that can be really overbearing. Enter cut-to-fit ENJE shades!
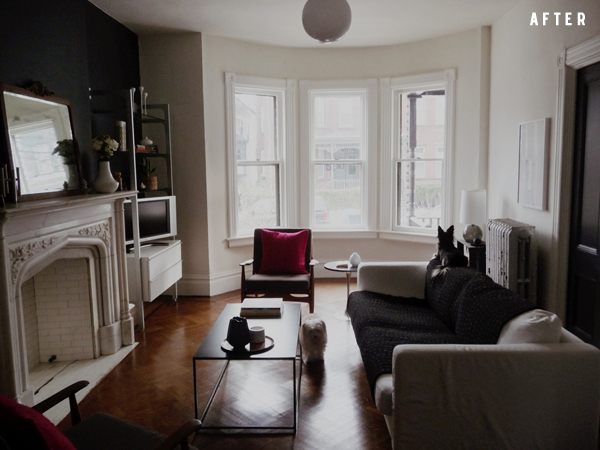
See? Beautiful windows! And it only took five years.
I’ve written before about the merits of repairing old windows rather than replacing them, and you should check that post for some really good window-repair resources.
Stay tuned for part five!
See also:
• Five years ago, part one.
• Five years ago, part two.
• Five years ago, part three.


66 Comments
The transformation is stunning. So what if it took so long? To me, the timeline seems completely realistic. You work full time and have a ton of interests and it sounds like it was a lot of work. I’d take long breaks in between scraping and sanding too. But I’m glad for you that it’s done. Your windows wear their newly restored dignity well.
jbhat
I was reading this post while staring at one of 11 windows that desperately need the same time and attention!!! This is awesome inspiration to begin work on ours…someday. 🙂 They look beautiful!
You’ll get there eventually. 🙂
I love that you put five years into making them perfect (intentionally or otherwise!), and that you get emotional that their original!
My neighborhod is about 75-100 years old and almost all rentals (college town) . The rugby team across the street ripped the interior doors out of their craftsman and threw them at cars on night, Im sure they will be replaced with the cheapest option at Home Depot. I understand that the landlords can’t always afford to fix the houses properly (only to have them trashed again) but seeing the houses on my street fall into decay and beige ‘upgrades’ makes me so sad, without every window and sash replaced with plastic crap, the house loses its history and little of its soul. Your house has given me hope 🙂
Argh!! Stories like that make me so angry.
What happened to the old doors? Did they break? WHO DOES THINGS LIKE THAT?
Nothing makes me sadder than plastic windows in old houses. Plastic windows that can’t be painted or repaired. Plastic windows that will wind up in a landfill in 20 years.
Okay, there are things that make me sadder. Like hollow-core doors in old houses.
I had to drive over the door that came at my car, I couldn’t dodge fast enough. I called 911 and at first the operator didn’t seem to understand how doors would be flying towards cars, but when I gave her the address she understood “oh yes, the rugby house!”
…do you live on my street?
Okay, it’s not frat boys ripping out doors, it’s flippers.
Watching said flippers rip out the original doors with glass knobs and built ins and original floor and the original Claycraft tile mantle and put them all in a big dumpster made me so mad! I mean, maybe one of the built ins didn’t wind up in the dumpster and maybe wound up in my house maybe and maybe got refinished and looks great, but you know, just maybe…
You did such a good job Anna! I’m jealous of your original windows, I have crappy broken 80s aluminum replacements that I have to replace again with quality wood ones, because apparently there are only like 30 of us left on the planet that care about quality/aesthetics .
.
Wow – your windows look AMAZING!!! I’m very happy to hear its not as scary as it sounds, because I’ve been staring at 4 giant double-hung divided light windows (28 panes on each!) for 5 years and after waking up this winter to ice frozen on the *inside* of my bedroom window I realized that [insert voice of doom here] is is time… (We’re completely reglazing them.)
Did you take the upper sashes out to strip & repaint too? How did you block the “hole” in the frame?
28 PANES. Wow. You have my sympathies!! That’s a lot of reglazing.
I did not take the upper sashes out. Once upon a time, someone set some pretty serious nails (like small railroad spikes!) into the top sash of each window, fixing them permanently in place. With a lot of effort I probably could have removed the spikes and made the top sash operational again, but I think the damage to the wood would have been significant. We get very good airflow without opening the top sash, so I’m okay with it. I actually went ahead and completely caulked the area where the top sash meets the parting bead, so it’s totally airtight now. It’s cut down on drafts significantly! If I ever have to replace the glass I suppose I’ll have to slice through the caulking (and dig that nail out!), but let’s just hope that never happens. 🙂
Oh, sorry, I missed your other question! By “hole” do you mean the open window without the window in it? I made sure to finish in under a day (I only did one at a time) so there wouldn’t be any exposure, but otherwise I think I would have just nailed in some plywood.
Damn! Looks great Anna!!
In the first pictures, there is a tube or track that follows the curve of the ceiling against the windows. I have heard about these in old houses…that they are the original brass curtain rods. Was that the case with yours? Or was it just plastic tracking?
Oh no, it was just one of those gross plastic tracks! Painted to match the walls, even. Yuck!
OMG, will you marry me? I so needed this. I have ten windows that need rehabbing, and this gives me hope. I even share the same miserable harvest gold throughout the house. I am intimidated by this process so much so that I haven’t tackled it.
Thank you!
Check out the links in the other post I linked to, Tamisha. That’s where I learned how to do this! It’s really not complicated at all, you just need to have the right materials on-hand and know what you’re getting into.
Thanks, Anna. The other part that intimidates me is that all my windows either 12 over 12, 8 over 8 or 6 over 6….lots and lots of glazing….ugh. Maybe I’ll tackle that this summer….when I have lots of free time.
one more question and then I’ll stop bugging you. Did your windows have that molded lead guide on the sides and bottom? I’m not sure what to replace them with? They keep the sash from rattling in the frame.
No, they don’t. My windows are just wood and glass. The glass is held in place with glazing points and regular “putty”-type window glazing.
Can you not buy new lead?
The windows are amazing, Anna. The funny thing is that the bones of your home require so much labour, but they never get the attention they truly deserve. Your home is lucky to receive so much TLC from both you and Evan.
awesome job! people are so willing to think that new replacement windows are paramount to energy efficiency. what about the embodied energy that would be lost if the old windows were thrown out? thanks for being a proponent for the repair of windows, even if it did take a little while…
Not only the disposal of the old windows, but the manufacturing (and eventual disposal of) the new ones, too…
I just came across your blog a few weeks ago and am so glad I did! I’ve been working to restore our old windows too and don’t know whether to go for latex or oil-based paint. What kind of paint are you using?
Katie, I’ve been using BM Satin Impervo on all of the interior woodwork. It’s an acrylic enamel. I prime first with Zinsser Bulls Eye 1-2-3. This combination has been working out really well—I don’t see any evidence of wear, lifting, or bleed-through, even on areas I painted five years ago.
On the exterior of the windows (which haven’t been painted yet—we need a pro with scaffolding and a permit to do that), we’re going to use an oil-based primer and BM Aura Exterior paint (semi-gloss finish).
Thank you! We are planning to paint all 22 of our century-old windows. I am definitely inspired by the amount of work you’ve done on yours. After reading this and your previous post about the guest bedroom window, I am hopeful that we can repair our counterweight cords as well. When we took apart the dining room windows (2 sets of 2) for sanding and priming, the weights between the windows were easy to access but it seemed there was no way to access the outer ones. We were already moving towards reassembly but now I have renewed hope of repairing them.
Your home is lovely. The windows turned out beautiful. I especially love what you’ve done saving and restoring the hardware. Thanks for sharing!
Beautiful work. You should feel a special thrill every time you look out those windows. Did any of your windows have sash chains? Some of ours do, and I wonder if I can (or should?) replace them with sash cord. (Our house is a little newer than yours, ca. 1925.)
I’ve just ordered a “tiny sander.” Wish I’d bought one before I started repainting some of our trim work.
I think sash chains became popular in the ’20s, and as long as yours are functioning fine, there’s no need to replace them! I’ve actually read a lot of suggestions that cotton sash cords (like I have) should be replaced with chain whenever possible since it’s more durable, but the test-run I did with one of my windows just wasn’t very smooth—I think I would have had to really look for the exact chain size to fit nicely in my pulleys. I went with polyester (or nylon? I don’t remember) cord instead, which should at least degrade more slowly than cotton.
I loooooooove my tiny electric sander. It makes such a huge difference!!!
what tiny electric sander? web site please as I am looking for one
I have a Black & Decker Mouse.
ahhh a palm sander I was picturing something like a dremel but just for sanding. lol
Beautiful room and gorgeous windows. I sanded and repainted many sash windows too – labour of love and yes, it took us a long time too
This post make me feel *so much better.* Thank you.
Your windows are so unbelievably perfect, everything on this site is so perfect (even your basement), every time I saw photos of your windows, I figured you miraculously fixed yours in a jiffy and practically collapsed on the floor thinking about how much work we have to do.
Congratulations Anna, Happy 5 Year Home Anniversary. Your hard work, attention to detail and impeccable design easthetic has earned you one hell of a home!!!
What timing, as I will start working on the interior-side of my 1912 windows this weekend. The links you provide are really helpful–I’ve been scouring the web and watching lots of video footage to make sure I know what I’m myself getting into.
It’s great to see the resurgence of preserving the character in old houses! Your house is beautiful.
stunning transformation!
Your windows have come up beautifully! We have old timber casement windows in our house which were a not-so-lovely custard colour, very similar in colour to yours. They are very slowly being painted white, one room at a time. I always think windowS can make or break a room. xx
Happy Birthday to your house! Now for a different angle – it’s funny how most house owners in Germany have a completely different theory when it comes to ripping out old windows, it’s all about insulation and saving money (and I guess our landlady does have the point because this winter our flat did get really really cold and I don’t want to imagine what it would have been like without those plastic windows).
We do have details like this
in the flat but the rest is plastic – and that’s the case in about 95 percent of the old houses here.
I was trying to insert a picture, somehow it didn’t work out so here’s the link once again http://www.flickr.com/photos/85666974@N00/4983646728/in/set-72157624288049401/
and I hope I didn’t violate anything 🙂
I’ve read your other “five years ago” posts and I’m amazed at your ability to take your home from what it was to what it is. I’m so awful at visualizing the potential of a space and I admire you being able to!
Wonderful!!
My 100 year old house had [totally inappropriate, dirty] aluminum sliding windows from the 1950s (?) Horrible, cheap, no security whatsoever. Thus, I had to replace 14 of them in 2010 with new double hung windows. The cost was awe-inspiring (not in a good way). However, they are lovely. I am now inspired by you to hang the gorgeous shades that you have done. *fingers crossed*
Lovely! I absolutely adore old windows. The light that filters through them is just incredible, like the sun shining through water. I’m so glad to see you spent the time to repair them instead of giving up and replacing them. Definitely inspirational!
Thank you for this post! (and congratulations on finishing the windows.) We have sash windows that haven’t been opened in the 5 years we’ve lived here, because we’re not sure they actually work. Now I’m about to move my studio into one of those rooms, and really do have to investigate the window. After reading your post, I think I can tackle it!
In the event that they’re painted shut, here’s a good video from This Old House that shows how to open them safely!
The windows look great! Now if I could just get around to working on my 18 double hung & 11 casements. My Dining Room windows and trim were also a similar color with coordinating 70s wallpaper. At least we did a quick white paint cover up!
I wish more people would consider keeping their original windows. Studies have shown that if you have or add a storm window the payback for replacing them with a new double pain window is at least 25 years (longer than most of replacements will last).
I have 19 original windows in my 1927 home that have been staring at me for over a year. A window restoration specialist quoted me $2300 per window. When I replaced my ’50s storm windows, the company offered me full replacements…for $30,000! So seeing your beautifully completed job gives me hope for when I tackle mine.
$2300 PER WINDOW!!!!!! Wow. Was he going to gold-plate the sashes?! That makes me feel glad that I couldn’t find a window repair guy in my area—I was forced to learn how to do it myself!
We have ugly aluminum storm windows, too. We can’t afford to replace them, so I think we’re going to just have replacements made for the ones that are damaged/missing, and then paint the aluminum frames to match our exterior trim. I wish the original wooden storms had never been thrown away, but we can’t find them anywhere. The original screen inserts are in the attic, though!
Oh, and the $2300 was if I prepped the window myself including scraping the 80+ years of crusted paint layers from the exterior. I sent the man on his way and have spent the winter trying to psyche myself up for the task of doing everything myself.
you are amazing. and those windows are very beautiful. thanks to your amazingness
Beautiful. Good job. DIY can be so satisfying albeit lengthy.
thank you for this post.
just finished the kitchen to this old house
and the windows are next on the list.
your house is marvelous…
and i can’t wait to see the basement transformed.
Hi. Long-time lurker fan,
Reading your replies to comments in previous posts, I got the impression you wouldn’t use the Enje for these windows, due to the limited privacy they provide at night (and wondered what you were using, or would use, instead). If I’m right about your previous position, what led you to decide the Enje is adequate? Did you consider a light blocking shade, using something additional in conjunction with the Enje at night, solutions that involve blocking the bottom half of the window only, etc.? I am also not a curtain fan, and have been considering things like two shades per window (one Enje, one light blocking), and other unconventional approaches, along with the common halfish-height curtain/blind approach that works as long as peepers aren’t looking down from elevations.
No, nothing changed, I just don’t have a need for total privacy. I had a few questions from people who were wondering about the opacity, so I answered honestly—but I’ve never personally had any issue at all with the visibility factor. I’m totally fine with the level of sheerness of the ENJE shades!
Thank you for the super helpful post about the windows – amazing results. I too prefer the old windows, but so many of my clients just want to rip out and put in new units.
I’m not sure how I stumbled onto your blog (probably haunting remodeling blogs)…. but I’m glad I did!!!! 🙂
The window transformation is amazing. They look great now!
I have to do this, this summer. You’ve given me some insperation and some really good idea’s. I also don’t have the original storms. but I am hunting salvage stores, I my just end up with the aluminum. I really don’t know what the last owners of the house where thinking they had black tinted storm windows that they made every where. I only have 10 windows to do, but I have 6 basement windows that need full replacement, nothing really left of the original.
Thanks for the paint product ideas.
sorry forgot to spell check
I have done old window restoration and swear by the Restore-it product line for making the windows bulletproof. http://www.restor-it.com/
Ready-patch is solvent-based, which will fill the hole and harden. But often the dry rot in windows is deep, and it is very hard to remove all the compromised wood. Here is my process:
1. Strip the paint anywhere the wood is damaged or soft
2. Remove all soft wood with a screwdriver. Be bold. Soft wood is not structural and just compromises the window. I have had times when I had only a few thin strands of wood holding a sash together!
3. Use the Restor-it wood hardener on the entire area where you have removed wood or where there is damage. Re-apply until it is all absorbed and allow to harden completely.
4. After the wood hardener is set, use the wood filler to rebuild the area. You can actually create significant wood structure with the putty! You have to mix the blue and white putty parts with a putty knife in even proportions to make the active putty, but it is easy. Make sure all of the blue disappears during mixing.
5. Once the putty is applied, create “forms” to restore the original shape by placing visquene over the soft putty then running a putty knife over the visquene. With a little practice you can perfectly match flat surfaces.
5. After the putty has cured, sand the flat areas and cut in any profile with a sharp chisel or knife. This sounds hard, but it is not. You do not have to be perfect! If you have a router with a matching bit, you can also reshape the profile.
6. Prime and paint
I use this technique for a few reasons:
– 2-part, epoxy-based putty and hardener is incredibly durable. Sash rails are structure, not trim! They take a lot of abuse and are under significant strain due to their thin profile. Solvent-based fillers (these are one-part, apply out of a can fillers) will crack eventually under the strain. If you are filling a small hole in a window that has integrity, fillers are fine, but if you have real damage, you need epoxy to restore the actual strength of the wood, not just the appearance.
– Dry rot must be removed and neutralized. After a lot of experiments, I found that the restor-it hardener penetrated better. It actually dissolves some of the natural wood binder and replaces it with a much stronger bond that is impervious to water. There is nothing more frustrating than a beautiful repair that is compromised three years later when some rot remains under the patch.
– The epoxy product makes a very strong substrate for painting. The future strength of your window depends on the integrity of the paint membrane. When the paint sticks better the wood is protected better.
Reading this, I feel like it sounds like I work for Restor-it. I don’t. I am a DIY guy that loves old windows. Where I live in San Francisco, the original windows were often made of very stable old-growth redwood and other woods that you cannot replicate. MUCH better to learn how to repair.
It sounds complicated, but it is not, and it works.
Hi Matt, I actually do use a similar epoxy-based product when dealing with rot, but these particular windows did not have significant damage of that nature. Check the resource links in the post I mentioned (the guest bedroom window). There are a lot of sites that give much more thorough instructions for restoring windows with any manner of problems—including the epoxy method. This site is particularly helpful:
http://www.hereandthere.org/oldhouse/fixing-decayed-wood.html
http://www.hereandthere.org/oldhouse/windows-repairing-steps.html
I don’t intend for my blog to be a how-to guide for anything. 😉
Another VERY useful item is a Stop Bead Adjuster. Many old sash windows have adjustable stops (the wood that holds the sash in place). Over the seasons, the sash and stop may swell or shrink, and these adjusters can make it possible to move the stop in for weathertightness and rattle or out to free a stuck sash. They are clever and very authentic.
If you need them, I found them at http://www.wmjrigby.com/index.php?cat_id=112&nav_tree=10,20,112
The screws actually hold the stop in, and they are fitted in a clever slotted washer that you install with the slot going horizontal. If the window sticks, unscrew a quarter turn, adjust the stop out, and tighten. Do the opposite is a sash rattles.
I love the love you put into these windows! (And oh MY on the crockpot method.) We bought a big old house a couple of years ago (that I’m starting to think will always be a work in progress. oy.) and were VERY lucky most of the woodwork and walls were in OK shape (most, lol). The people we bought it from bought it years ago as a foreclosure and told us they day they moved in, there were price tags hanging from the pocket doors (!!) and all of the upstairs doors had been sold — 100 year-old hinges and all — by the dude who was foreclosed on. I am grateful for the pocket doors but often find myself crying on the inside over that original hardware!
I grew up in a turn of the century house, and I’ve always wanted to have one of my very own, but something tells me I wouldn’t be a very good old house mommy. I mean, this is NUTS. Sash cords, who what?! I didn’t even know such things existed.
Amazing. And the rustoleum tip is priceless… I’ve been searching for a durable black spraypaint forever.
Hello!
I discovered Door Sixteen via Manhattan-Nest. I have enjoyed looking at your archives this past month. Love what your doing with your house – great old house – and your little dogs are so cute! I needed some fresh inspiration & ideas to re-start me on my own old house. I like your clean, “crisp” style – great bathrooms! I look forward to seeing more – Thank You!
Oh lady, your windows look incredible! Wonderful job!! Our homes are so similar in layout it’s eerie. (Your living room is our bedroom – footboard faces the fireplace…) Sadly, our windows were in waaaaaaay rough shape and needed replacing completely – the hardware on yours is to die for! Love it, love it, love it!
I know what you mean about blinds vs drapes. I think I’m going to try some in our bedroom though – looking for something kind of… romantic, I guess. And we need full black-outs in order to sleep. I do so love the Ikea shades though. I’m thinking that’s what we might do in the kitchen windows.
So AWESOME, girl!!
happy birthday house!
We have old sash windows in our house that we love and restore one-by-one. Just wondering if you have found any useful ways to insulate/winterize them. They can still be rather drafty. Thanks!
Hi RRR, check the links in this post—there are a couple that have good advice on winterizing old windows!