
A mere seven months after my last kitchen renovation update, at last! The final reveal! In real-life, I “finished” the kitchen last January, but of course you never actually finish a renovation project, do you? Just looking around the room now I can immediately count at least five things I still need to do in here—the big one being retouching scuffs and scrapes on the floor that happened during the countertop demo and refrigerator replacement. It’ll happen eventually! In the meantime, there’s no point in putting off sharing the completed (“completed”) kitchen as it is.
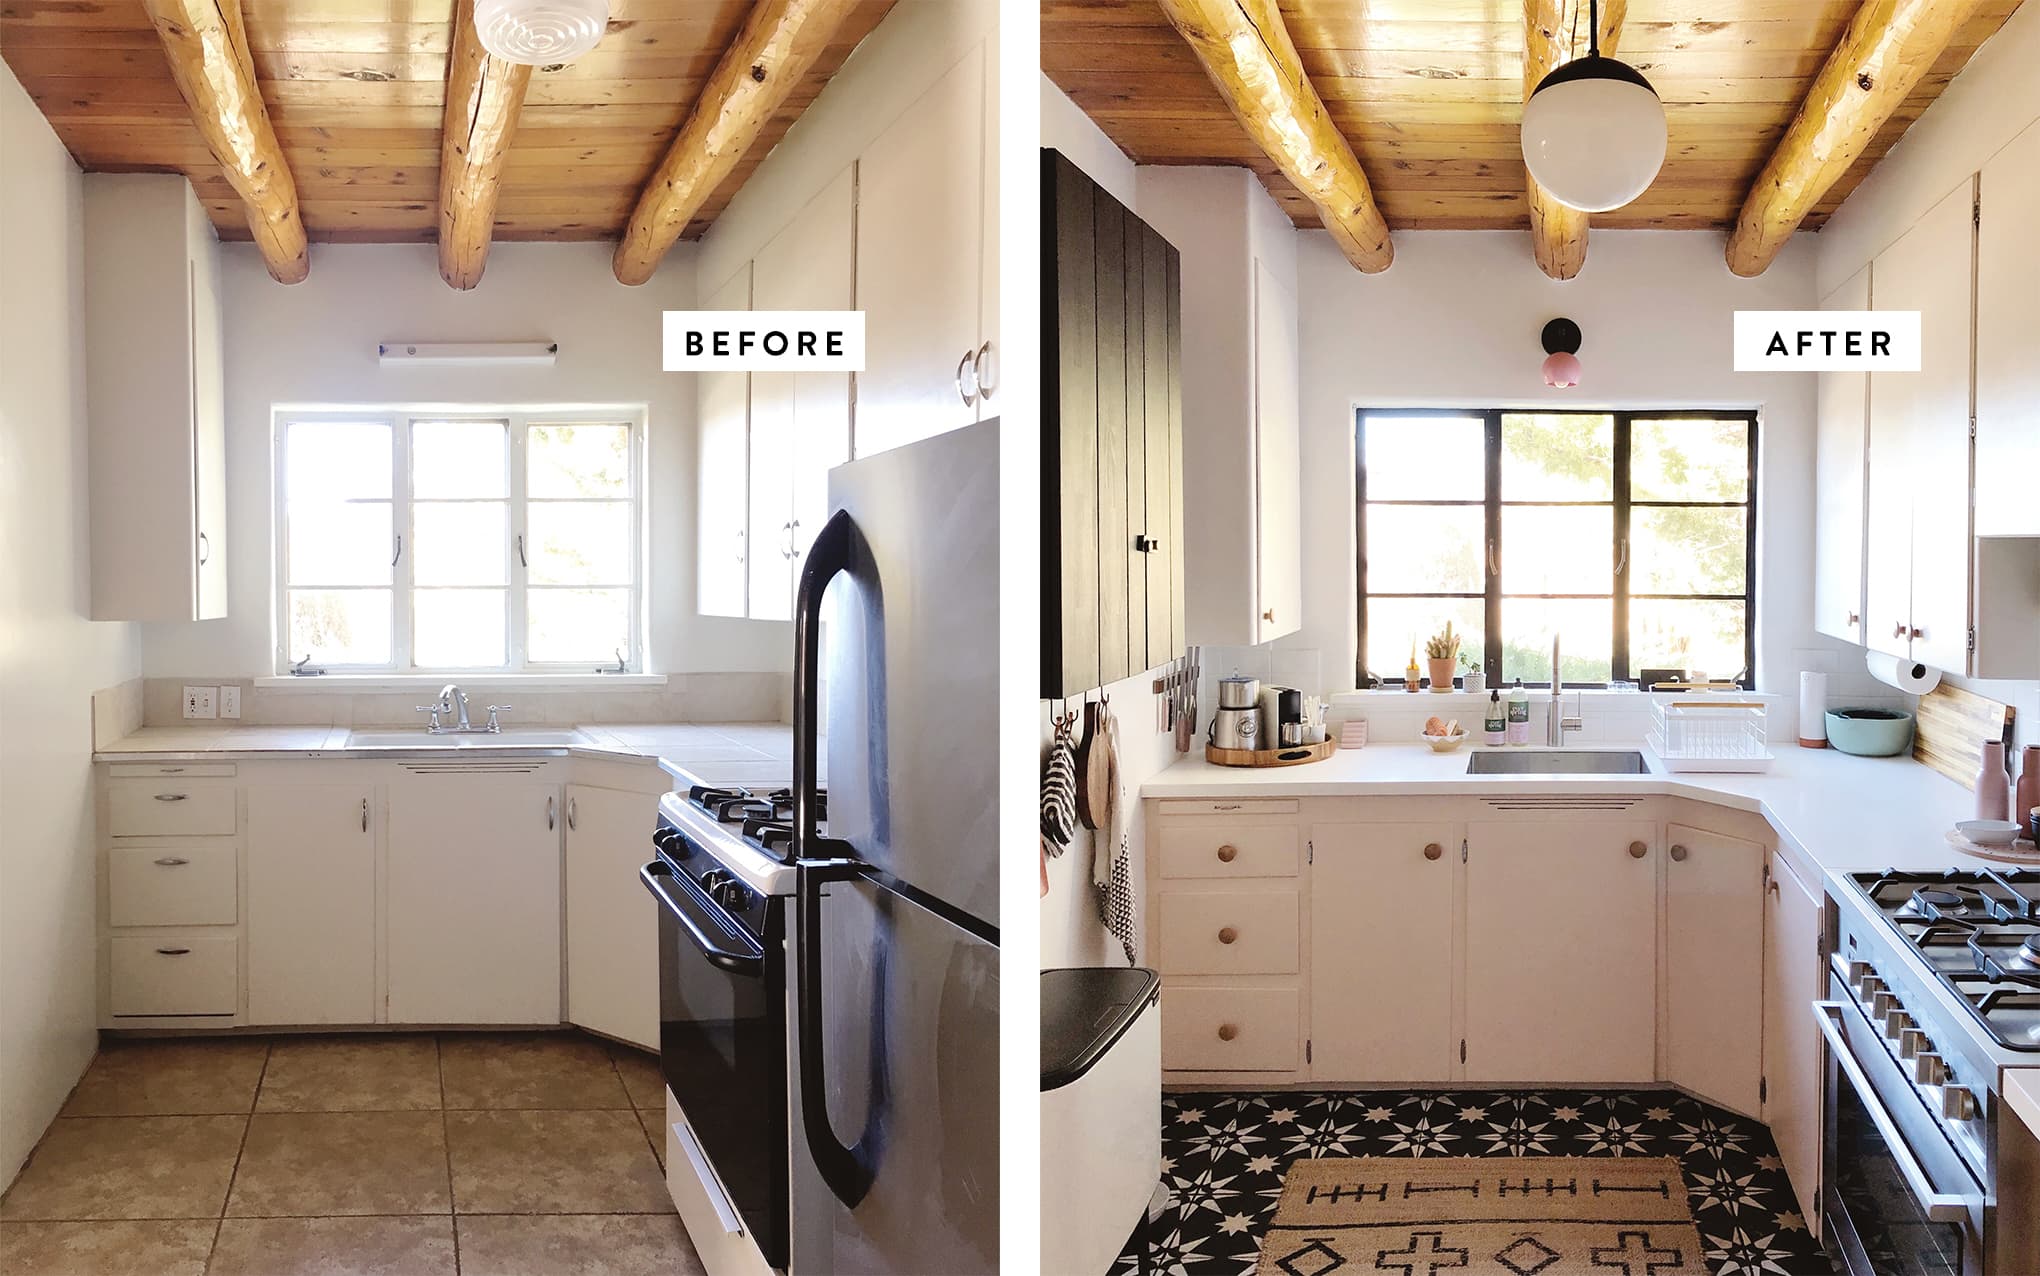
I took a whole bunch of photos yesterday, and I think what makes the most sense is to kind of “walk” around the room with them. I’m including a few side-by-side before-and-after set, too, since if you’re like me you want to compare every little detail between the beginning and the end. (Side note: Remember when people used to get all up in arms over before-and-after photos on Apartment Therapy that were taken in different lighting? It’s funny to think about now—all of those accusations that all someone did was open a curtain and magically the room looked like a whole new space.)
I’ve already detailed all of the steps of the renovation in previous kitchen posts, and now I can give you the details on the finishing touches and all of the stuff that went into the room after the renovation—the lovely little details that make it my favorite room in the house.
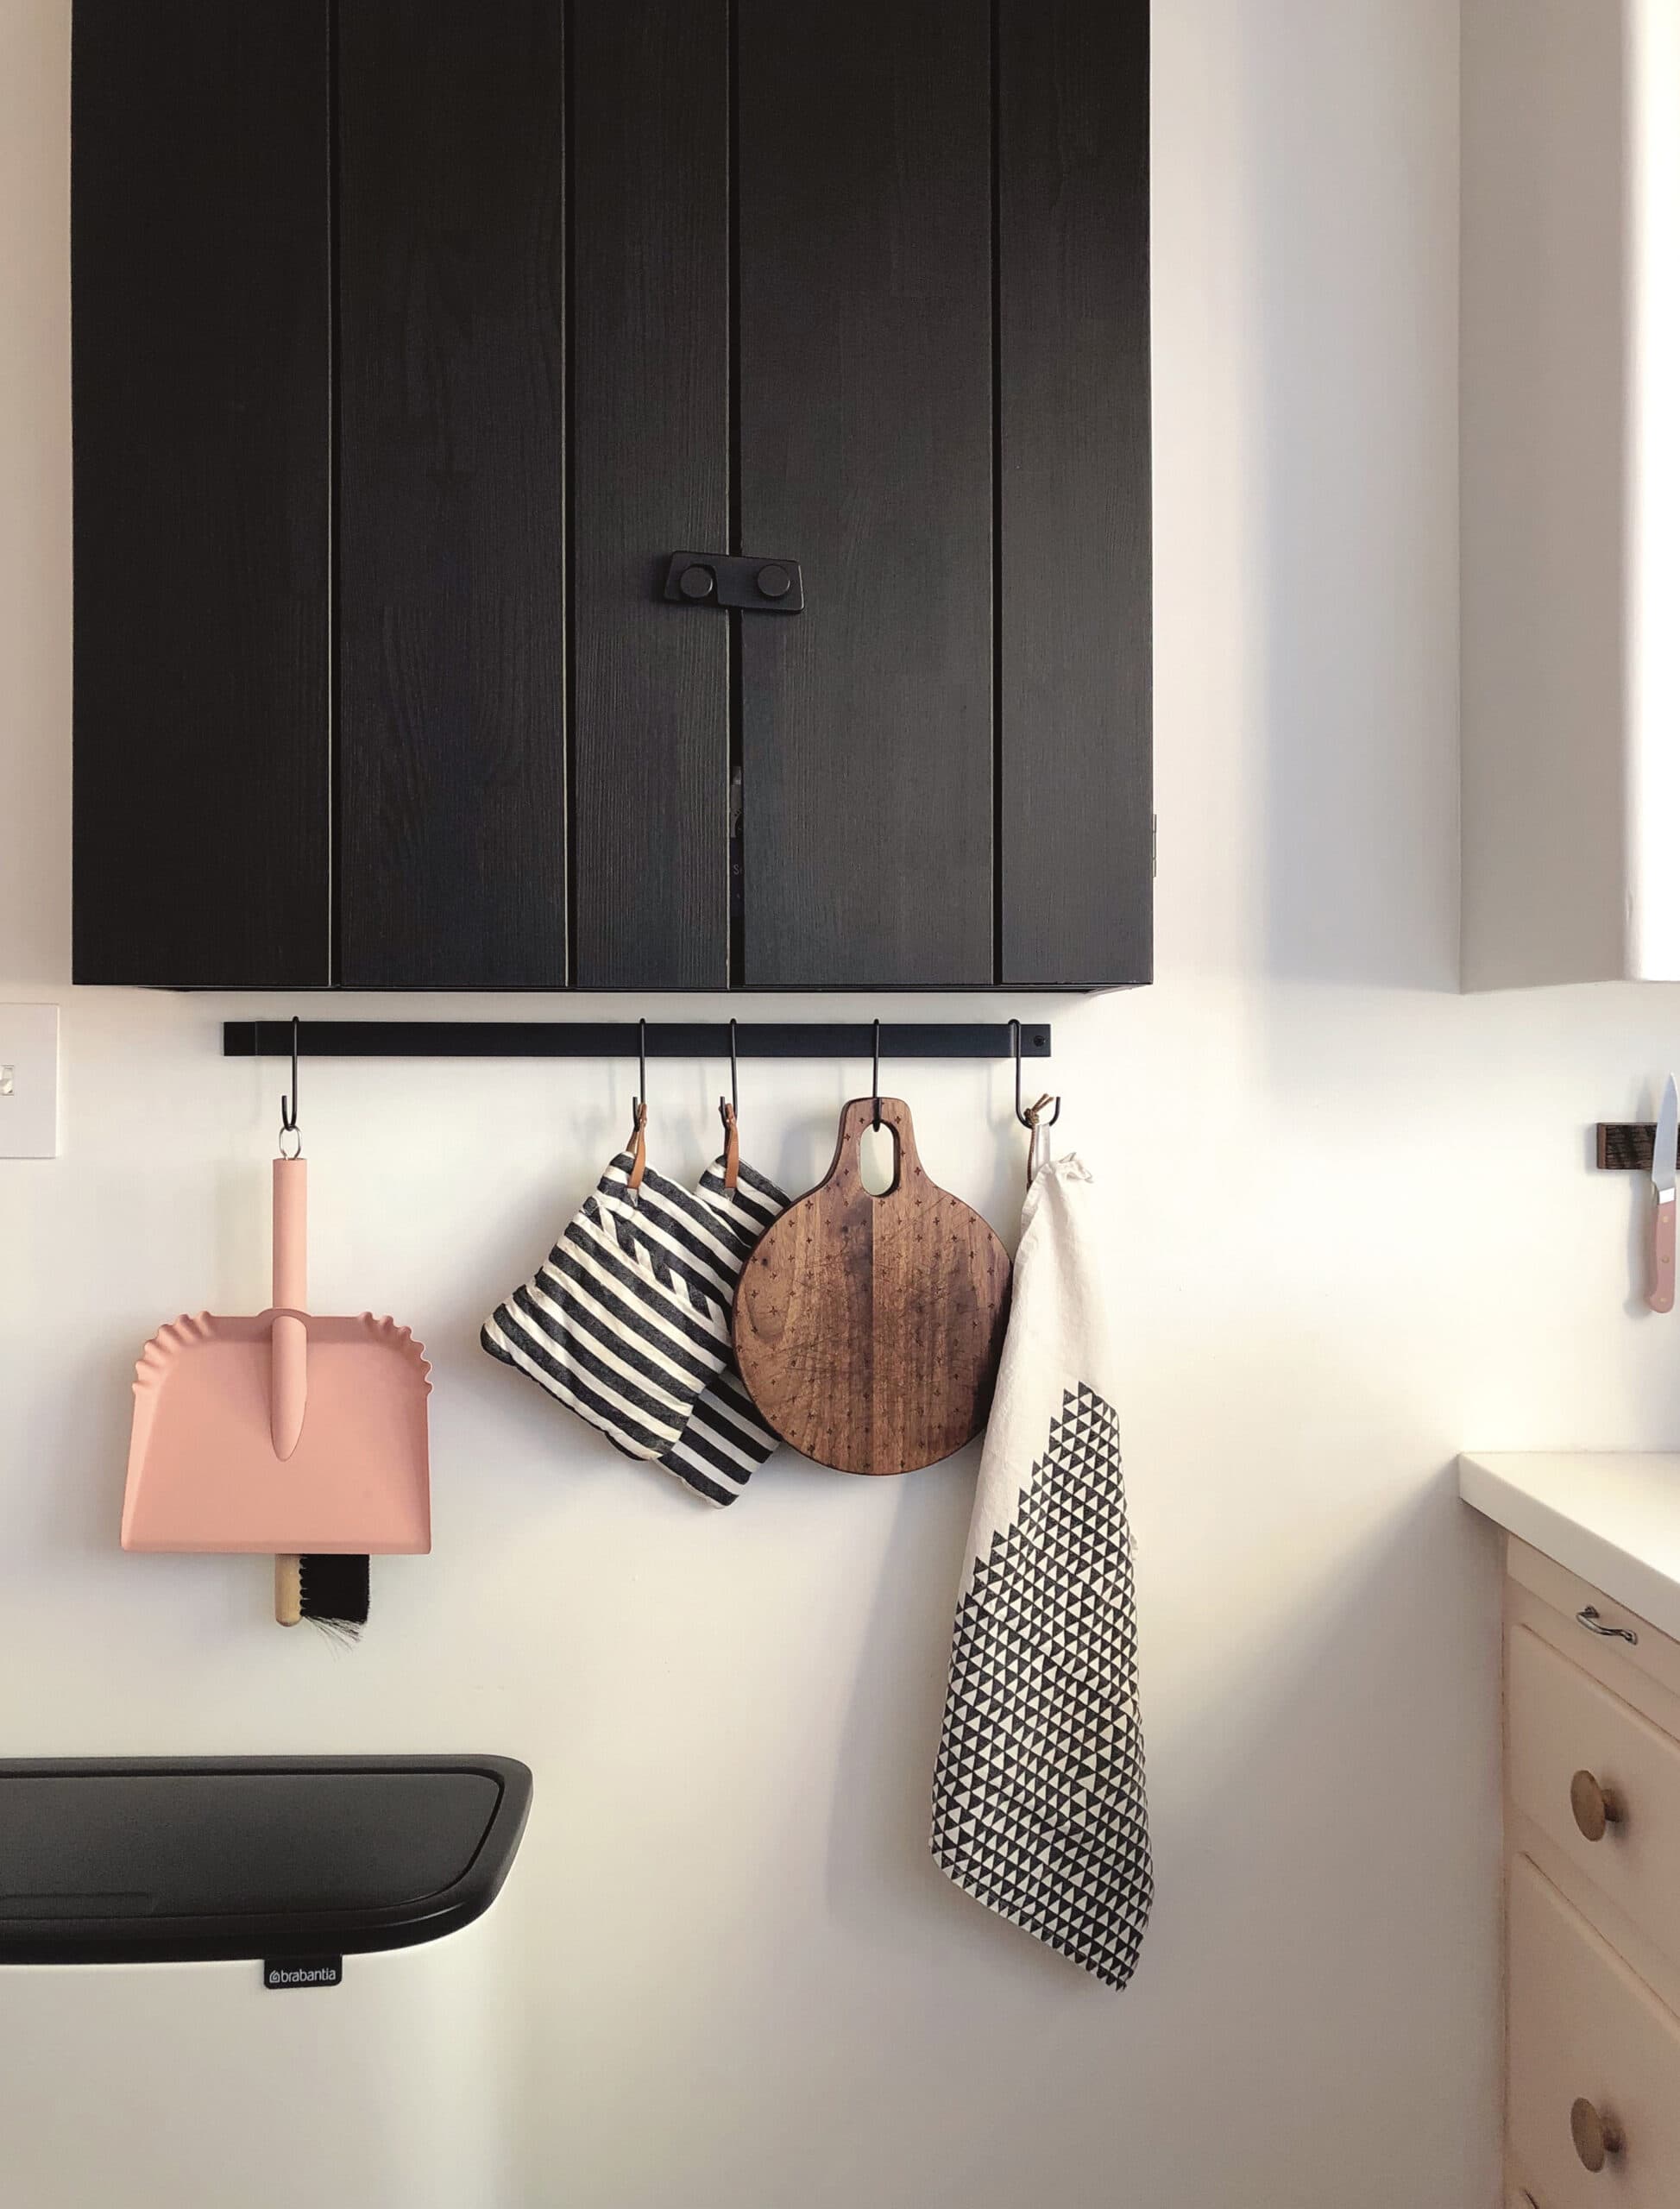
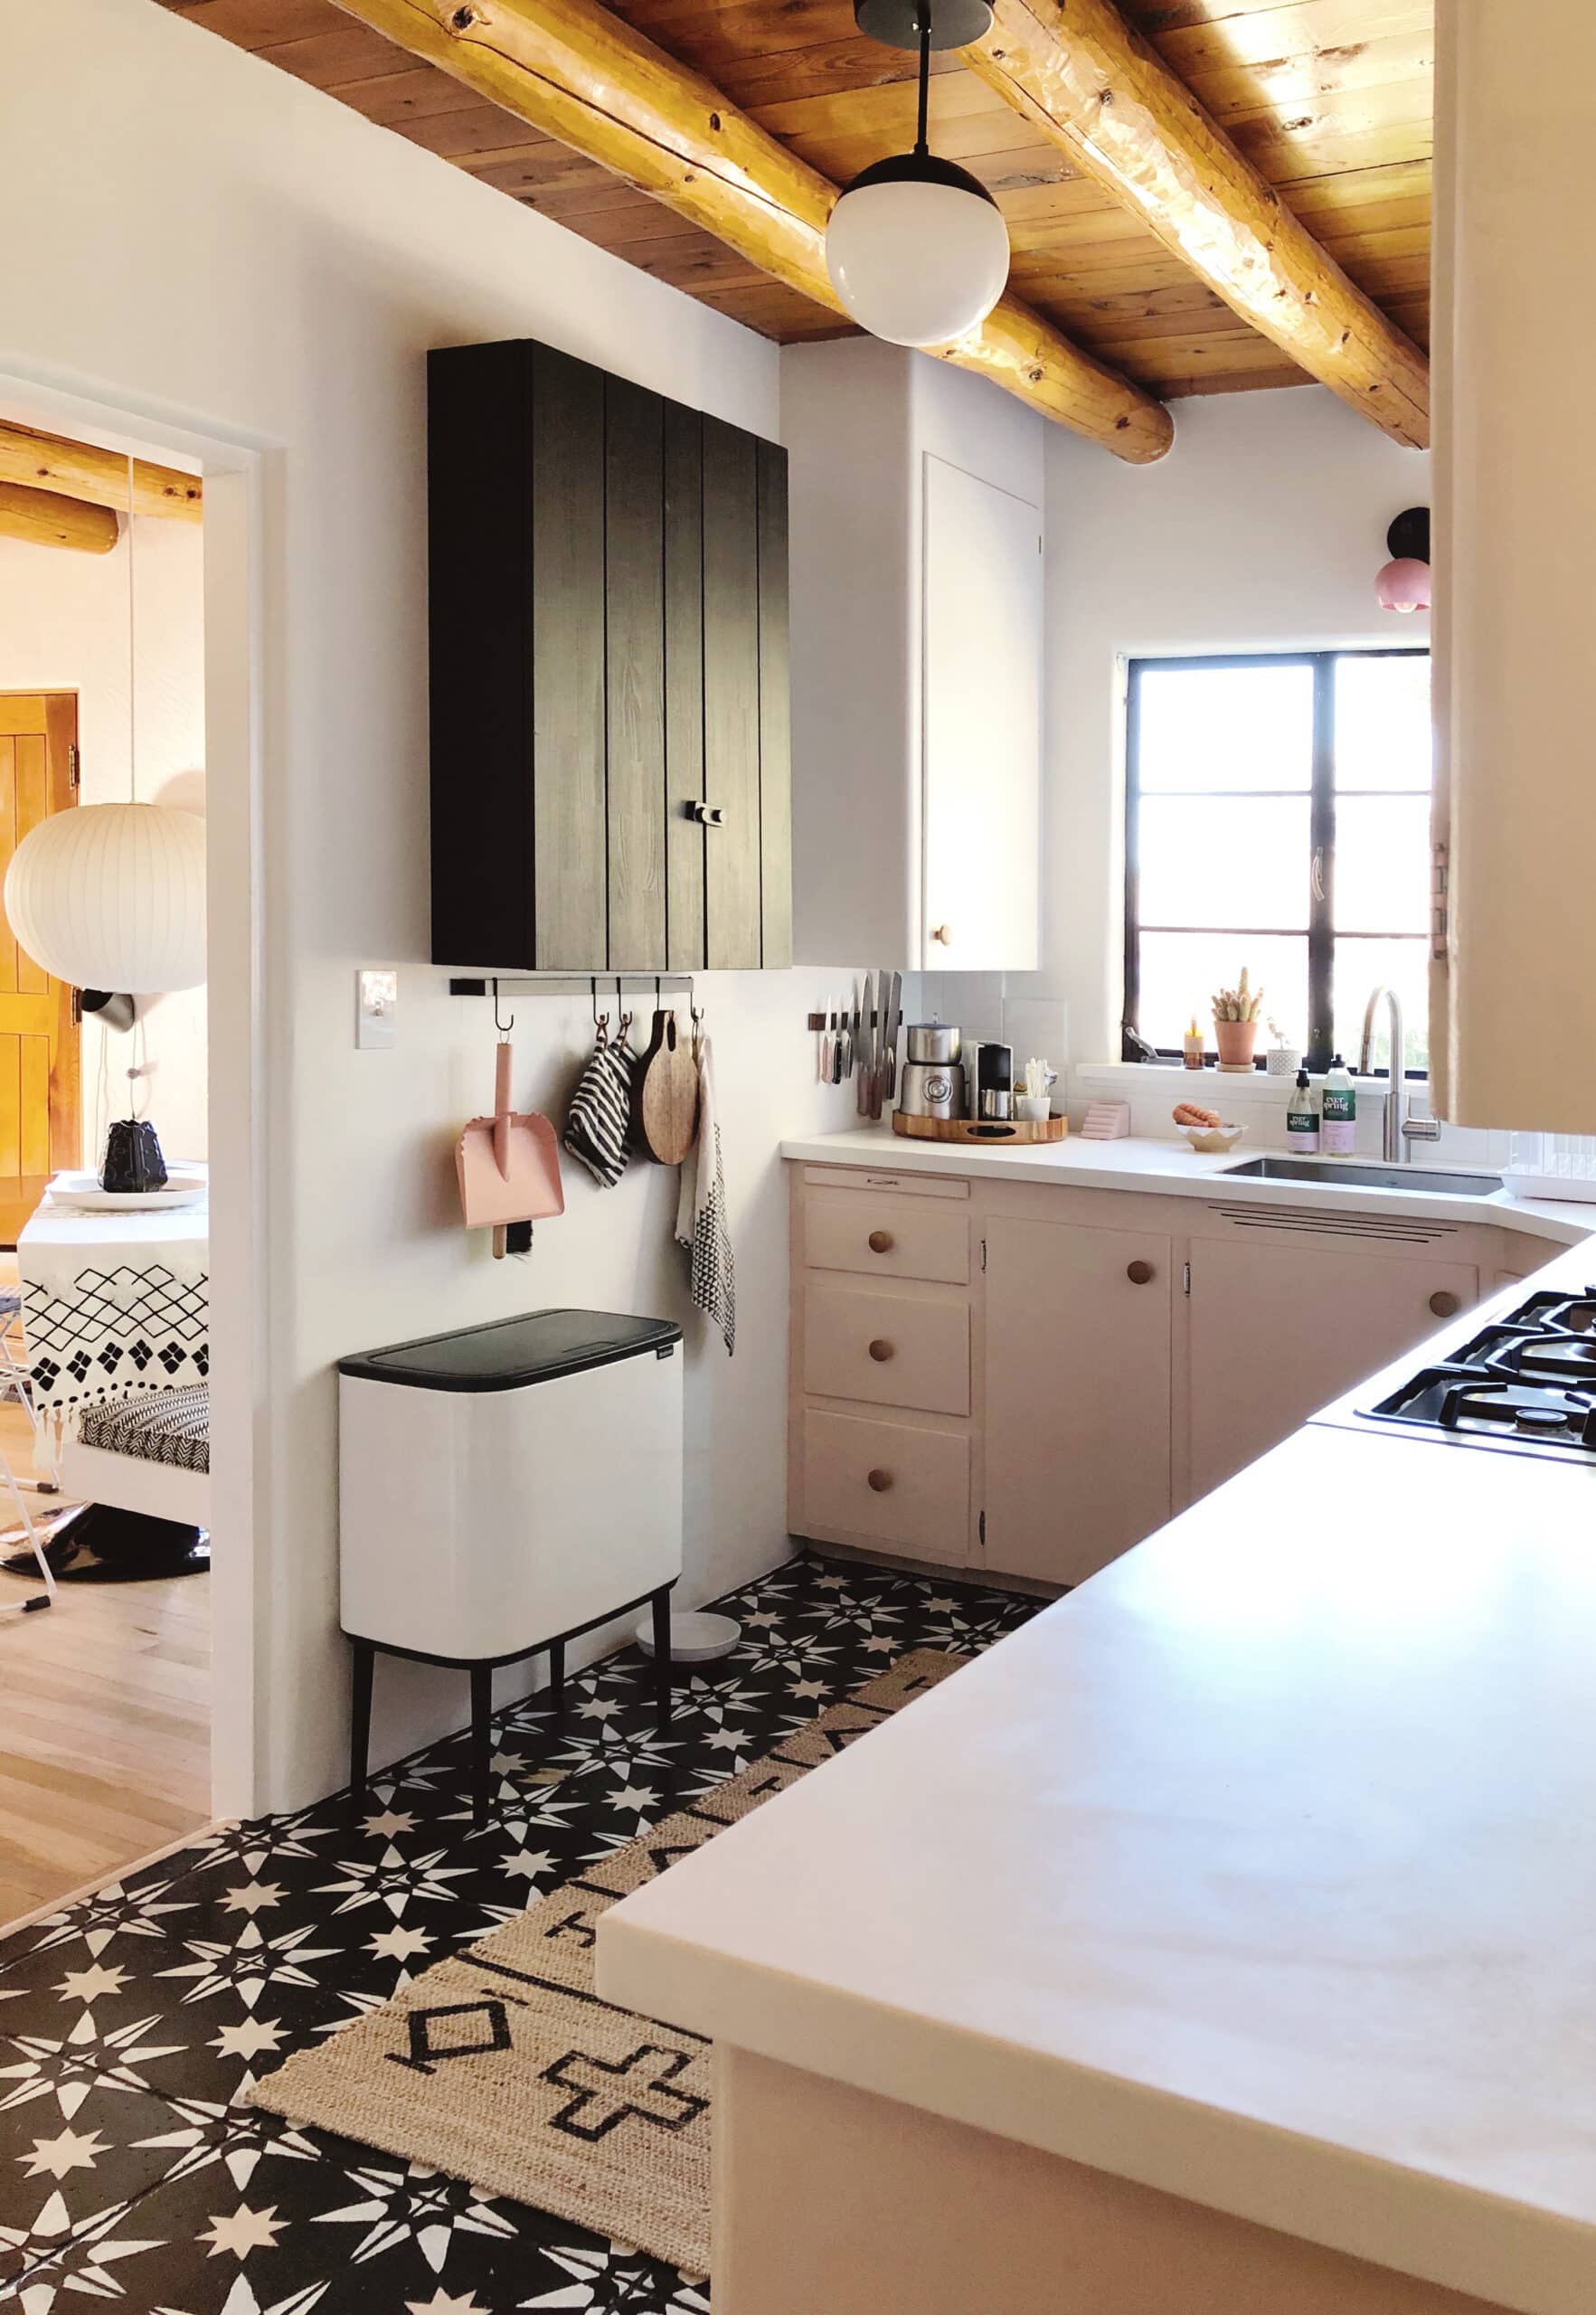
It’s the spice cabinet! Hello! I love how perfectly it fits on this otherwise empty wall. It’s like it was made for exactly this spot.
Also, that thing on the bottom left? That’s a trash/recycling bin. You can see it better in the top photo! It’s the Brabantia Bo Touch Bin, and it’s AWESOME. I really wanted a trash can with an integrated section for recyclables, and I didn’t want it to be stainless steel. When I stumbled on this one and saw that it’s ON LEGS, I was sold. It’s so nice to have a trash can higher off the ground, and I love being able to leave the top open while I’m cooking or cleaning. It’s SUPERB.
✚ Cabinet: IKEA
✚ Iron hanging rail + hooks: Amazon
✚ Dust pan: West Elm
✚ Potholders: Target
✚ Cutting board: American Heirloom
✚ Tea towel: Bookhou
✚ Trash/recycling bin: Brabantia
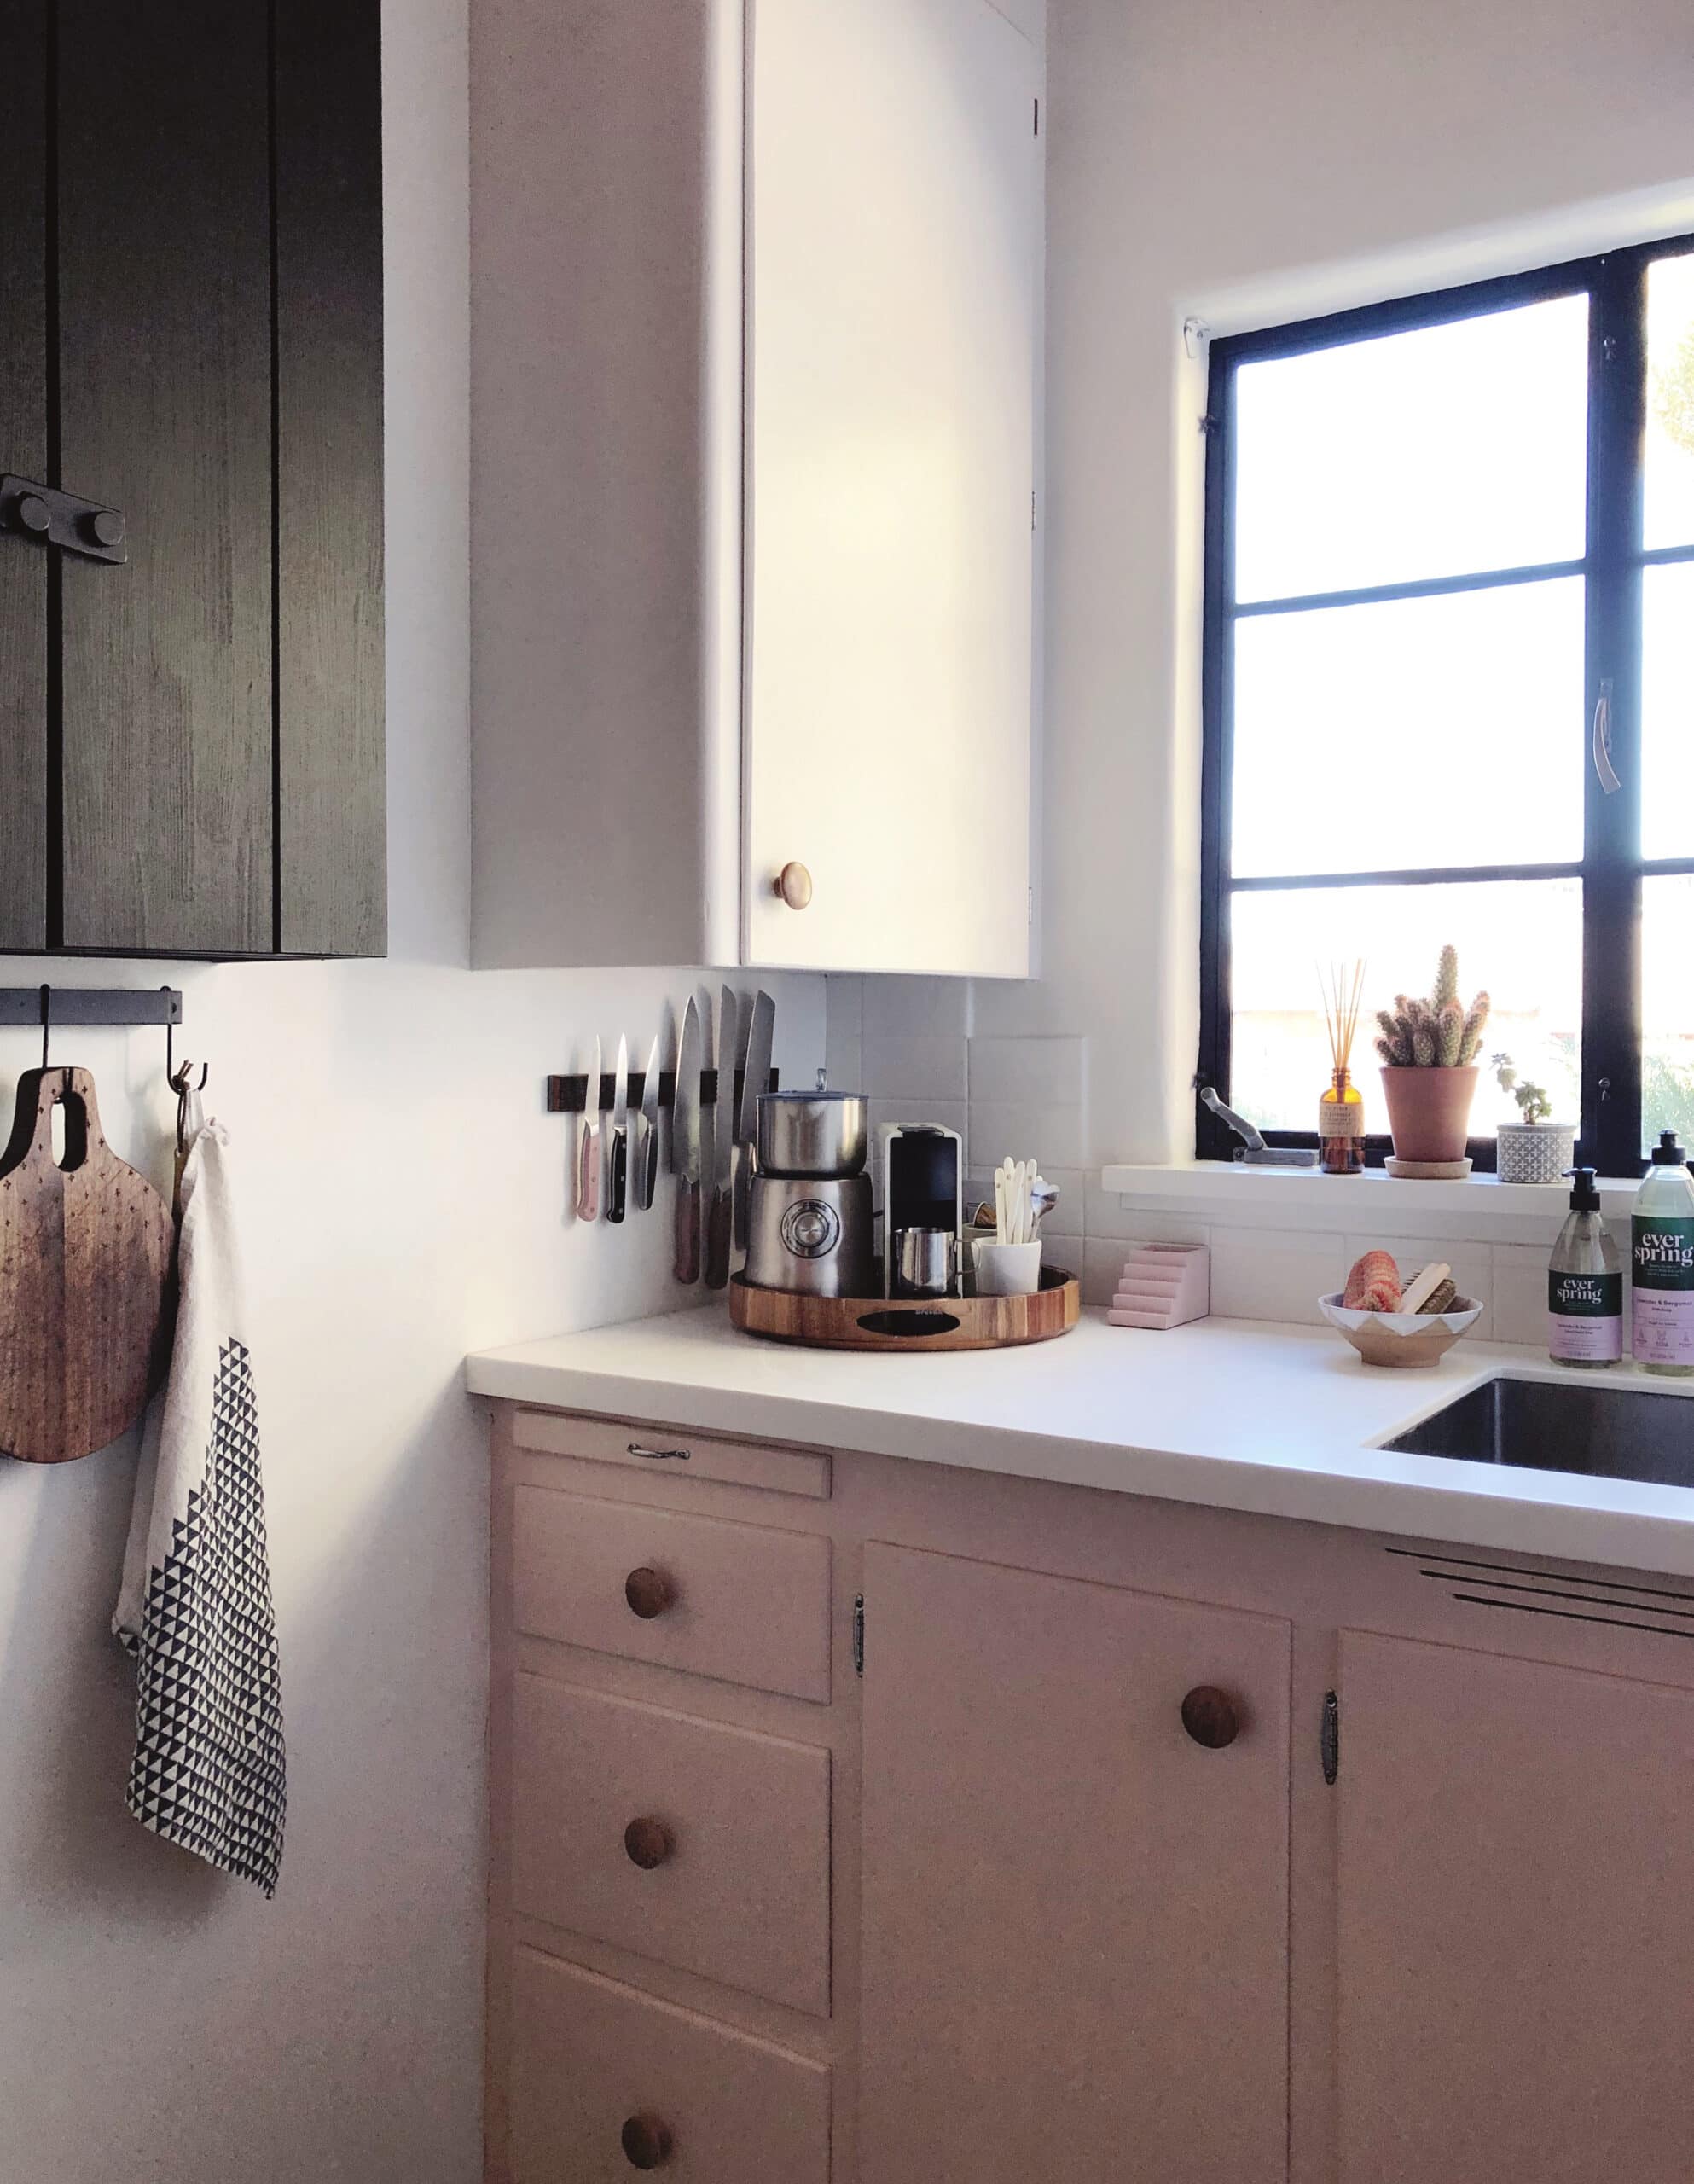
Here’s the pick-me-up coffee station! You can get the details in this post. I still love my Nespresso machine and my Breville milk frother!
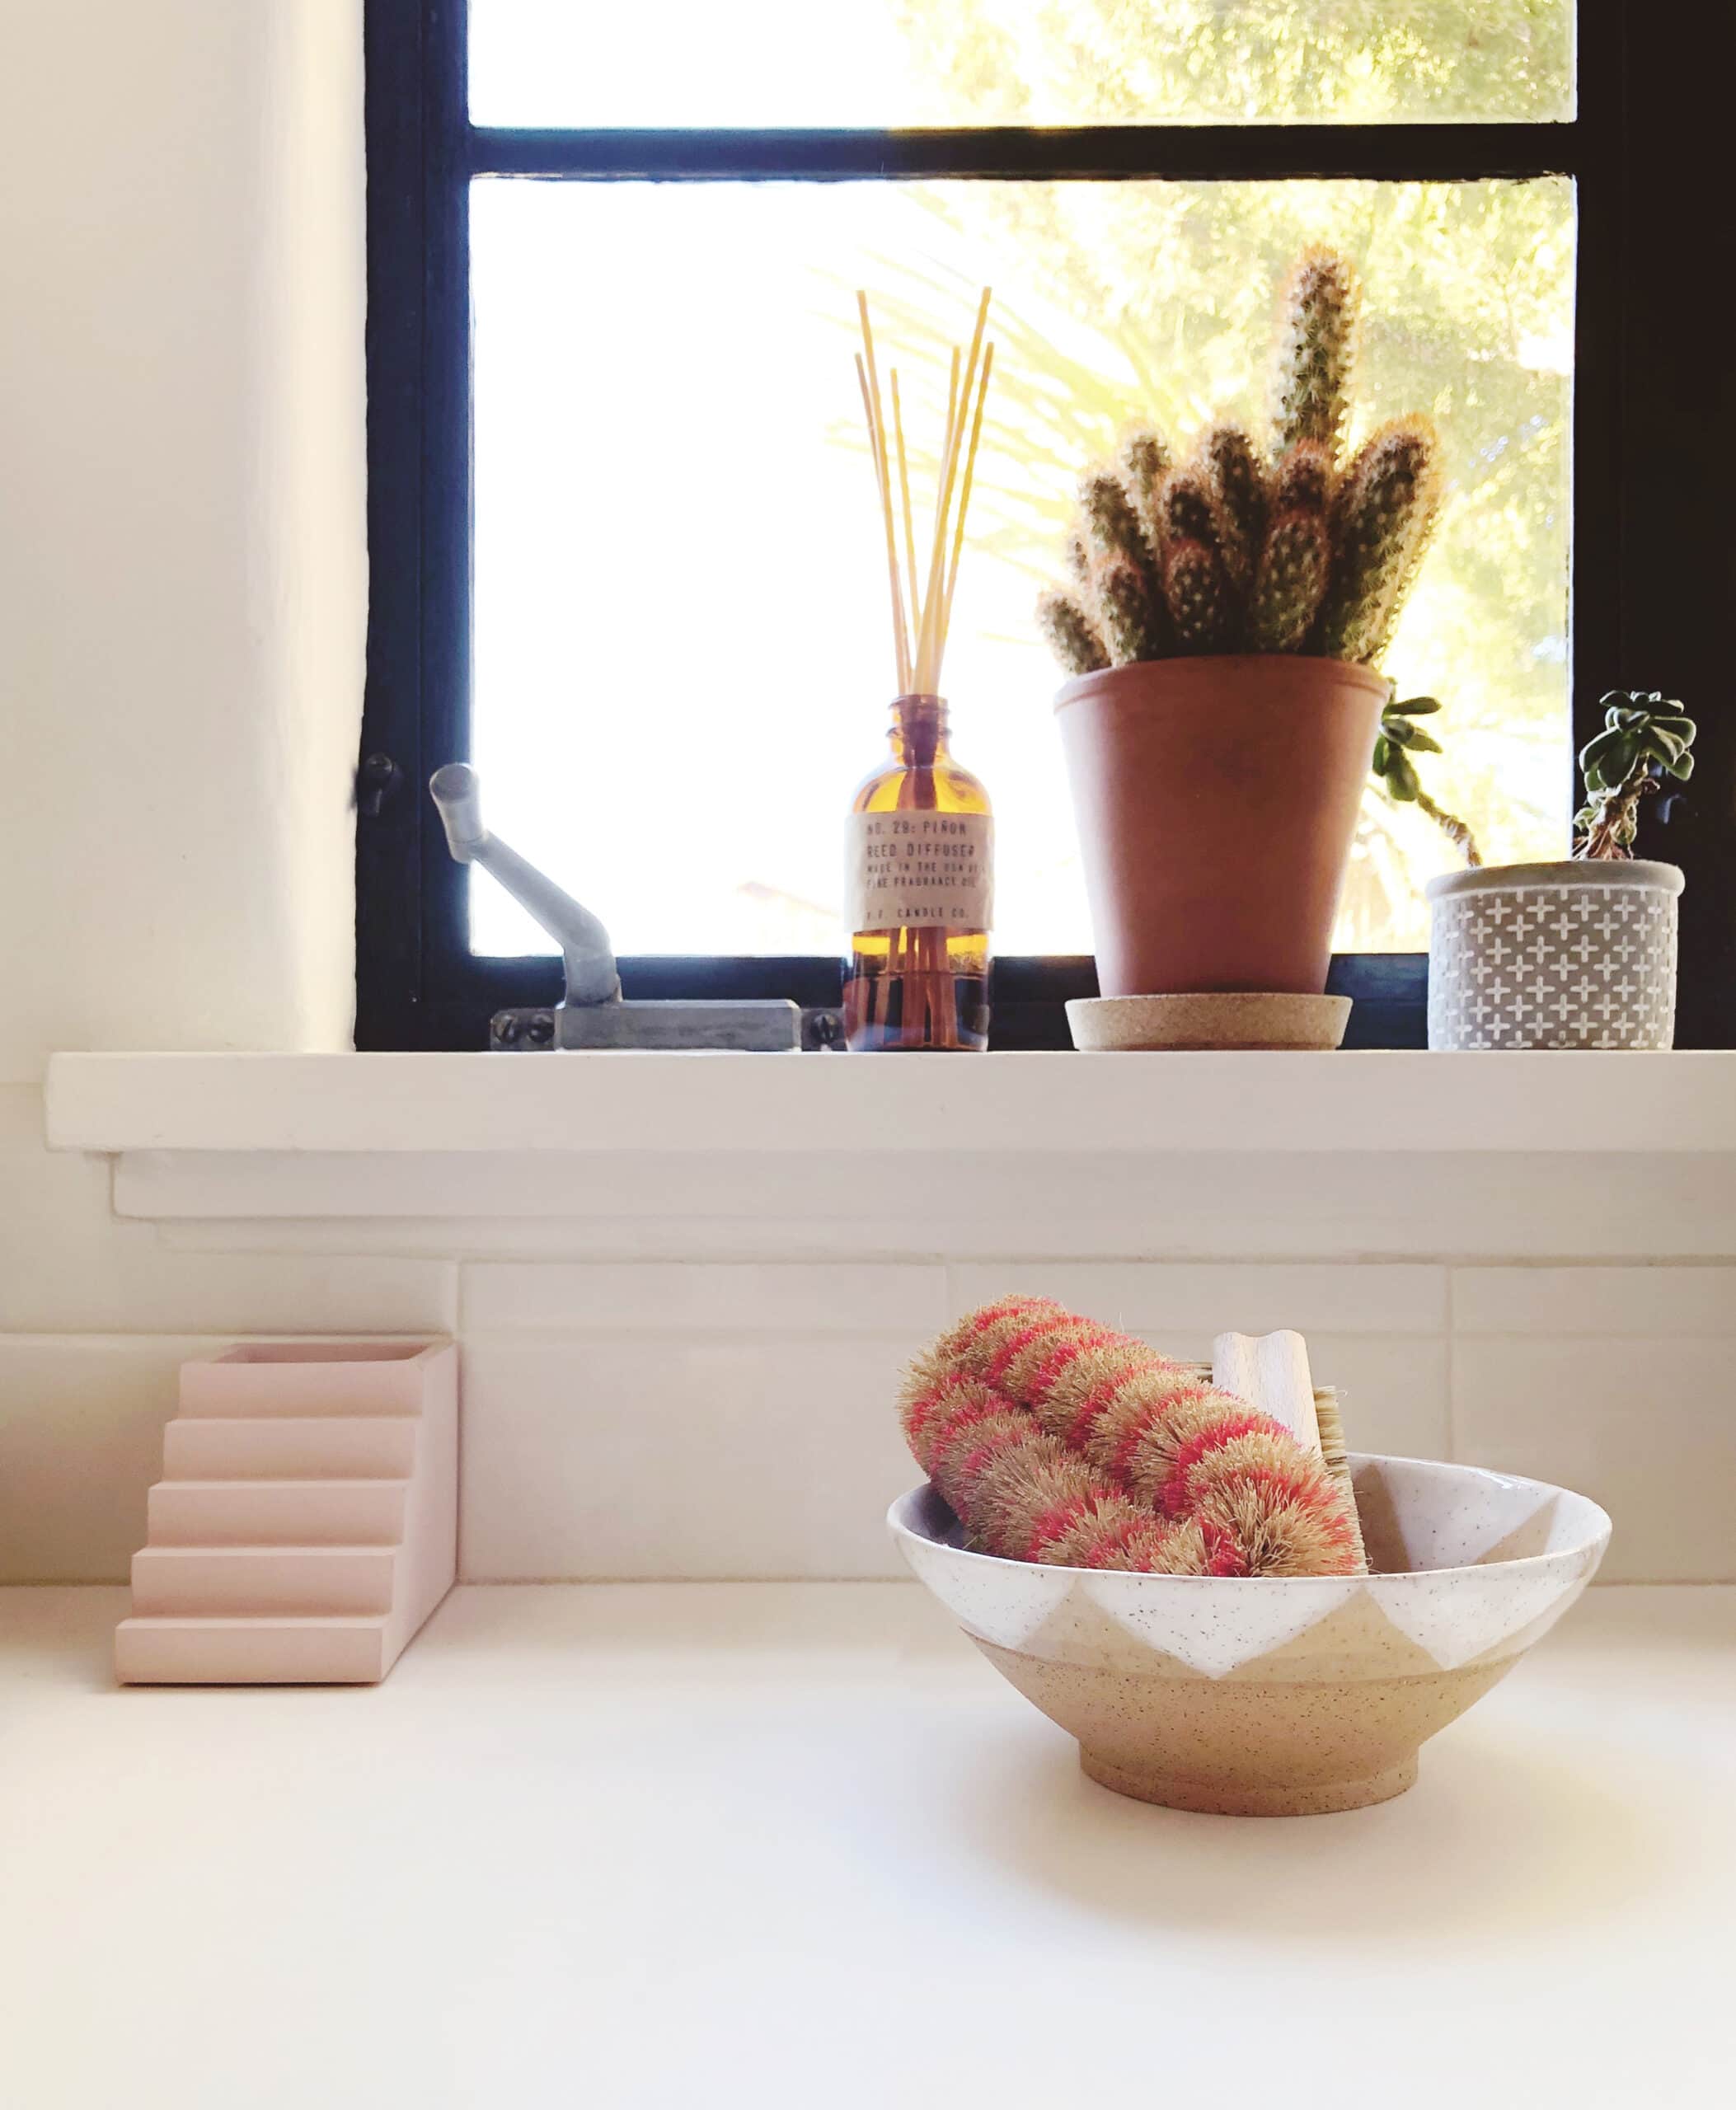
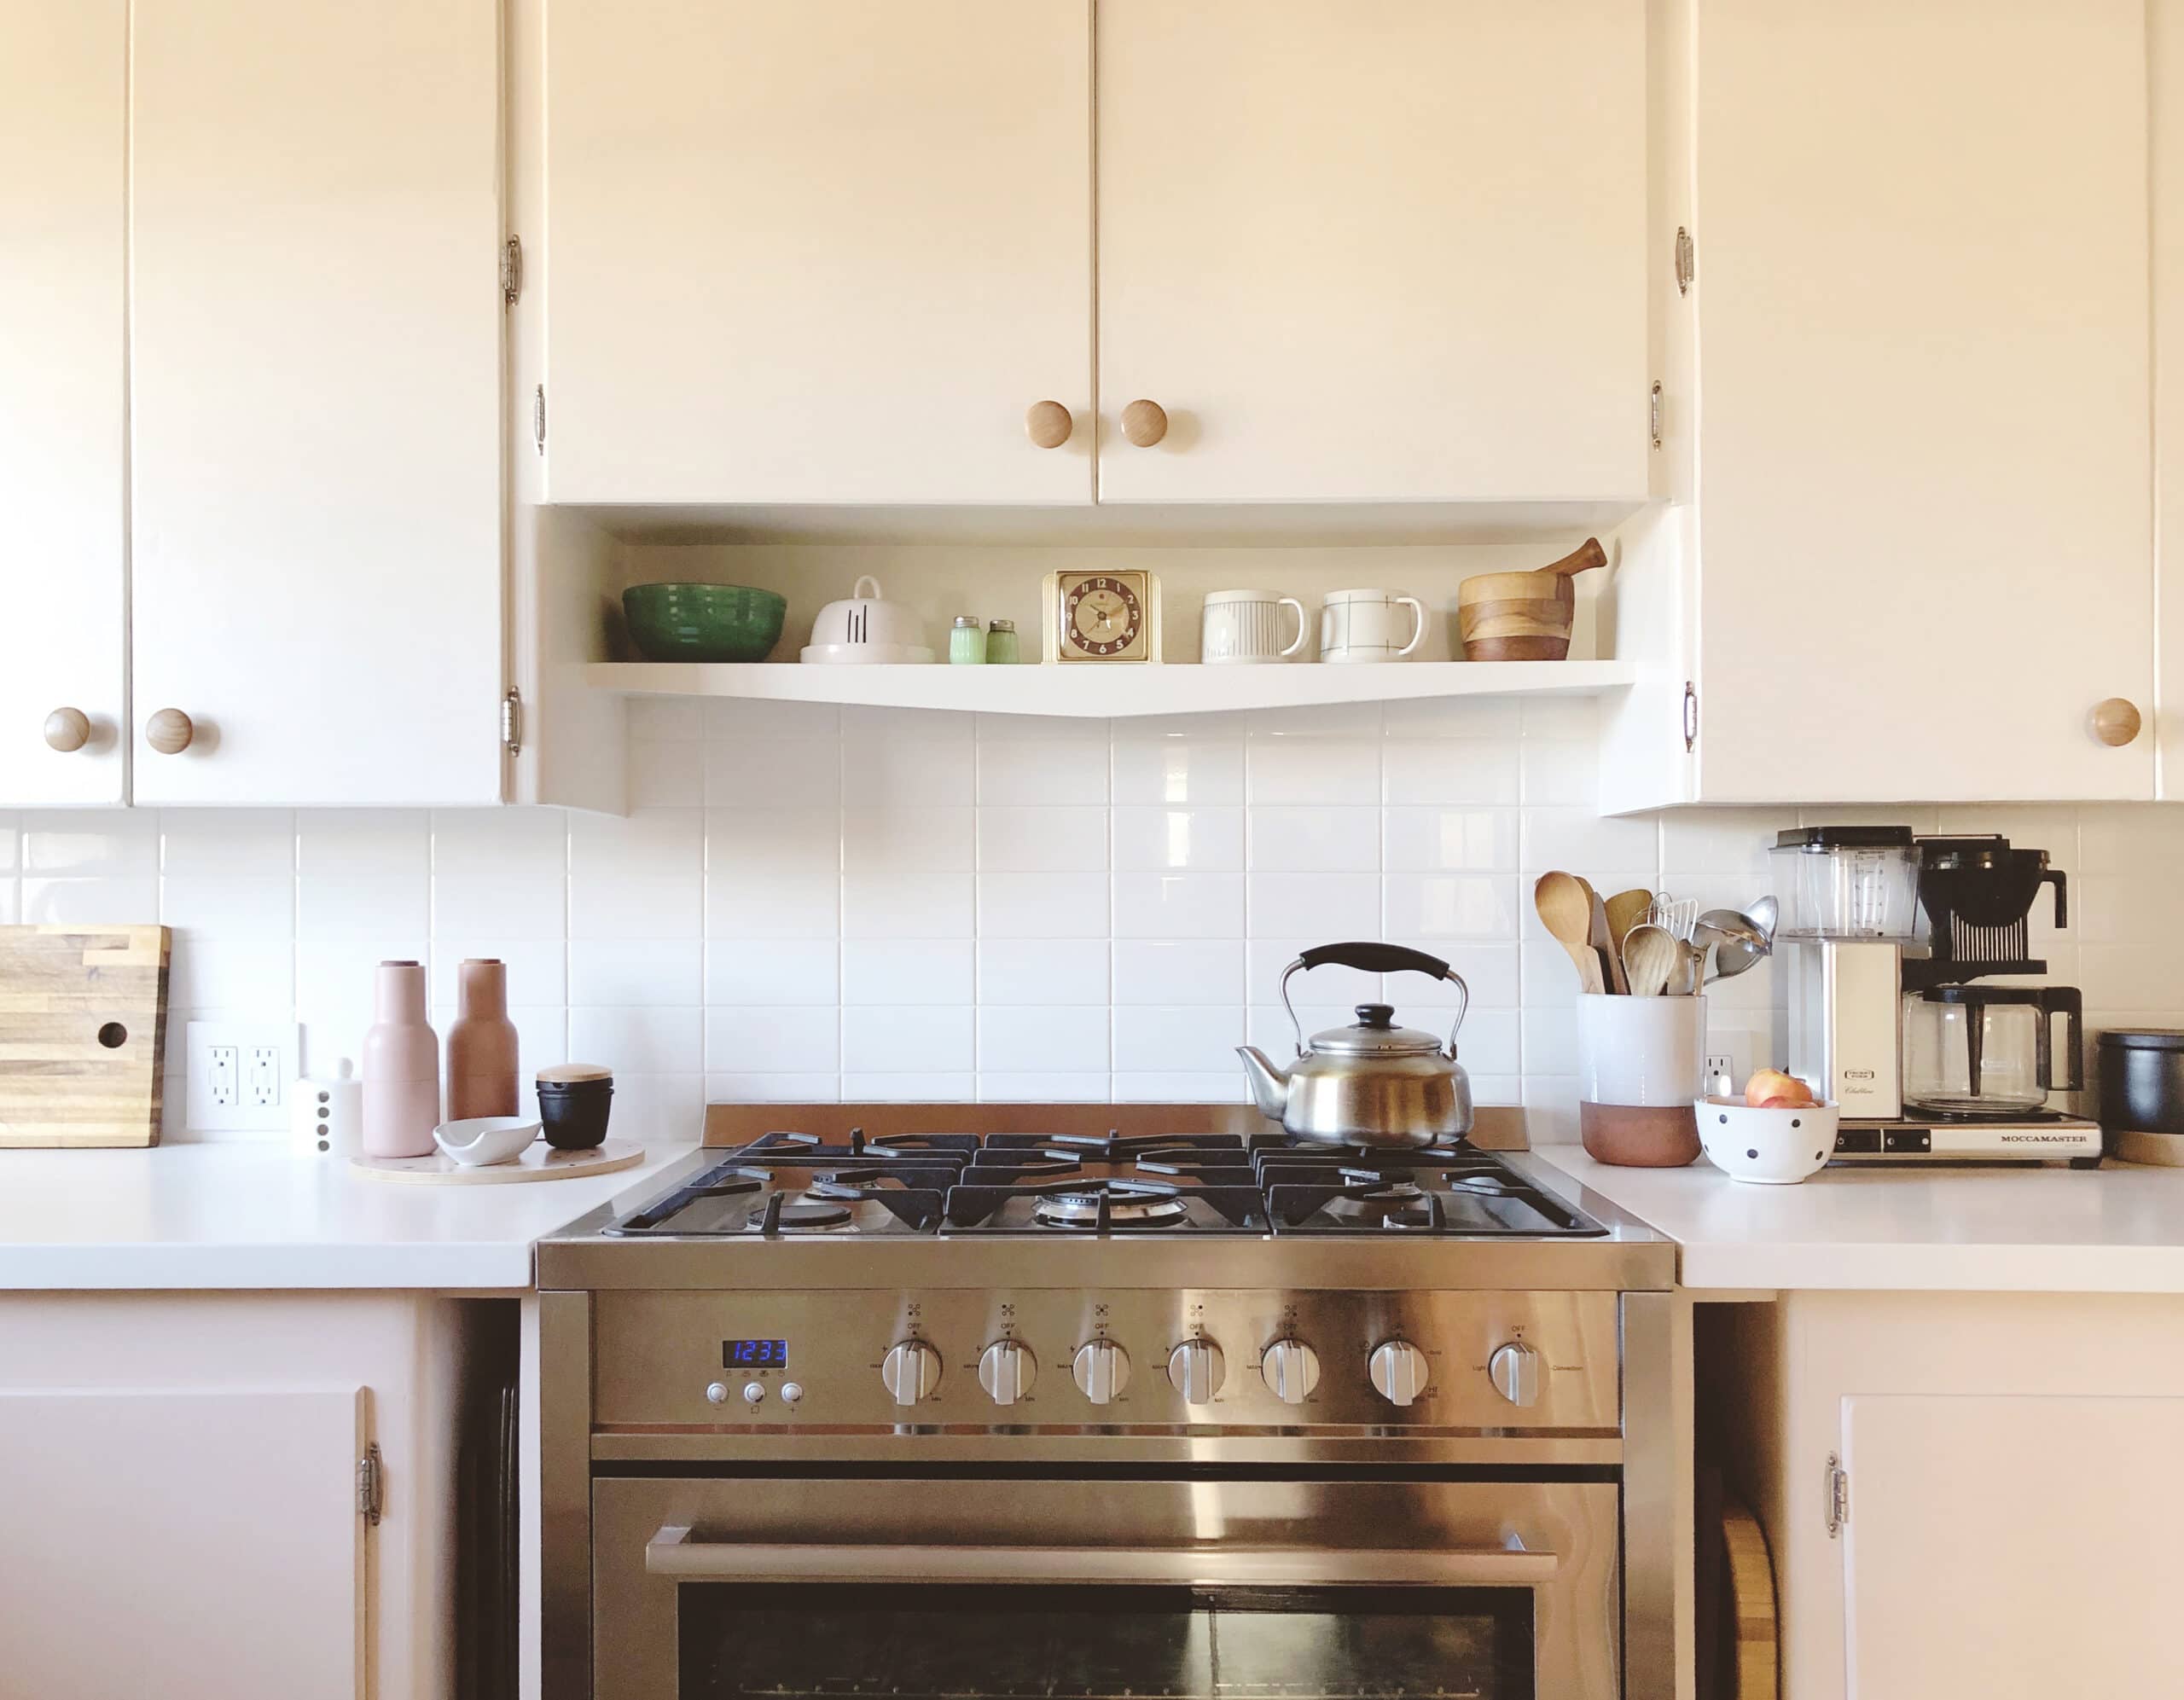
This is the area to the left of the sink, with a little pink concrete pen pot I use for sugar-esque packets and the most lovely of bowls for scrubbing implements.
✚ Pen pot/packet holder: DOIY
✚ Ceramic bowl: Geninne D Zlatkis
✚ Tawashi scrubber: HAY
✚ Nail brush: Garrett Wade
✚ Piñon reed diffuser: P.F. Candle Co.
✚ Plant pots: Target
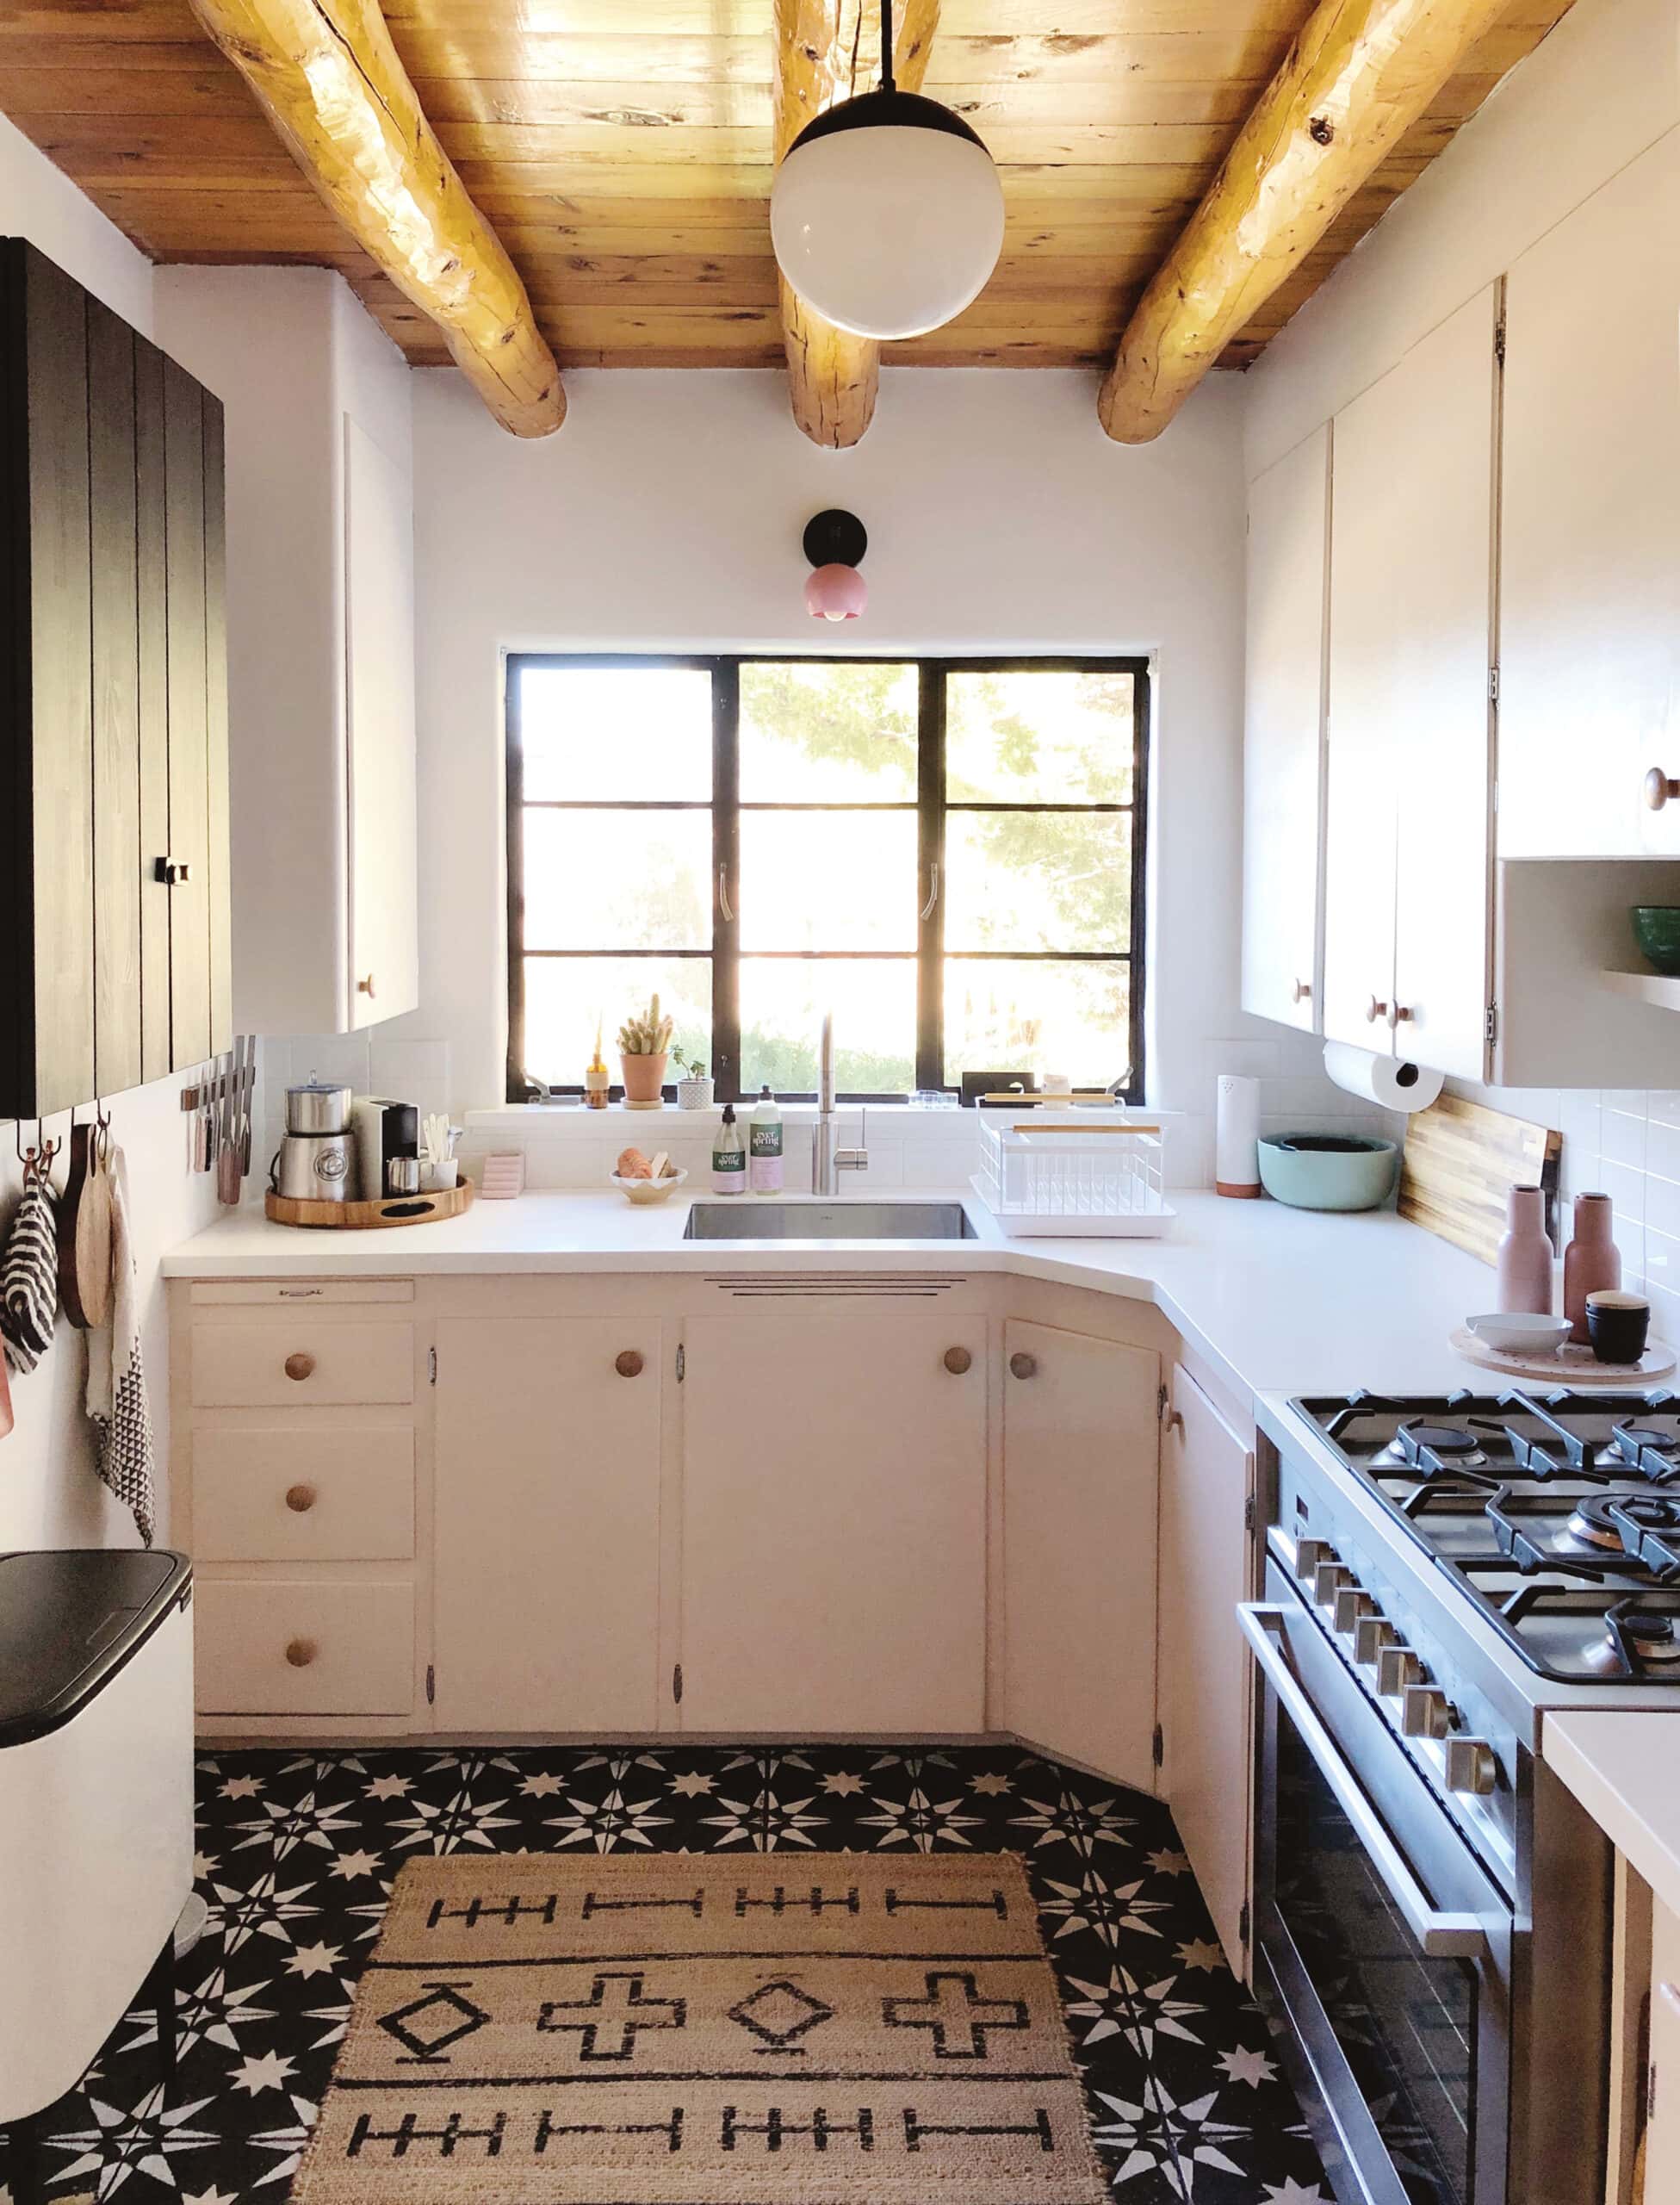
I love the kitchen. Truly. It’s so functional and easy to be in. It’s great to not feel like anything is in my way, or like I need to reorganize things in order to cook. The spots that were dead zones before are now in use in better ways. There’s just the right amount of counter space. The sink RULES. The countertops still look brand new, and couldn’t be easier to keep clean. It’s all great. I’m so happy this all happened without ripping out the original cabinets—as simple as they are, they really make the kitchen feel like it still belongs in this 1950 house.
✚ Pink sconce: Sazerac Stitches
✚ Ceiling pendant: Wayfair
✚ Dish rack: Yamazaki
✚ Sink: Kraus
✚ Faucet: Kraus
✚ Countertops: LG HI-MACS (Nordic White)
✚ Floor tiles: hand-stenciled
✚ Rug: Rugs USA
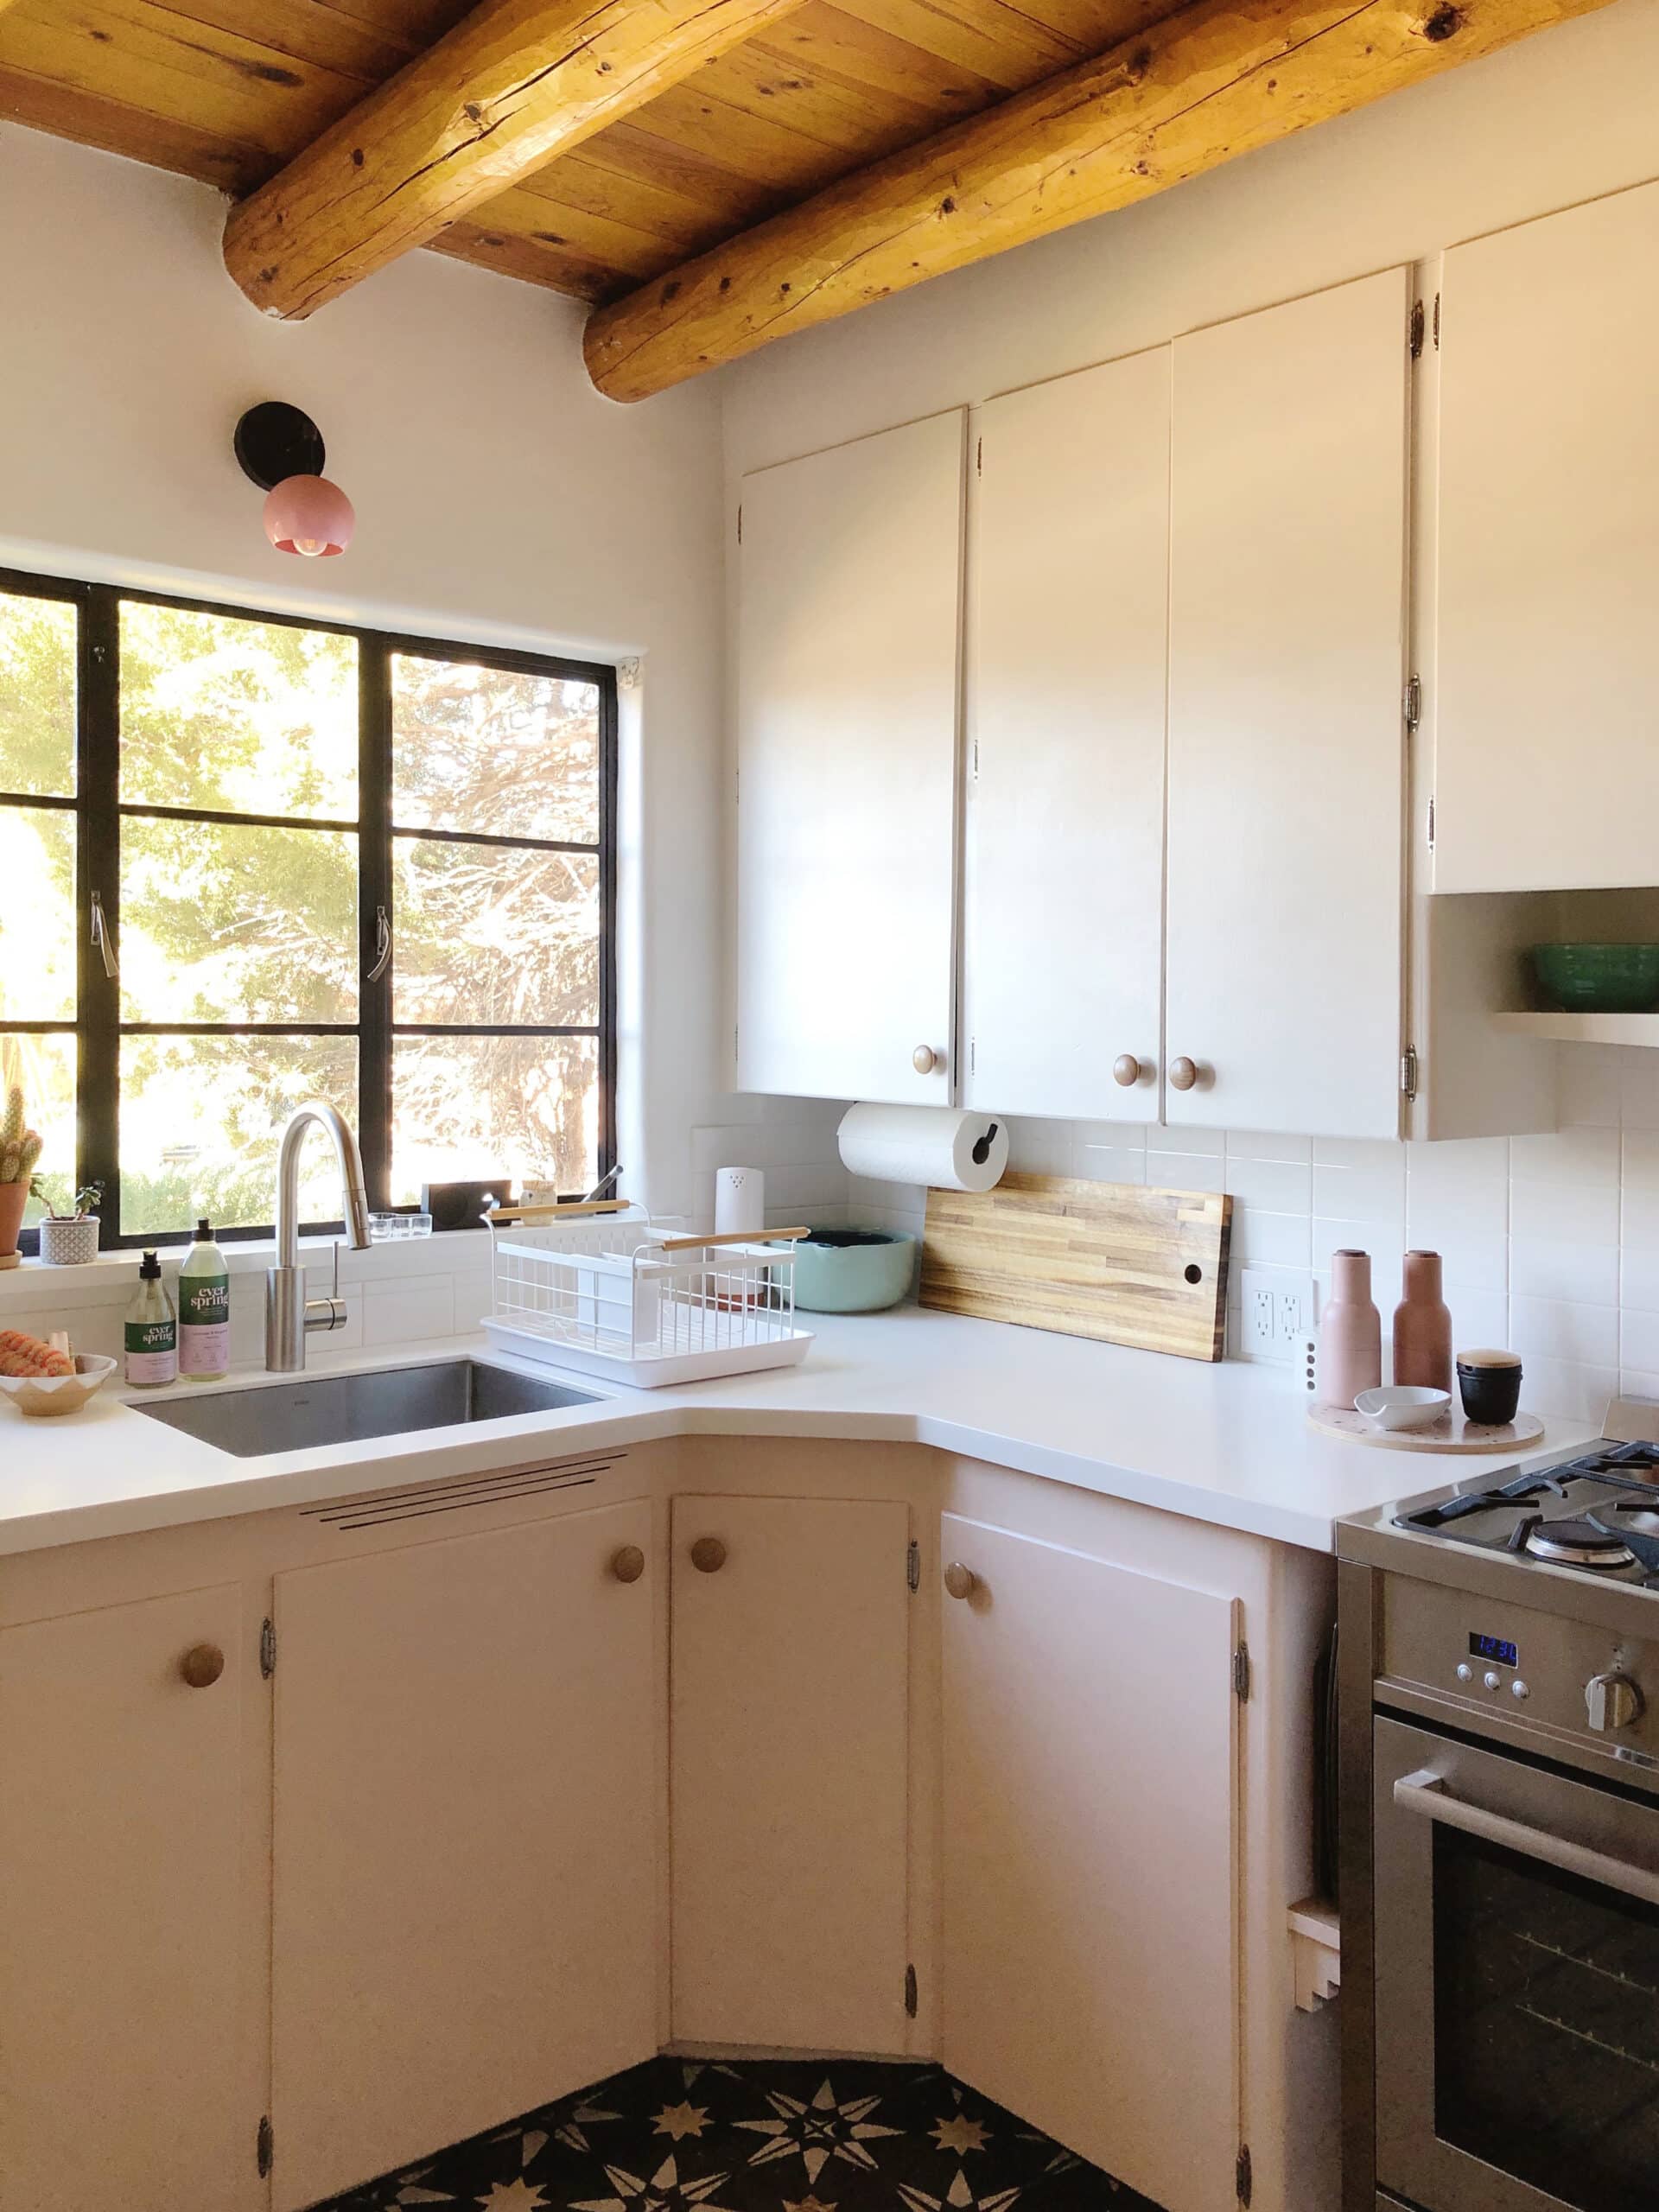
✚ Paper towel holder: Earth & Iron
✚ Mixing bowls: Crate & Barrel
✚ Cutting board: IKEA
✚ Salt & pepper grinders: Menu
✚ Spice grinder: Food52
✚ Spoon rest: Martha Stewart Everyday
✚ Upper cabinet paint: Valspar Du Jour
✚ Lower cabinet paint: Farrow & Ball Pink Ground
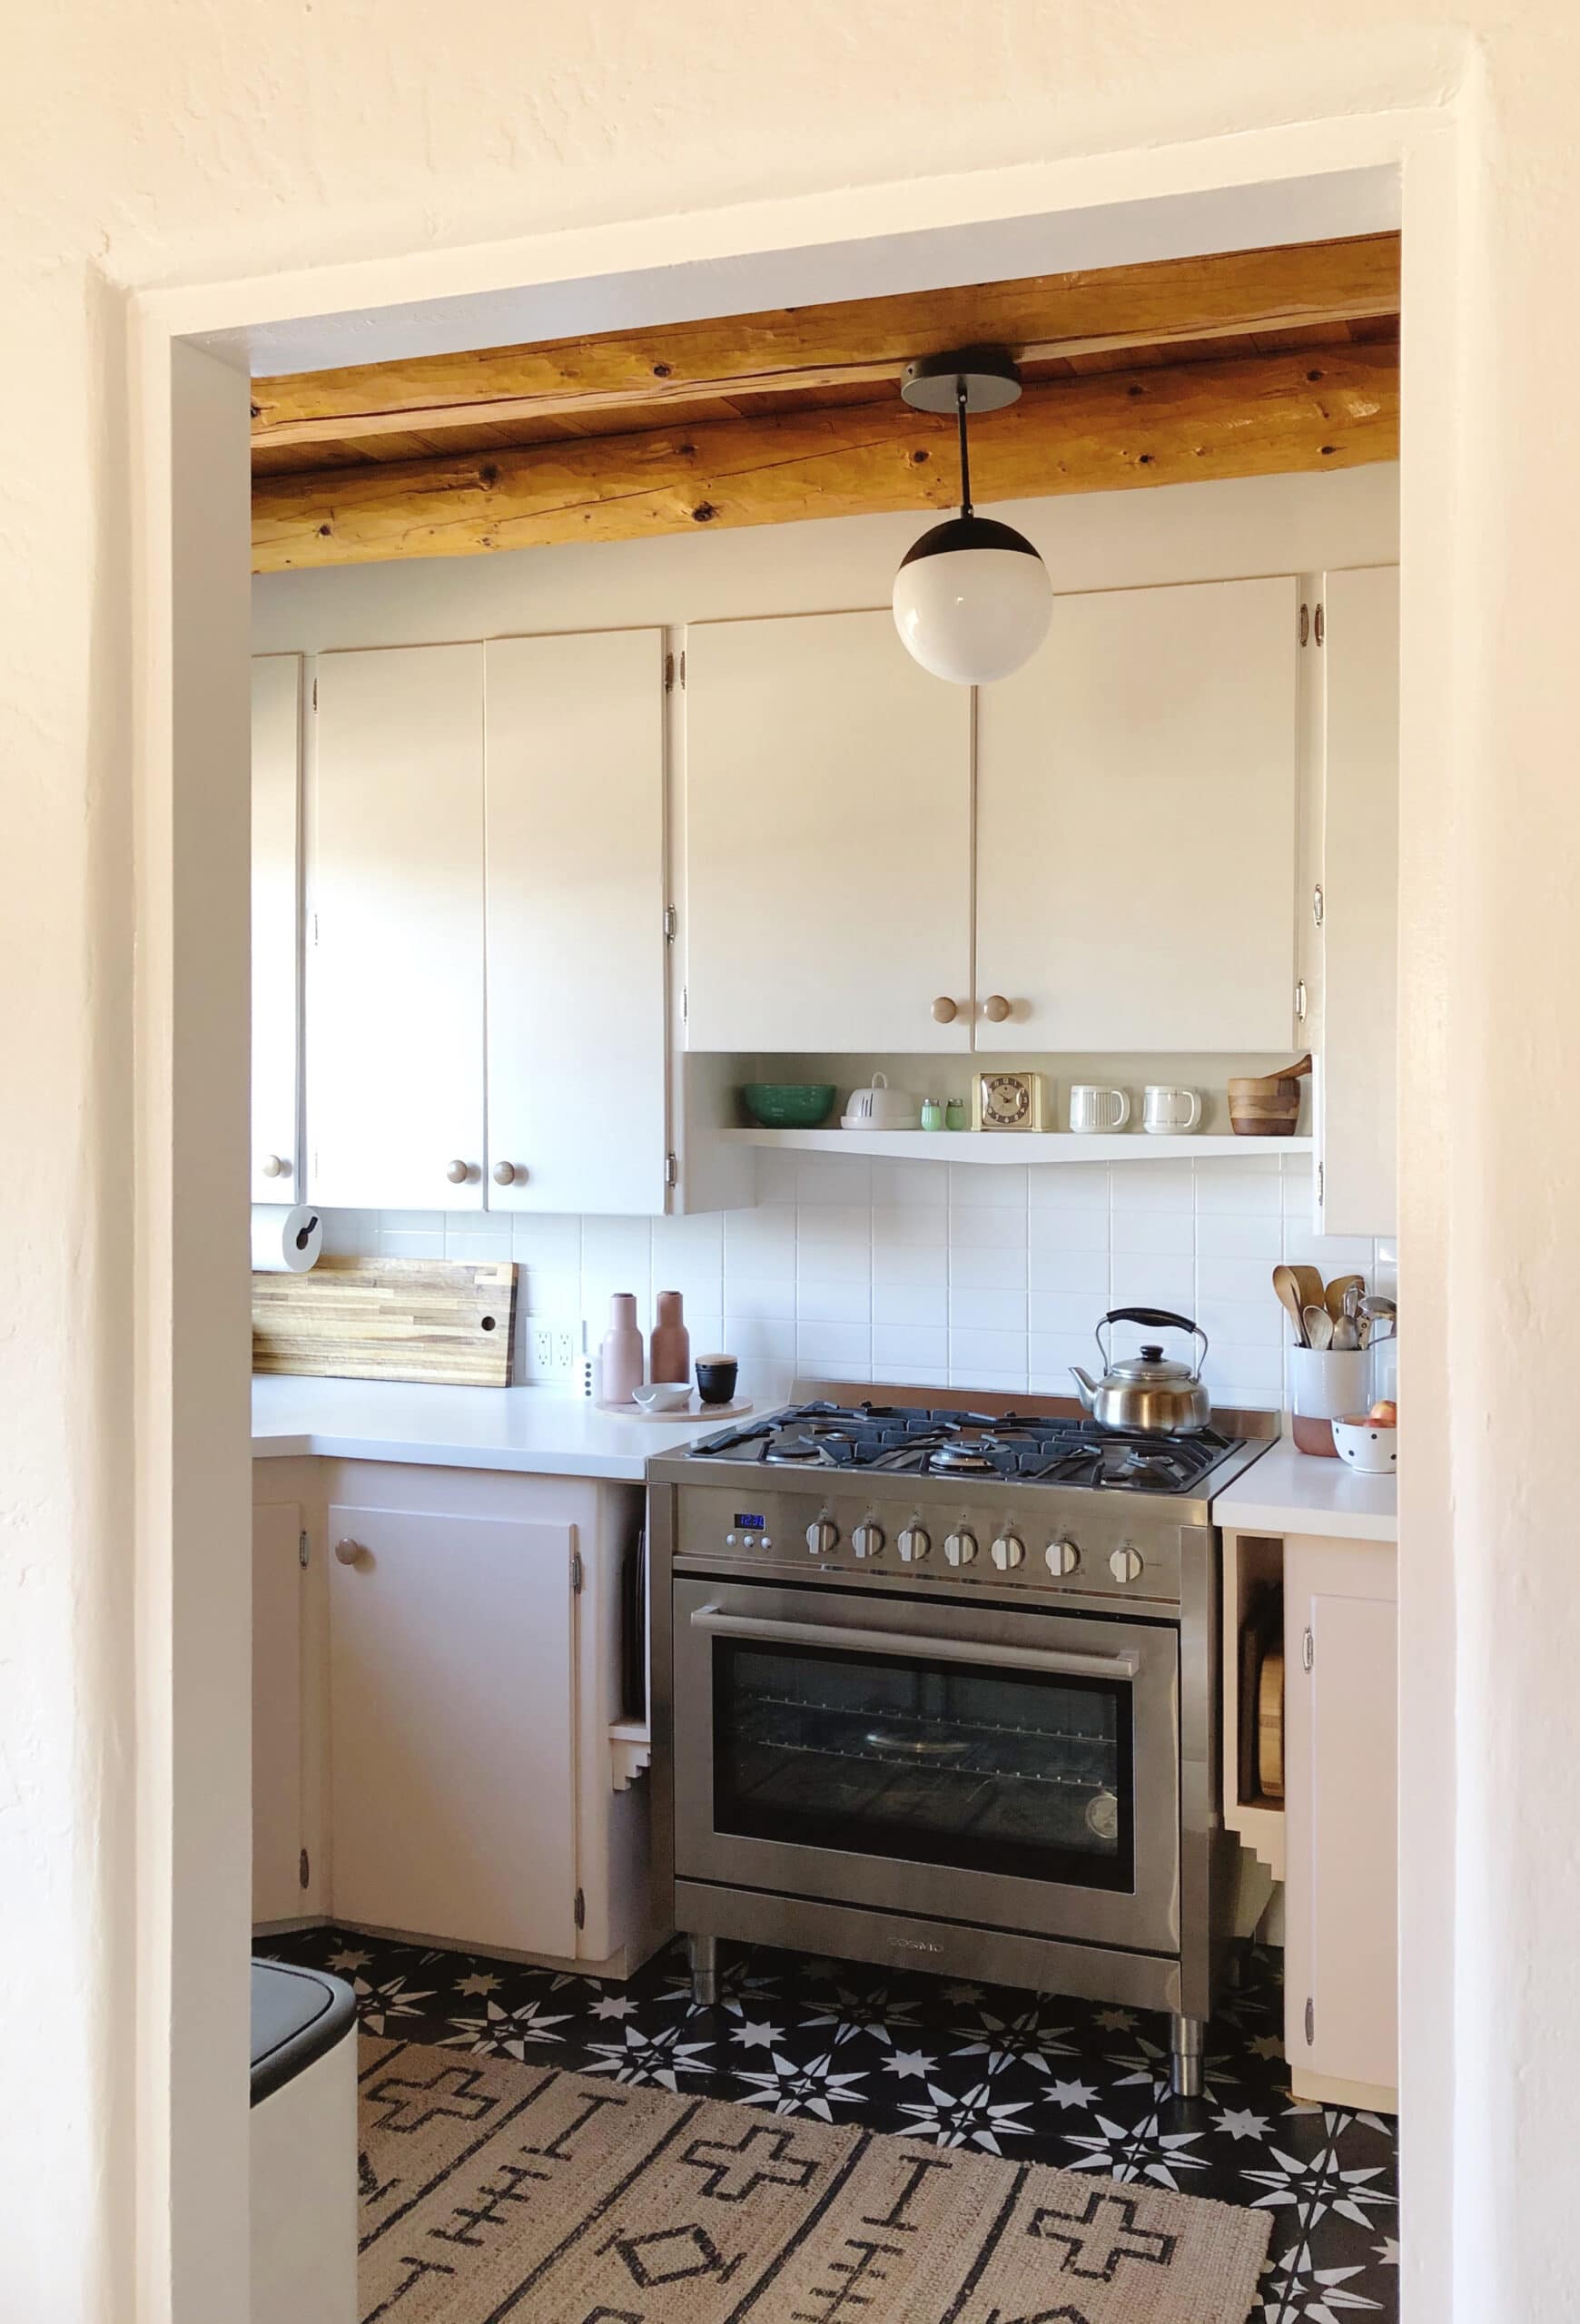
✚ Range: Cosmo
✚ Kettle: Sori Yanagi
✚ Utensil crock: West Elm
✚ Cabinet knobs: Home Depot
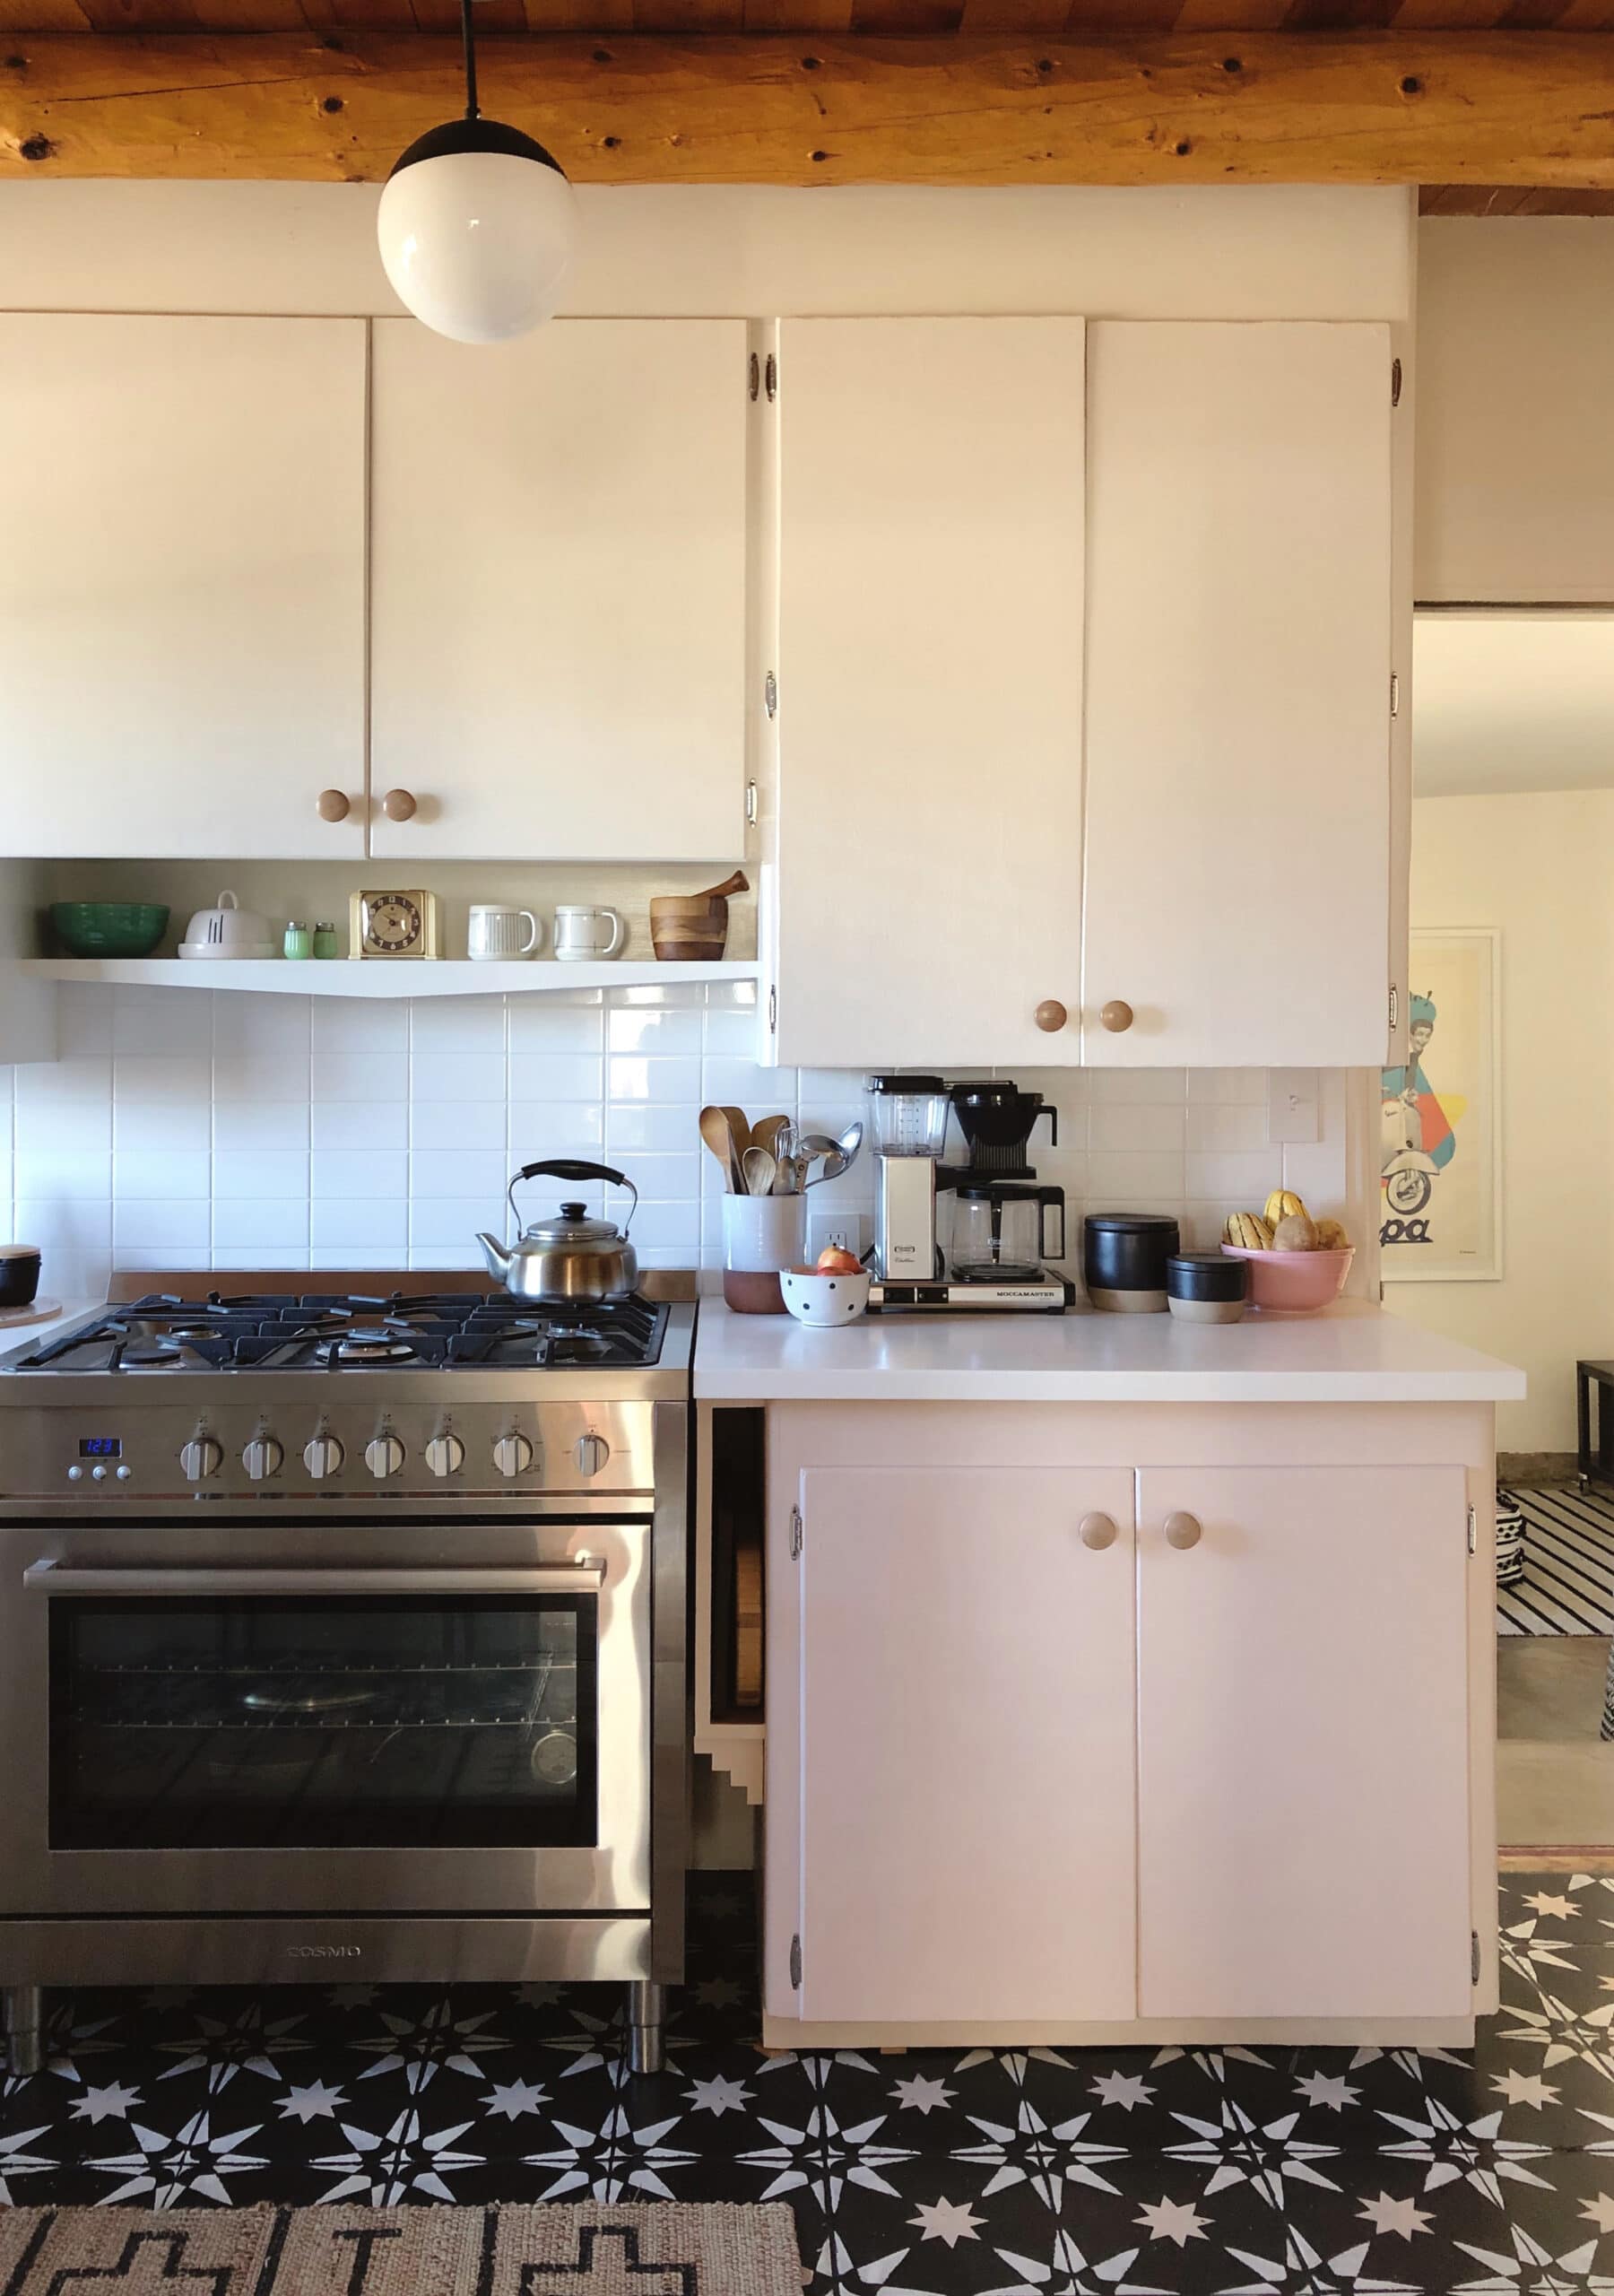
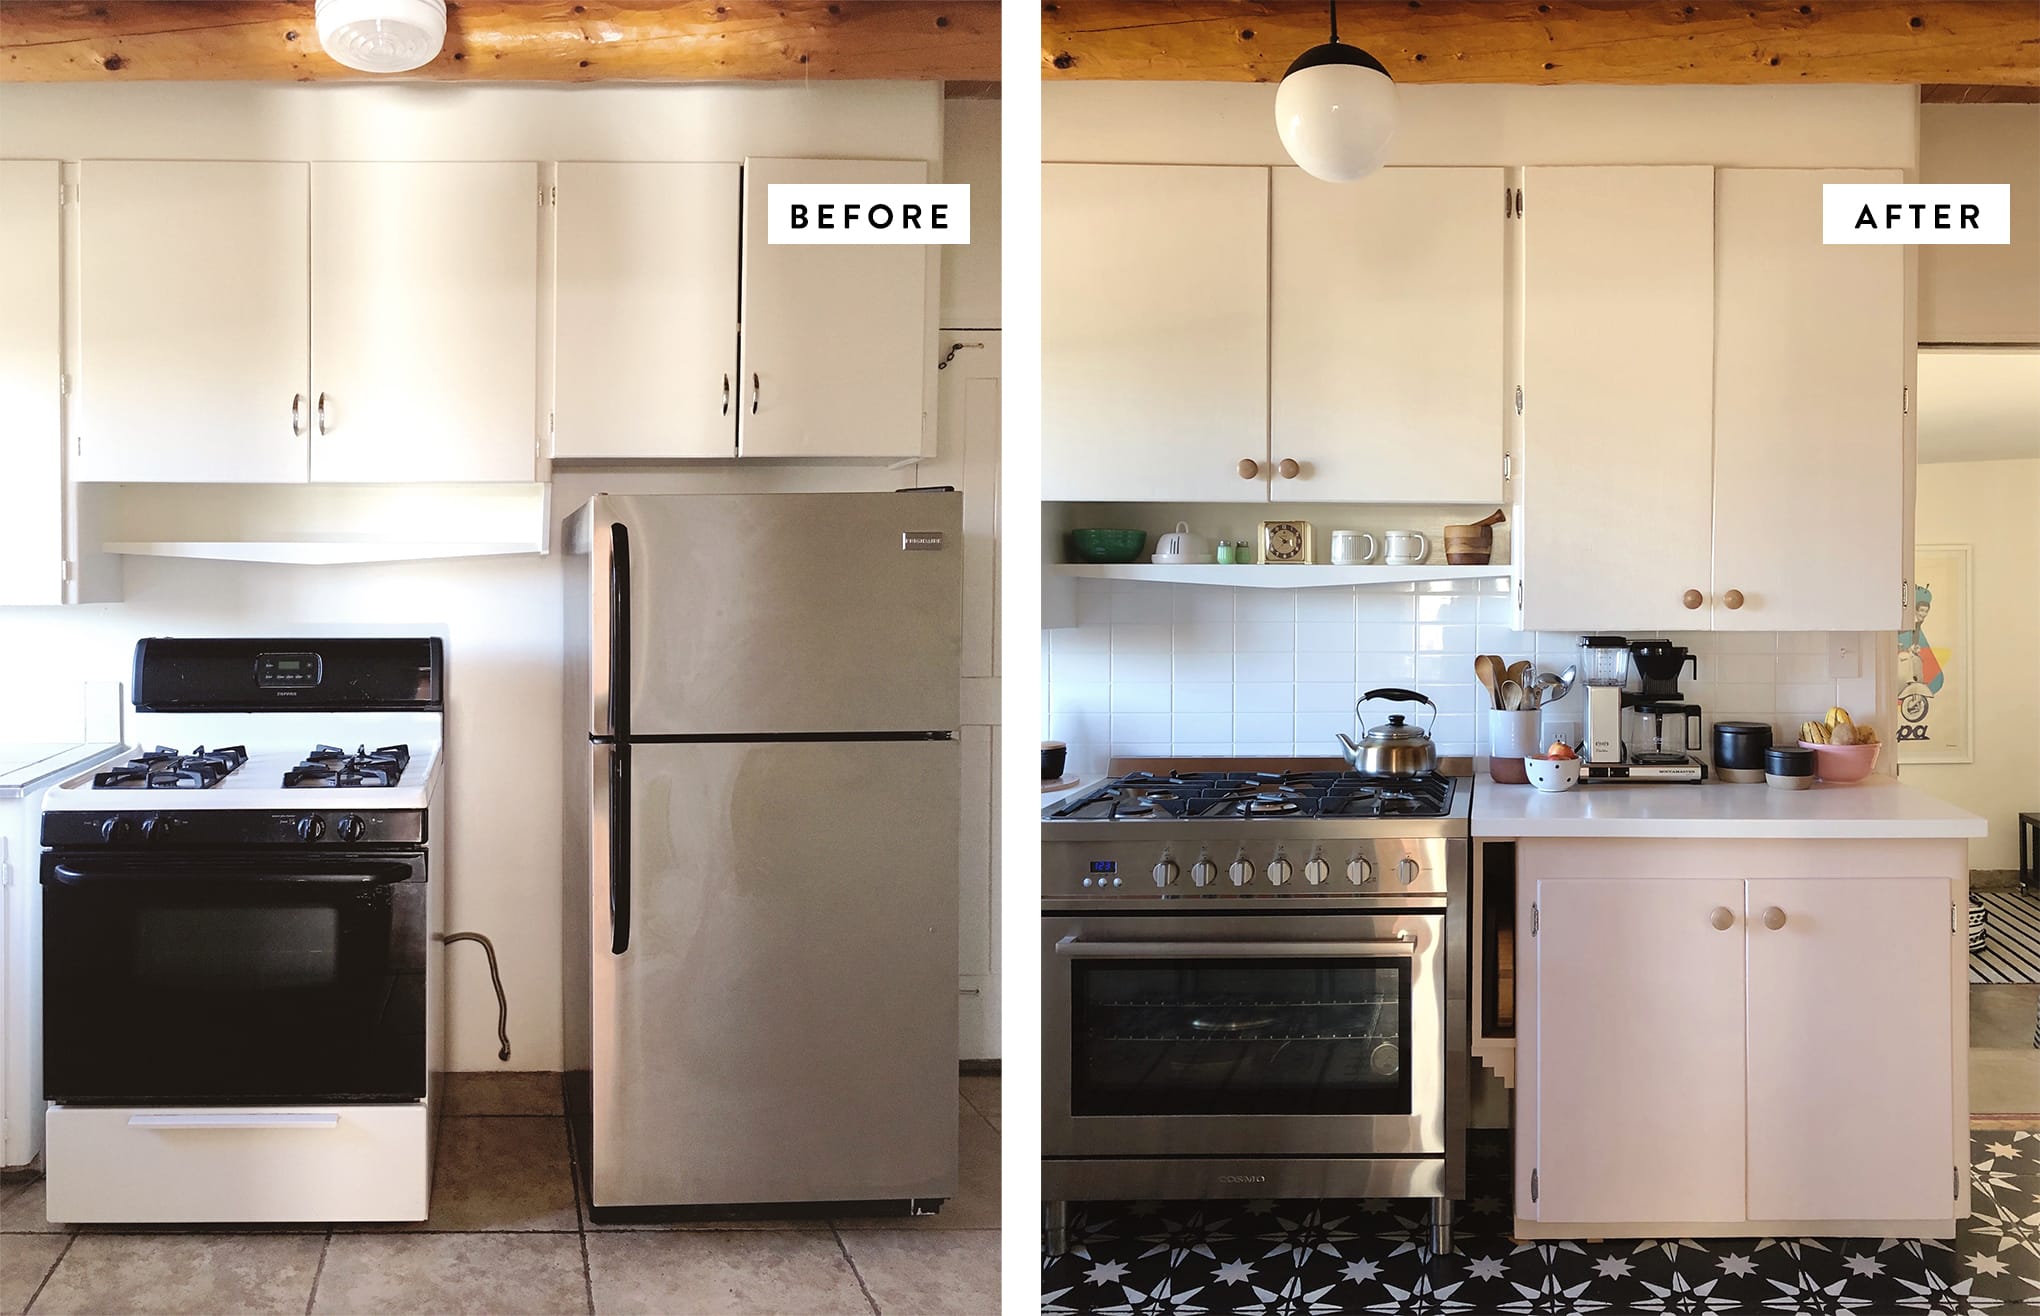
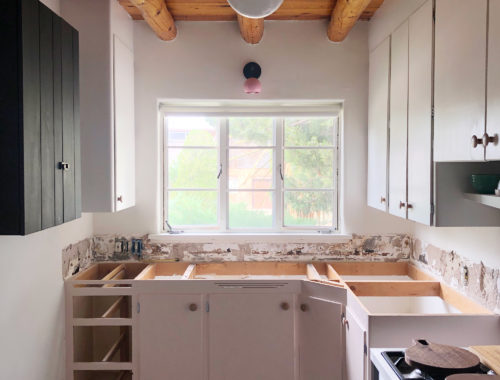
I still can’t get over what a different it made moving the refrigerator out of this spot and building new cabinetry (and adding counter space!) in its place. I’m endlessly grateful for the job Manuel did matching the original cabinets—you truly would never know they hadn’t been in the house forever. (My storage cubbies with their New Mexico flourishes are pretty sweet, too.)
✚ Butter keeper: Sandbox Ceramics
✚ Mugs: Clay Factor
✚ Coffee maker: Technivorm Moccamaster
✚ Coffee + sugar jars: Target
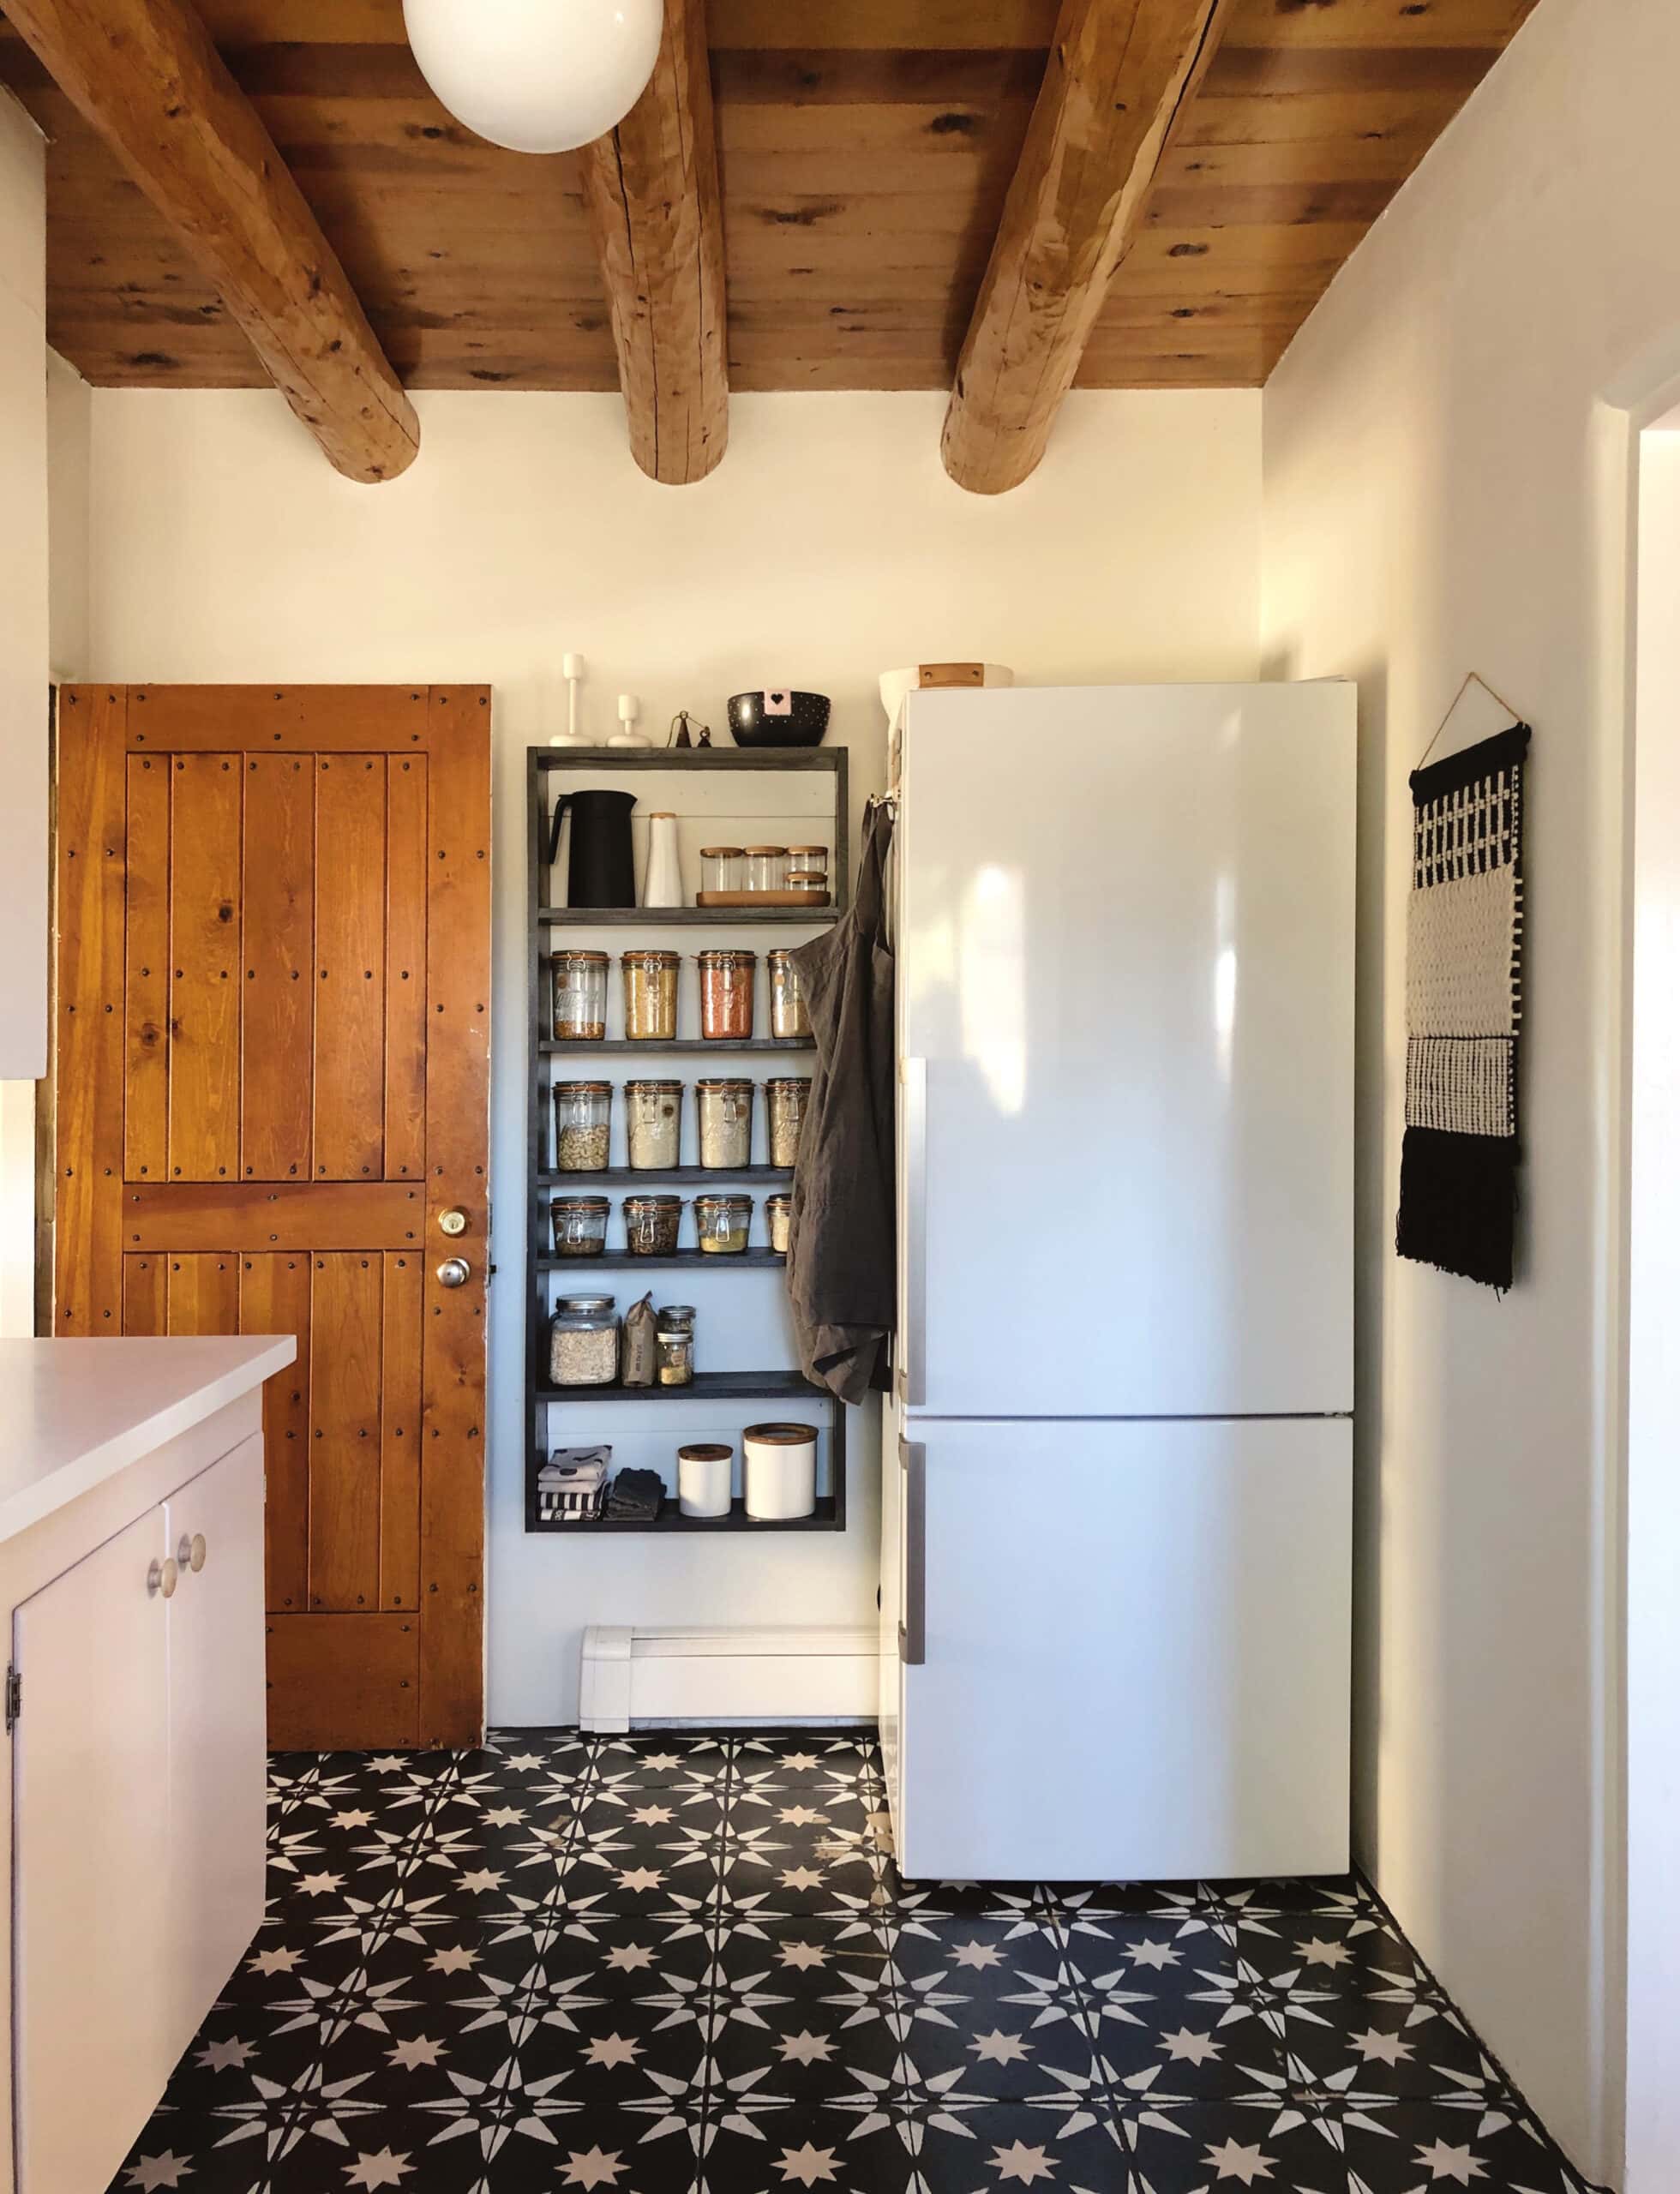
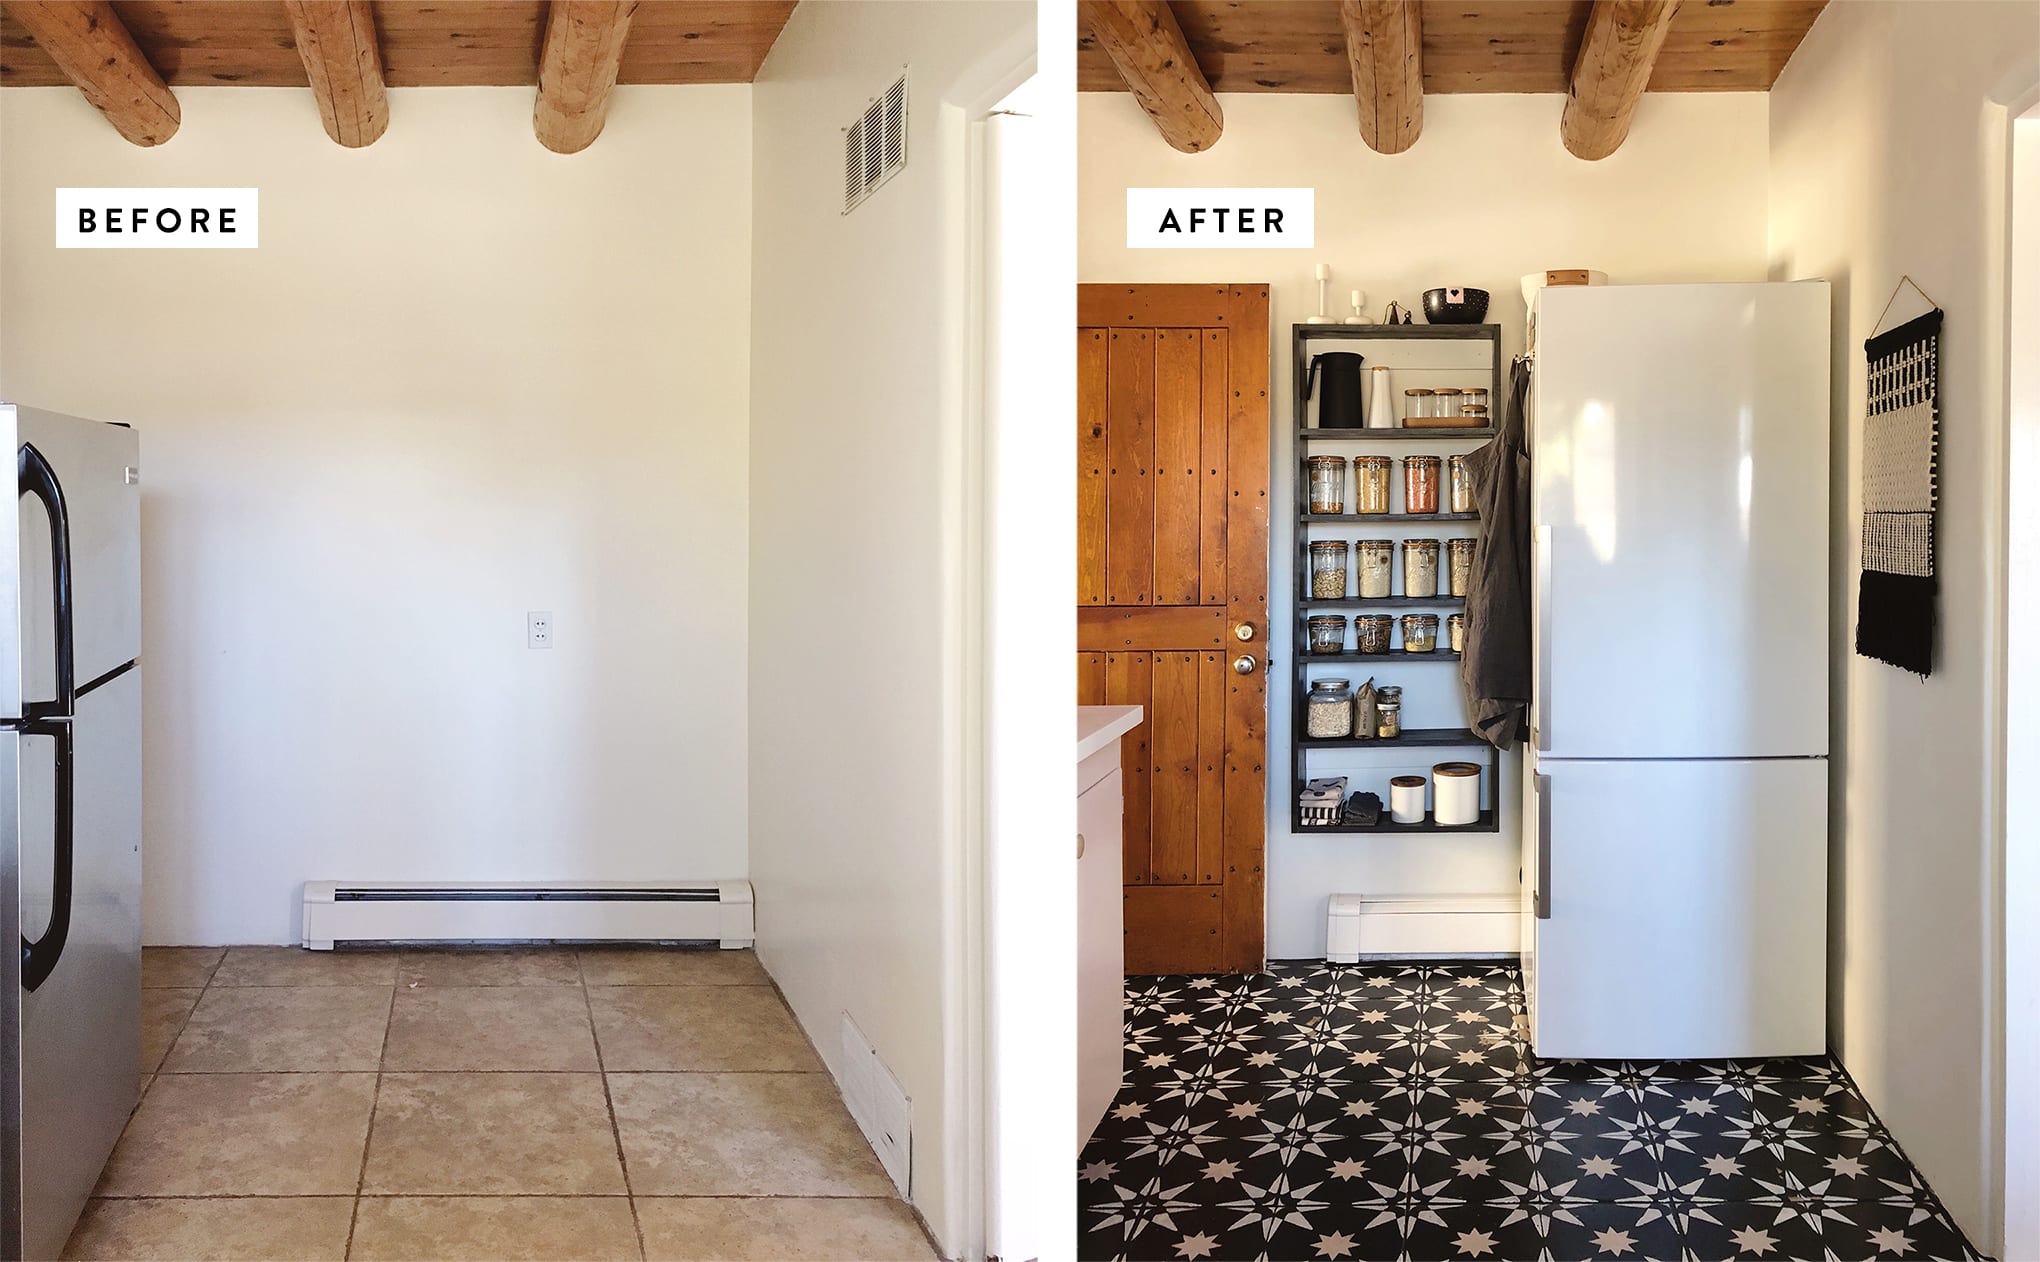
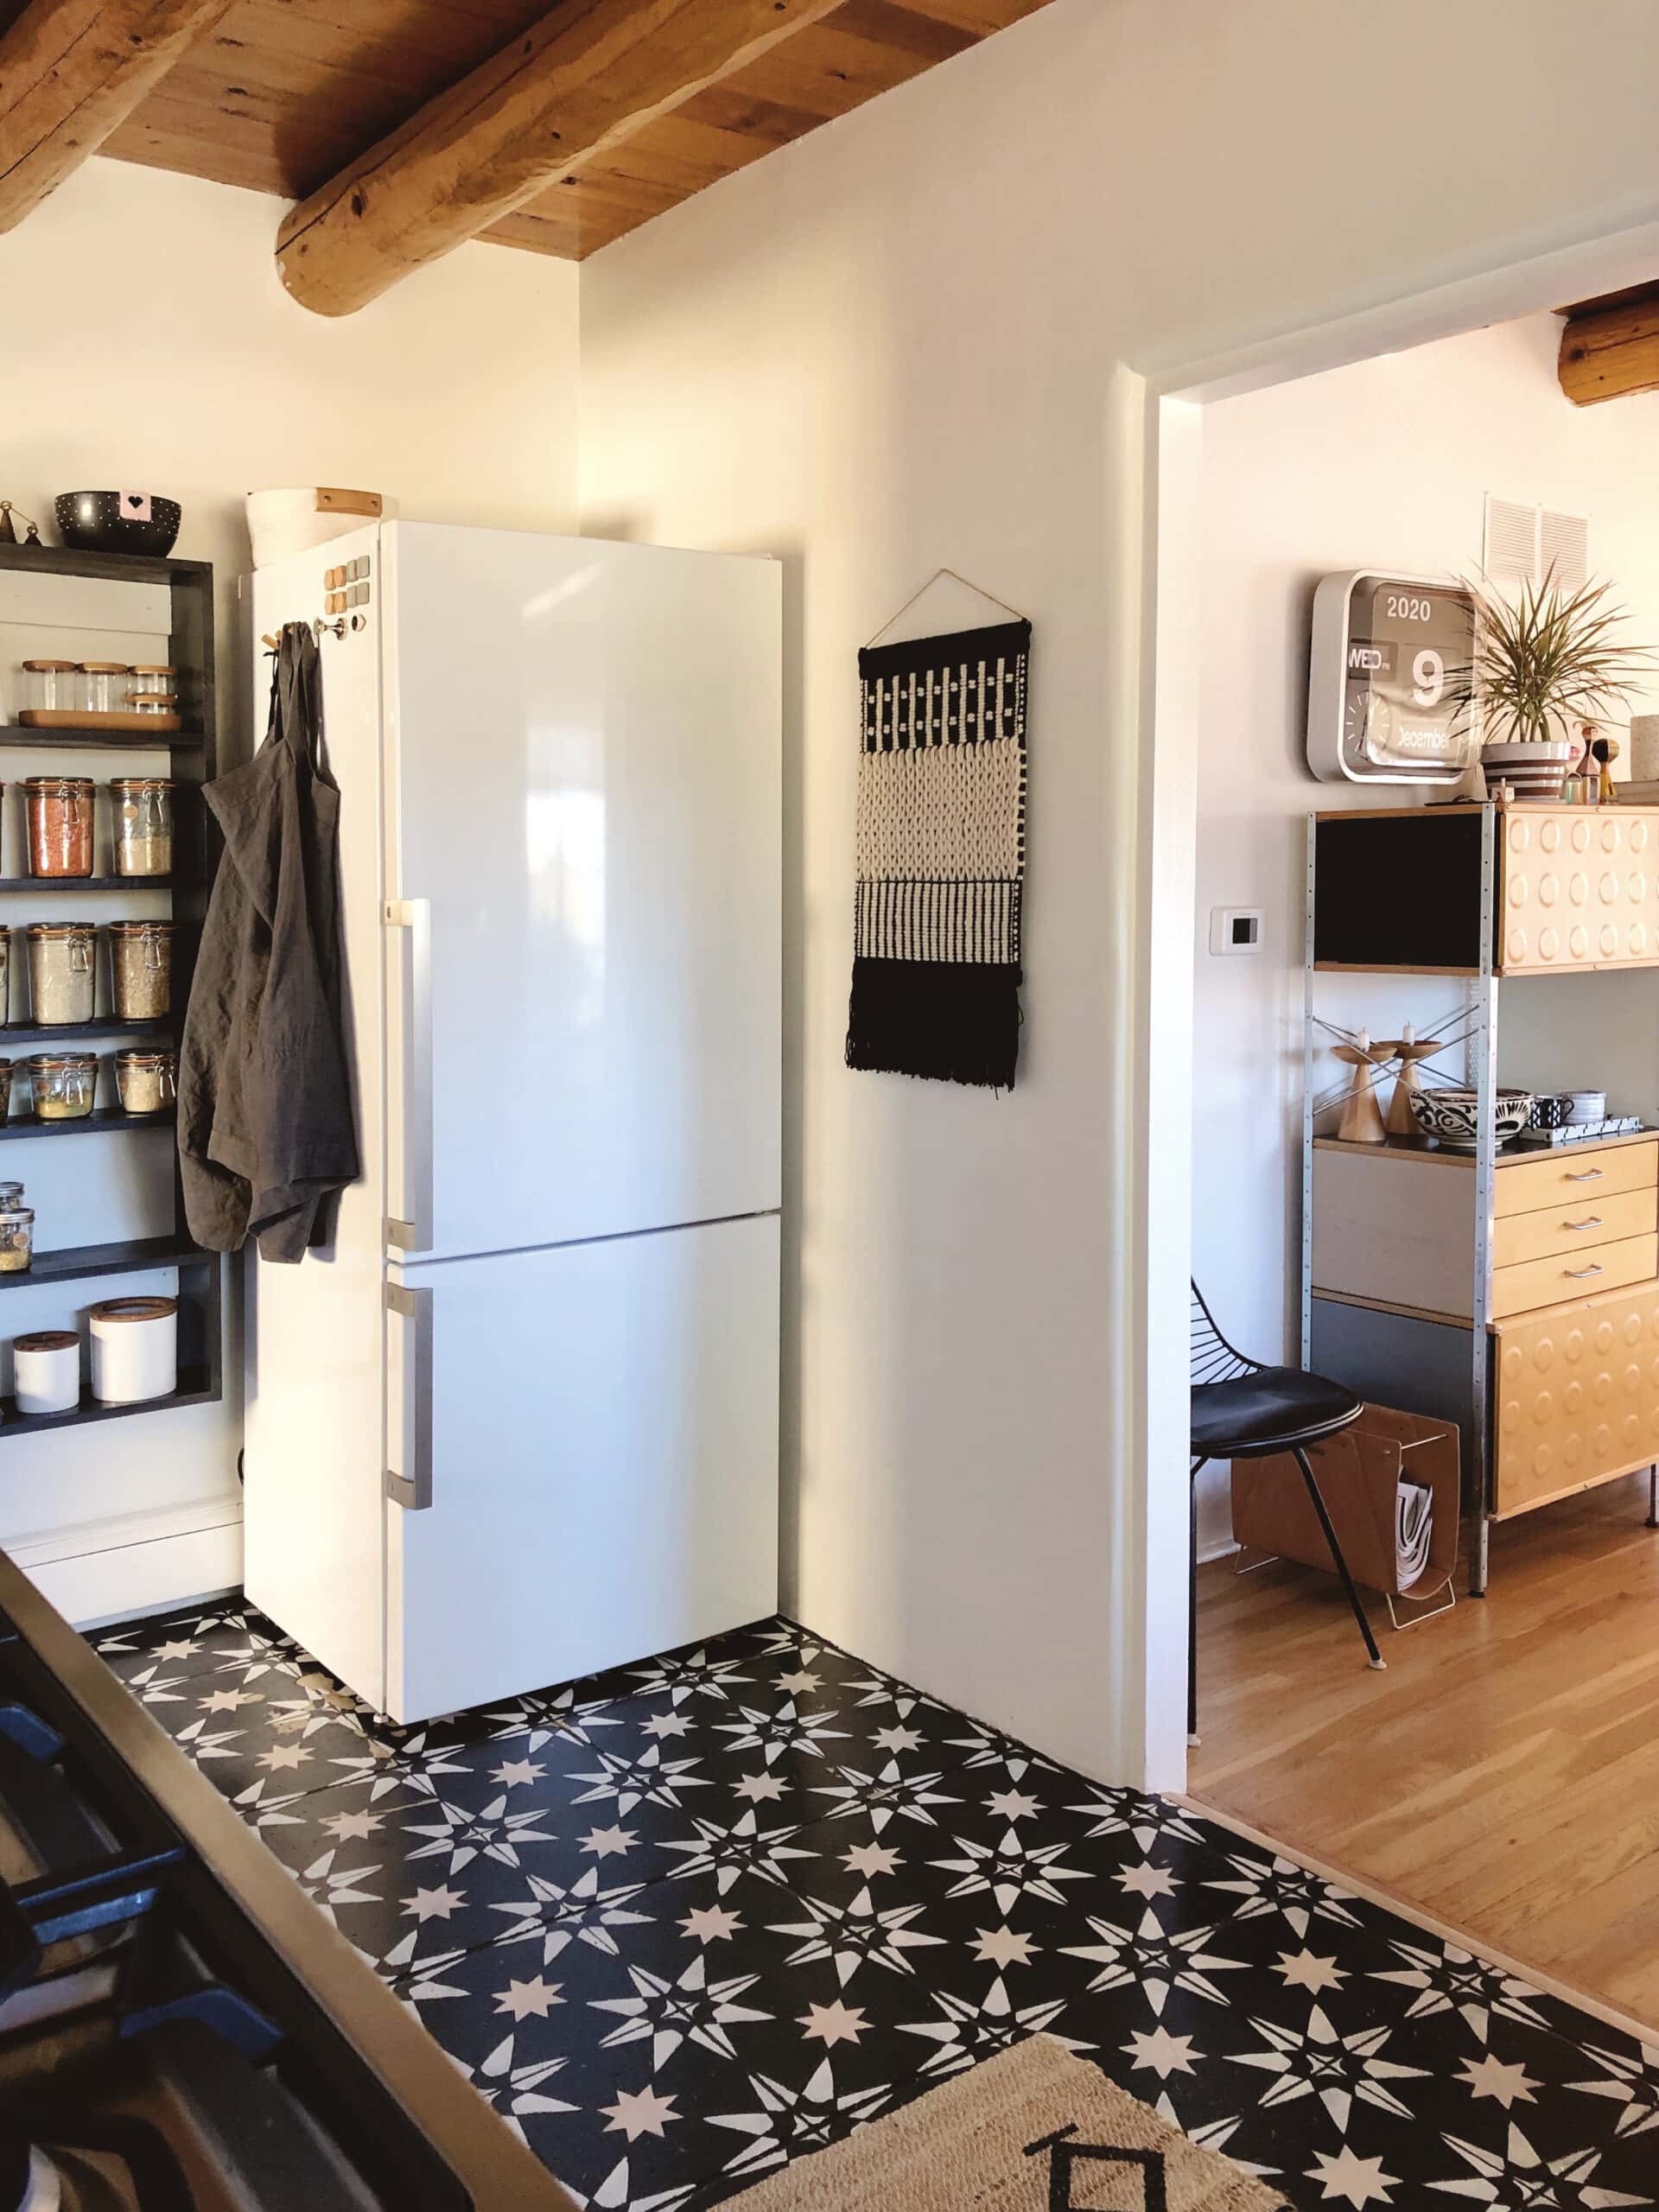
Getting a taller refrigerator with a smaller footprint and putting it in this formerly-dead space at the end of the room has really worked out. Trying to build cabinetry around it would’ve been a waste of time and space, but the finished sides on this fridge mean that it wasn’t necessary. Building these simple shelves made up for the lack of a pantry, too—I even have room for more jars in the future.
✚ Refrigerator: Summit
✚ Storage jars: Le Parfait
✚ Thermal carafe: IKEA
✚ Candle holders: Iittala
✚ Heart bowl: Hella Jongerius
✚ Wall tapestry: Target
And that’s the kitchen! If you have any questions at all about the process, expenses, resources, or anything else, please feel free to ask. As always, my primary wish in sharing projects like these is to help demystify renovation, and to empower others to turn their own homes into spaces that work FOR THEM and their families—even if you don’t think you know what you’re doing or if you’re working with a shoestring budget.
For anyone coming into this project at the end: This is a kitchen in a pueblo revival-style house in Santa Fe, New Mexico, built in 1950 by Allen Stamm. I’ve posted a series of installments over the past year breaking down each step in the process—all of which are linked below. Thank you for reading!
Kitchen recap:
✚ It’s time to meet the kitchen!
✚ Kitchen planning!
✚ Kitchen cabinets: Prep + painting.
✚ Painting and stenciling the kitchen floor.
✚ Kitchen countertop demolition.
✚ Painting the kitchen’s steel casement window.
✚ Let’s add some cabinets!
✚ Building cabinet cubbies for extra storage.
✚ It’s time for the kitchen to get some countertops!
✚ Installing a stacked bond subway tile backplash.
✚ A new refrigerator! Pantry shelving!

64 Comments
Gorgeous!! It has been so fun to follow this project and finally see the full result. I really love how you put your own touch on spaces while truly honoring the style and architecture of the house. So inspirational.
Thank you so much, Hannah! I wish it hadn’t taken me so long to get the whole project up—thanks for sticking with me. 🙂
I love everything about it! It feels like it fits your house even more now!! I especially love that you kept the original cabinetry!
Oh heck yes! Another amazing Anna kitchen reveal. Your D16 Newburgh kitchen reveal inspired me so much and in the years since I have taken on two kitchens in part because of how much you demystified the whole concept. This one is just as inspiring! And again so refreshingly kind and sympathetic to the home it’s in.
Thank you!
Thank you, Adam!!
That’s so nice to hear, Amanda! This kitchen is SO different from the one in Newburgh (about 1/4 the size, for starters), but it really is the most exciting room in any house to renovate.
There are scuffs on that floor?! It looks like it holds up so we’ll, I’m sold on that technique.
Love the before and after facing the sink – the before reminds me so much of many pre-war apt rentals: so hopefully cute with so much unrealized potential…way to fight complacency!
I think anything that’s painted is going to get scraped up if you drag a couple of refrigerators across the surface! I should have protected the floors, but I stupidly didn’t take the time to do it properly—same goes for when the countertop demo was happening. I just told myself I could touch them up later, and, well…”later” has now been more than a year. OY. Other than that, though, they’ve held up really well! I haven’t seen any marking or scraping AT ALL as a result of regular daily use. I would absolutely recommend it in any DRY room.
It’s so lovely! Love all the small details 😀
Thank you, Kate! 🙂
It’s fantastic, functional and unique! My absolute favourite part is the stunning floor, but I love the entire kitchen.
Thanks, Claudia! We probably will want to re-tile the floor properly someday, but it’ll be a messy ordeal—I’m really glad that there’s a stopgap in place that seems to be holding up really well.
Exactly what I was thinking! Each item is beautiful and carefully chosen for function. It looks like a kitchen that is used and loved. This reveal brings me real joy. Thank you Anna!
looks so great a New Mexico version of your style
Thank you, Jacqui! It’s been fun getting to know such a different style of architecture than I’m used to.
I love your style so much! It’s just amazing.
And when I grow up (and my tiny apt grows up, too 😀 ) I will have the super fancy, extremely gorgeous trash bin!
I have a lot of feelings about trash cans!! It’s funny how a crappy one can really bring you down on a daily basis. I do kind of wish that I had enough space for a pull-out bin under the sink, but there’s just no way that was going to happen.
It’s beautiful !
Thank you!
I love how thoughtful this renovation is: of the integrity of the architecture and of the usability of the space, of budgets and of the environmental footprint.
Thank you so much, Emma. I have to admit that I don’t really think directly about environmental footprint when I embark on a project like this, but it’s something that tends to fall in line if you renovate FOR YOURSELF instead of for the sake of following trends—the “greenest” renovation is one that lasts. That said, I know things like dishwashers and exhaust fans are environmentally friendlier than hand-washing and opening windows, but you won’t find either in my kitchen (I don’t care about having either, and they would have meant a huge loss of storage space and enormous increases in expense to install them)…so there are compromises!
So gorgeous! You are incredibly talented. I have an Allen Stamm home that definitely needs a kitchen remodel…
Good luck, Kami!! One of the many things Stamm got right about these houses is the kitchen layout—I’m amazed by how much storage there is in such a small footprint! You’ve got a great leg up starting with his bones. 🙂
Thank you for giving us a “final” overview — it’s utterly charming. How do you like the functionality of the F52 spice grinder? I’ve been dithering over getting that one.
Lynn, I LOVE that grinder SO MUCH. I was also on the fence about it until my friend Geninne (who is an avid cook) told me she has it and loves it. It’s SO much easier to use than a mortar and pestle, especially when it comes to thing that tend to “pop” under pressure. (I still use my mortar and pestle for larger things that I just want to “muddle” a bit, though.) It’s also really nice to be able to clean it so easily—much simpler than an electric grinder. I’ve never used it to store spices since I just grind what I need, but I like that it has a lid just in case, too. 🙂 Go for it!!
I LOVE it! You are so good at this, Anna!
Been mulling over a technivorm moccamaster (we currently have a bonavita, but it’s dying) – do you love it?
Also that trash/recycling bin is so good! (words I never thought I’d type, ha)
I can’t believe I’ve never written a dedicated Technivorm post before, because I am extremely devoted to that thing!! I was given one as a gift in 2012, and I’ve never looked back. It’s the #1 thing I recommend when asked about kitchen appliances or coffee in general. I bought one for my mother in 2014, and me buying something I already own for my mother is pretty much the gold standard of recommendations from me. Without getting TOO dramatic about a coffee maker, let me just say that this thing is LIFE-CHANGING if you’re someone who (a) loves coffee, and (b) really appreciates a great cup of coffee. It produces the smoothest, hottest, most flavorful cup I have EVER experienced from a home-brewer—and that includes pour-overs and french presses. It’s a damn miracle. Even “cheap” coffee like Target’s pre-ground store brand tastes incredible brewed with the Technivorm. Needless to say, I recommend it 100% without a second of hesitation. (Plus, they come in a bazillion colors now!)
Thank you for sharing! I just bought my first house, and your blog has given me the resolve to tackle the gross under-the-kitchen-sink area that I’d probably otherwise just ignore. Thank you for sharing your incredible work & voice!
Having a tidy, clean space under the sink is one of life’s small daily pleasures!
How do you like the range?
Given the price, I’m happy with it. There aren’t many 36″ options that were in the budget! It can be a bit tricky to light sometimes, but other than that, no complaints.
The pencil cup/sugar packet holder matches your new Mexico cubbies!!!!!! Love.
It was meant to be!
This is so gorgeous! I love how the changes are subtle but really impactful. It’s really inspiring! I’ve commented before that I’m always working to find a balance with what to change at my house (we’ll tear down/gut and rebuild in the next 5-8 years – it’s a 100-year-old beach cottage turned full-time home, but has zero charm and the bones aren’t great), and I really appreciate that there are so many ideas I can borrow that will make our kitchen function much better, but without investing so much $ that it would be wasteful to take apart in 5-8 years.
I love it so much! I love how well everything fits in with the architecture of the house, and I love how it’s not staged all to heck for a picture– I’d rather see how your countertops actually look & work IRL, coffee pots and all!
As a longtime fan of P.F. Candle Co’s unisex Pinon perfume (RIP, sob!), I’ve been really disappointed in their candles & room spray in that scent (the incense is great, but my bf has asthma so I can’t burn it in the house). How strong is the diffuser in terms of throw? I’ve been afraid to buy yet another Pinon product that I can’t actually smell, and I would looooooove for my house to have that as its signature scent.
If you’re looking for a scent that’s very “present,” this isn’t it. I actually don’t really like scents that fill the entire room/house constantly, which is why I can tolerate this one—I can really only smell it while I’m washing dishes, or if I leave the house for a few hours and then come back.
It looks so good!! One question – are the walls the same color as the upper cabinets, and did you repaint them as well? Or just get a cabinet paint that was close to the wall color.
Good question! I didn’t think to mention the wall color. Throughout the entire house, the walls are Valspar Bistro White (flat) and the trim/woodword is Valspar DuJour (semigloss). The walls were previously painted a color I like to refer to as “hot mayonnaise.”
I think you are the hardest working genius, with the best taste that I know! What you did with that whole house is just amazing. I am so happy to see that little bowl on your counter being useful that I get a bit emotional ♥️
Well, that’s a pretty big coincidence—I think you are the hardest-working genius with the best taste that I know! 😉 Your bowl makes me happy every day—it’s so beautiful. Thank you ❤️
So beautiful Anna! You have the best eye with such creative solutions for everything. Following the process was so fun, but it’s a treat to see it all pulled together.
Thank you so much, Echo!!
what a thoroughly outstanding kitchen reno … everything is so well thought out and curated to fit … the Bo Touch Bin is really perfect … but you got to me at ‘coffee station’ … off I went and found a nespresso essenza mini at almost half price so Santa has been put on notice (I already have the breville frother … this triggered how tempted I became last time I read that post). I got the reusable pods, too. ALSO: almost forgot – I love the pink lower cabinets with the white uppers and how you’ve played sisal + wood knobs. I’ve been toying with using light pink in my kitchen but wondered … I’ve only seen it once before used on uppers and I swooned then, as well. congratulations – your home must love you to bits
Thank you, Brenda! The pink lowers were completely my boyfriend’s idea—I’m so glad he pushed for it, because I would probably have gone much darker, and that’s not what the space needed. (BTW, how do you like to reusable pods? Are they messy to fill up?)
Anna – I’ll let you know once I’ve tested it. I bought it and the nespresso essenza mini before I finished reading the rest of the post. Oh my – I just noticed that pink pleated dustpan matches the pretty pen pot/packet holder which matches the oven side storage stepped brackets … and the more I look at the lower cabinets, the more I love them … I think they are just the right, high-end, toe-tapping, almost imperceptible, tint of ballet pink. No wonder it’s your favourite room.
Anna – Reporting Back: I’ve used the new Nespresso Essenza Mini for a week now. Here’s my hack: I used the RECAPS Aluminum Espresso Lids with the Stainless Steel i Cafilas Reusable Capsules. I would get the pack of 3 capsules if I were doing it again – so you can fill 3 at a time and have extras at the ready. I saw comments about them not making the same amount of crema and that they were difficult to use in the machine (someone said they broke their machine) … using the foils instead of the top that comes with the set, reduces the depth by just enough to make them slide easily into the machine and the holes punched Into the foil are the same as using Nespresso pods which helps in creating similar crema.
AND not messy.
There’s actually something I found rather satisfying grinding the beans, lining a few capsules up to fill over the coffee canister catching extra grains as I scooped them in and tamped them down, lining up the foil, and pressing it down over top. Add extra coffee once you tamp down the first and second times … ie, ram as much in that pod as you can as it makes for better crema. Being loosey-goosey with filling and tamping does not. Stray grounds wipe easily off the shiny, rounded lip of the capsule and the foil tops are easy to peel off after.
I’m going to still buy Nespresso pods to have on hand but I like my own brew a lot, too, so I’m happy I bought the set and the foils. If you can get the set without the tamper, do so – the back of the spoon is designed to tamp the grounds in.
Brenda, thank you SO much for reporting back!! This is sounding a little daunting to me as an un-caffeinated activity, but maybe if I can get myself to prepare them in advance…
The final photo is my favorite – a teaser shot into the dining room? You have so many great treasures and impeccable taste! Happy Hanukkah!!
Thank you, Melissa! Yes, that’s part of the dining area. 🙂
Another beautiful space Anna. I’m always struck by the way your renovations reflect the existing personality of a space while also being uniquely you. I love this.
That’s very nice, Laura. Thank you.
What a treat to see such a personalized kitchen renovation. I don’t begrudge anyone their white designer kitchen if that’s what makes their heart sing, but impeccable little gems like this are what make my heart sing. Thanks for sharing and, as always, for the inspiration!
love it, thank you for sharing.
So fun to see this! What a gorgeous job you’ve done. Really inspires me for someday when I own a home!
Gosh I just LOVE this sweet cozy little kitchen now! You did a fantastic job <3 After reading how well the floors have held up, you've convinced me to cover the awful tiles in my mudroom/office (it generally stays quite dry) in the same fashion. Anything you wish you'd done differently so I can learn from the master? Thanks for sharing, this is wonderful!
Thank you, Lina! As for anything I’d do differently with the floor, I really can’t say without experimenting with other types of paint. I had originally planned to use oil-based paint, but I don’t know that it would have turned out any differently. As it is, I’m totally happy with it. The most important thing is to PREP WELL with plenty of sanding and de-greasing so you get good adhesion. And remember, you can always do touch-ups if needed!
So satisfying!
If you have the chance, could you let me know what light fixtures you have in your dining room? Thank you.
Hi, Sarah! The fixture over the dining table is a Nelson Bubble pendant.
It looks amazing! I’ve loved this whole series.
How is the dish drainer and tray working for you? I’m looking for something that looks good since it lives on the counter, but is also big enough for a meal’s worth of dishes.
I absolutely LOVE the dish drainer, Morag! I’ve had it for just over two years now. It’s just the right size, and everything seems to fit in there perfectly—even when I’ve cooked a big meal with lots of dishes. Granted there are only two of us, but I think the capacity versus footprint is ideal. And it’s cute!
Looks fantastic! How’s the light from the Wayfair ceiling pendant? We need three hanging fixtures to go over a kitchen island and I’m wondering whether the frosted bulb cuts down on glare enough that it wouldn’t be annoying if at eye level or close to eye level. Thanks!
Hi Laura, the globe is completely frosted, so you don’t even see the outline of the bulb itself when the light is on—it just appears that the entire globe is glowing. Does that make sense? I don’t personally like any lighting at eye level (mostly because it’s prone to getting bumped), but if your concern is just about glare, I think these pendants would be fine.
Hi Anna! I have such a specific question – what kind of salt do you use with your Menu salt mill? I received a set as a housewarming gift but the coarse salt I had been using with it keeps falling out before it is ground. Do you have the same problem?
I have coarse kosher salt in it right now, but sometimes I use coarse sea salt (no preference).